

Configure Transport Fever 3 full load at the stop where the vehicle should collect cargo. In Line Manager, select the line, open that stop's configuration, choose the departure mode and read the stop timers separately. Full load (any) waits until one cargo type is full; Full load (all) waits until the vehicle is fully loaded.
The any/all distinction applies to trains and ships in the vanilla game, which can carry multiple cargo types in separate wagons or compartments. Other vehicle types wait for full load in both modes. Switching a truck from any to all is therefore not a general solution to an early departure.
First establish whether the vehicle is loading nothing, leaving partly loaded, or waiting after loading. A departure setting cannot create missing cargo. If stock never enters the vehicle, use the cargo pickup checklist before extending its wait.
Choose a departure mode for the actual service
If needed, scroll horizontally to read every column.
| Mode | Departure condition | Useful when | Main tradeoff |
|---|---|---|---|
| Load if available | Stops and loads compatible available cargo | Keeping a service moving matters more than filling every trip | A vehicle may leave with a partial load. |
| Full load (any) | Waits until one cargo type is fully loaded | A mixed train or ship can usefully depart once one product is full | Other cargo types can remain partly filled. |
| Full load (all) | Waits until the vehicle is fully loaded | All required supply streams can support the intended load | A missing or slow supply stream can prolong the stop. |
For a train carrying two different cargo types, one type reaching full capacity can satisfy any while the other still has room. That is an intended difference from all, not proof that the setting is broken.
Do not reduce the rule to “one wagon is full.” The condition is stated in terms of a cargo type. Several wagons may carry that same product. Inspect the cargo breakdown and capacity rather than selecting any because a single wagon appears filled.
For a bus, truck or other vehicle type outside the vanilla train/ship distinction, both full-load modes wait for the vehicle to be full. If it cannot fill promptly, compare Load if available with a deliberately bounded stop; do not expect any to solve the problem solely because its name sounds less restrictive.
Open the exact pickup stop
- Select the vehicle and identify the line it is actually assigned to.
- Open Line Manager and select that one line so its stop list is clear.
- Find the visit where the vehicle should collect the relevant cargo. Check the direction and stop order.
- Open Configure Stop, either from the stop row or its cargo icons.
- Check the permitted cargo and load percentages, then select the departure mode and inspect the three timer fields.
Per-stop settings matter. The origin and destination can use different loading rules, and a station can appear in more than one part of a route. Editing a similarly named destination stop does not prove that you changed the origin visited by the vehicle you are watching.
Confirm the selected line and stop name before making a change. Then reopen that same configuration to check it was applied. Watching another vehicle on a different line can otherwise make a working setting appear inconsistent.
Distinguish the three timer fields
The stop configuration shown below includes Max. Additional Wait, Min. Stop Time and Max. Stop Time. They are separate controls. Do not describe all three as a single “waiting time” setting.
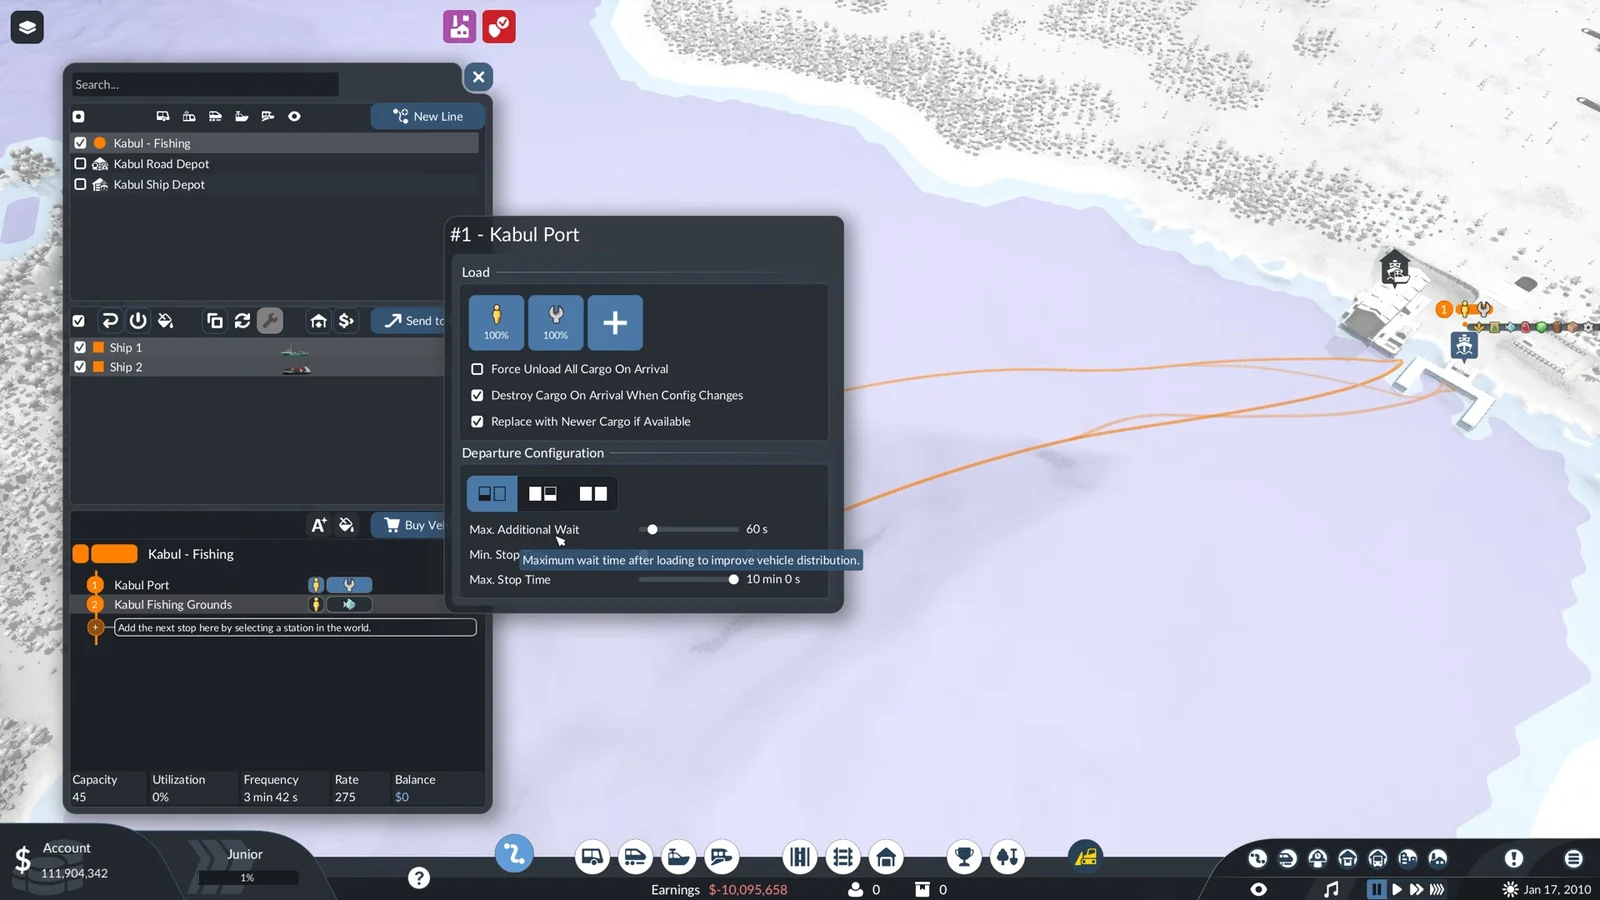
The additional-wait tooltip describes time after loading that helps distribute vehicles. The stop-duration fields are shown separately beneath it. The displayed values belong to this example; they are not recommended defaults for every line.
If needed, scroll horizontally to read every column.
| Control | What to inspect | Diagnostic use |
|---|---|---|
| Departure mode | Load if available, any or all | Establish the load condition you expect to satisfy. |
| Max. Additional Wait | Additional time after loading for vehicle distribution | Explain a pause after loading rather than an absence of cargo. |
| Min. Stop Time | The displayed minimum stop-duration setting | Check when a vehicle stays even though loading appears complete. |
| Max. Stop Time | The displayed maximum stop-duration setting | Check when a vehicle leaves before reaching the intended load. |
The maximum-stop tooltip explicitly describes the upper time spent at that stop. Inspect that control when a partly loaded vehicle departs. Increasing additional wait changes a different part of the configuration and should not be used as a substitute for checking the maximum stop time.
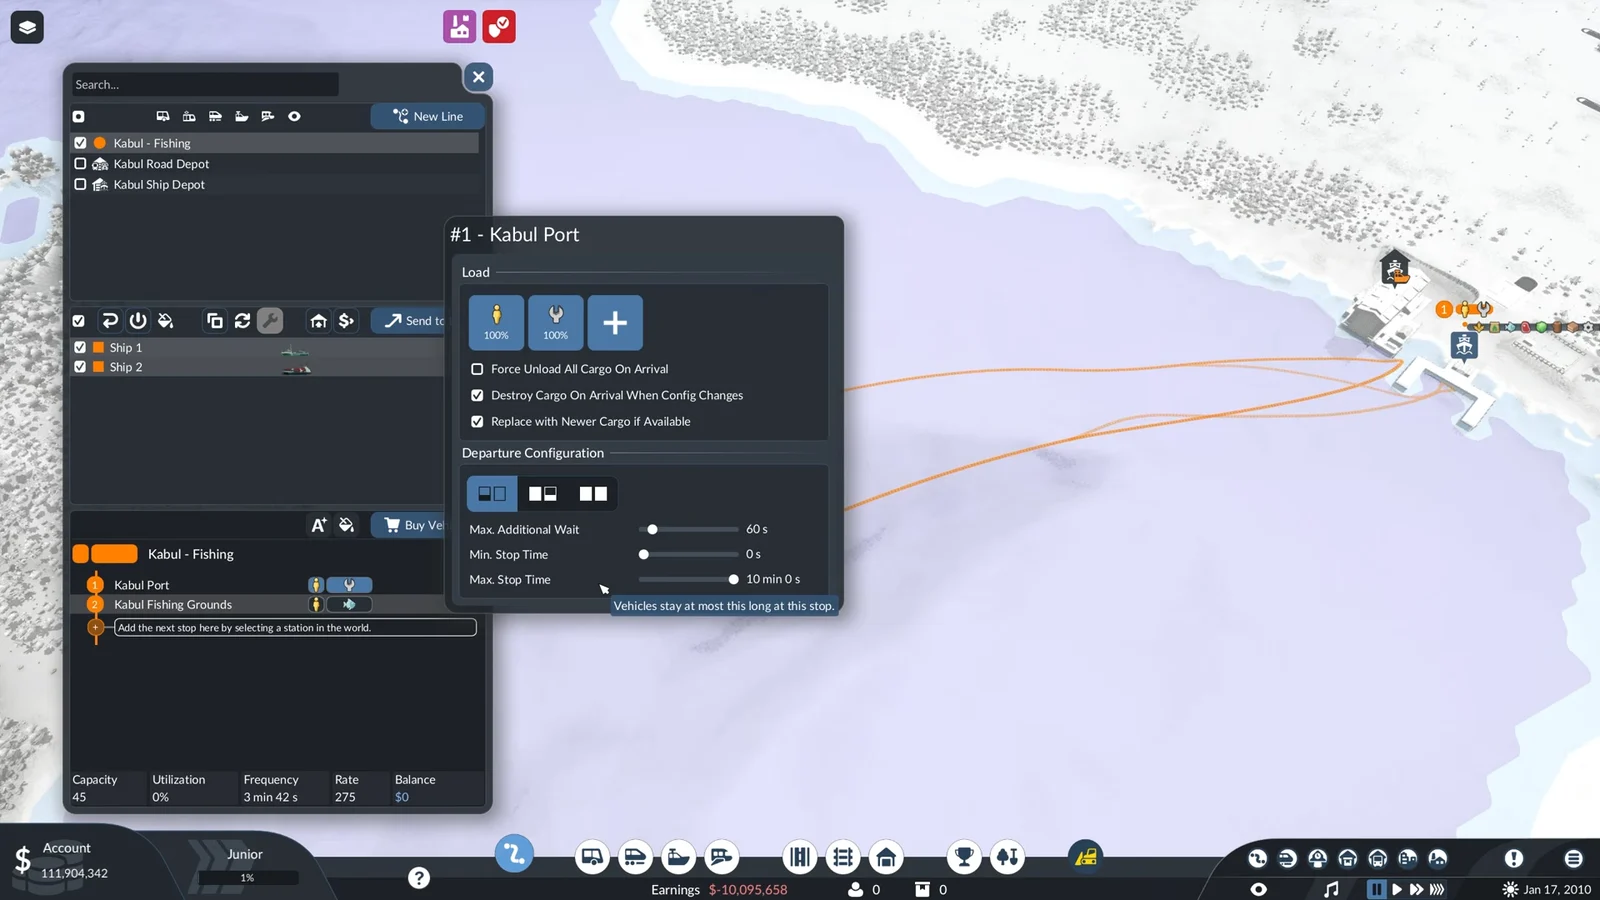
These screenshots verify the controls and their tooltips. They do not show a controlled, partly loaded departure when a finite Max. Stop Time expires, so they do not prove that this limit overrides full load in every situation. Verify the actual departure in your save instead of assuming every early departure has the same cause or setting a universal timer value.
Diagnose a vehicle that leaves partly loaded
Check the active mode before changing a timer
Reopen the origin stop and confirm that full load is actually selected. Hover the departure buttons to read their names; a tooltip on one button is not the same as that button being the active choice.
If Load if available is selected, partial departures are consistent with that mode. Choose full load only when the route benefits from waiting and the supply can support it. For a time-sensitive delivery, collecting available stock and leaving can be preferable to waiting for a larger shipment.
Check whether any has already met its condition
On a mixed train or ship, inspect each cargo type. If one type is full and the others are not, any can satisfy the departure condition. Choose all only when waiting for the remaining supply fits the service you want.
Changing to all can convert a partial departure into a long wait. Before making that change, inspect whether the remaining product is actually available at the stop. You are changing the condition for departure, not increasing the producer's output.
Check the stop's maximum duration
Read Max. Stop Time and observe the vehicle's actual stop duration. If departure repeatedly occurs near the displayed boundary while cargo remains below the intended condition, investigate that limit. Compare a deliberately changed maximum on a later visit while keeping the line, vehicle and cargo selection consistent.
Do not change the mode, all three timers, vehicle capacity and producer at once. You would lose the ability to tell which change altered the result. A partial departure at one busy visit is also not a complete test: note whether the producer had stock and whether cargo was still loading when the vehicle left.
Diagnose a vehicle that waits too long
If needed, scroll horizontally to read every column.
| What the vehicle is doing | Check first | A useful next action |
|---|---|---|
| Waiting with no cargo entering | Available stock, permitted cargo and compatibility | Repair the pickup rather than lengthening the wait. |
| One product full, another still empty | Any/all mode and the missing product's supply | Use any if that departure suits the route, or repair the missing supply. |
| Loading slowly while stock is available | Loading-speed breakdown and platform warning | Fix the loading bottleneck before blaming the full-load rule. |
| Full or finished loading but still stationary | Additional wait and minimum stop setting | Observe the wait phase separately from loading. |
| Blocking an incoming feeder | Terminal use and the arrival path | Keep the supply vehicle able to reach its unloading point. |
A missing supply stream keeps all from completing
Compare the vehicle's cargo selection with the stock available at that stop. A mixed service may expect a product that the origin never supplies. Confirm the intended product at the producer or connected warehouse before waiting for it to fill.
If one useful cargo type can fill but another cannot, choose between repairing the missing supply, changing the intended load or using any. The correct choice depends on the receiver and the purpose of the route. There is no benefit in waiting indefinitely for an unwanted product just to make a capacity display look full.
A long vehicle can load slowly at a short platform
When a train or tram is longer than the platform, loading and unloading slow down. The vehicle, station and terminal selection views show an appropriate warning. Inspect that warning and hover the vehicle's cargo loading status for the speed breakdown.
A rising cargo count indicates loading is progressing. Compare platform length and specializations before concluding the vehicle is stuck. Compatible vehicle, terminal and warehouse specializations influence loading speed, but do not infer a fixed completion time from capacity alone.
A waiting pickup can obstruct its own supply
At a shared cargo terminal, check whether the vehicle waiting to collect a processed product prevents a feeder from delivering the input. If the input vehicle cannot reach the receiver, the product needed to complete full load may stop arriving.
Inspect the line's assigned and alternative terminals and the actual approach. Separating arrival and pickup where the layout permits is more useful than simply adding more waiting vehicles. For a transfer, follow the warehouse incoming, stock and onward-pickup checks so the supply path remains visible.
Observe one complete visit after changing a setting
Use one named vehicle and one stop visit. Record the departure mode, selected cargo percentages and all three timer values before making the change. Keep a note of the available source stock as well, because a timer comparison is not meaningful if one visit had cargo and the other had none.
If needed, scroll horizontally to read every column.
| Visit stage | Observe | What the observation separates |
|---|---|---|
| Arrival | Vehicle load, stop name and source stock | Wrong stop or absent supply from a departure-rule problem. |
| Loading | Cargo counts by type and loading-speed status | Active loading from a stalled pickup. |
| Condition reached | Which cargo types are full | Any being satisfied from all still waiting. |
| Remaining pause | Vehicle state and duration | Loading time from stop-duration or distribution waiting. |
| Departure | Actual load and elapsed stop time | The result of the changed setting from the intended result. |
Reopen the stop configuration after the visit to confirm the same values are still selected. Then inspect whether the departure meets the service's purpose: the intended product moves, the stop is usable by other traffic and deliveries remain timely.
For a delivery-only visit, unloading is a different process from the next departure. A vehicle can unload successfully and then remain at the stop because of its configured waiting or loading behavior. Use the unloading timeline if cargo never reaches a receiver; keep a post-unloading pause in this guide's departure checks.
If the observed behavior still contradicts the selected mode after supply, stop identity and timer checks, keep the save's build, mods, vehicle type, stop configuration and a record of the visit. That gives a reproducible problem to investigate. A single unexplained departure is not evidence that all trucks or all full-load modes are broken.
Sources for the modes and illustrated controls
The any/all vehicle distinction comes from the official Lines and Vehicles manual. The timer illustrations come from recorded stop configuration, 16:12–16:19. They show the controls and tooltip text, without establishing a controlled partly loaded departure at timer expiry. This is a reviewed third-party example, not a game session performed by this site.