
Build a bus route by placing passenger stops where people can actually reach them, adding those stops in the intended travel order, and assigning buses from a connected road depot. Check the route preview before purchasing the fleet. A line returns from its final listed stop to its first, so the stop list must describe the return journey you want passengers to receive.
Once buses are moving, inspect waiting passengers, transported passengers, line frequency and vehicle loads together. A green coverage highlight establishes passenger access; it does not guarantee that everyone inside the radius wants to make the trip. Improve the service that passengers use before extending it into every surrounding street.
Choose a Passenger Journey Before Placing Stops
Start with the connection you want to provide: an internal town trip, a link between nearby towns, or a feeder serving a larger passenger station. These jobs require different stop lists. A town loop can distribute passengers through several districts, while an intertown connection needs a practical journey in both directions.
Select the buildings and stations the route should connect, then inspect their surroundings. Passenger catchment requires a valid walking path that remains reasonably close to the station's covered area. A building may appear geographically close but still be poorly served when its access involves a large detour. Place the stop for the journey people can complete, rather than for the circle that looks largest on the map.
Avoid starting with a bus model and then looking for somewhere to run it. That reverses the useful decision: the route creates the requirement, and the vehicle should match that requirement. Your initial service needs accessible origins, useful destinations and a connected road path between its stops.
Place Road Stops and Check Their Coverage
Small roadside stops attach to a street side. Larger bus and tram stations provide terminal platforms and can be expanded with modules. For a modest first service, inspect whether roadside stops cover the necessary buildings before committing to a large station construction.
When you place or select a station, the game highlights buildings inside its catchment area. Green indicates passenger transfer access, blue indicates cargo transfer access, and white indicates that both are possible. For a passenger bus line, green or white coverage is the useful result. Blue coverage alone does not establish that people can board there.
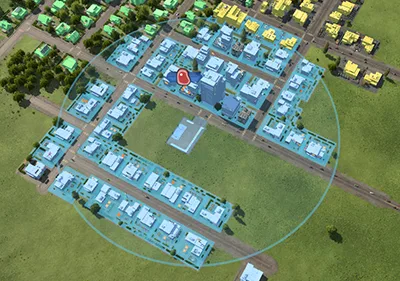
Inspect the passenger access colors as well as the radius; blue coverage alone describes cargo access.
Check both ends of an intertown route. A well-positioned stop in the first town does little for passengers whose destination is outside the useful catchment of the second stop. For a feeder, also inspect the relationship between the roadside stop and the passenger station it is supposed to serve. The route should connect reachable places, not simply pass near their names.
Opposite roadside stops are grouped into one station when they occupy the same street section. Remember that grouping when editing the line: the station name may represent more than one physical stopping position. Inspect the selected terminal and route preview to establish which side each visit uses.
Write the Stop List as the Actual Journey
Open the line manager and create a new line. Add the stations in the order that the buses should visit them. The game inserts the next station after the currently selected stop or segment, so first select the correct position in the list when expanding an existing route.
A simple connection between A and B returns to A after B. A route with intermediate stop C needs closer attention. If you list A, C and B, the next leg runs from B back to A; it does not automatically insert a second visit to C. Add C again where you want the return journey to stop there.
For a town circuit, a list such as A, B, C and D returns from D to A. That can be useful when the complete loop serves the intended trips. It can also impose a long ride on someone who needs to travel against the loop's direction. Follow the full cycle in the preview before deciding that a circular service fits your town.
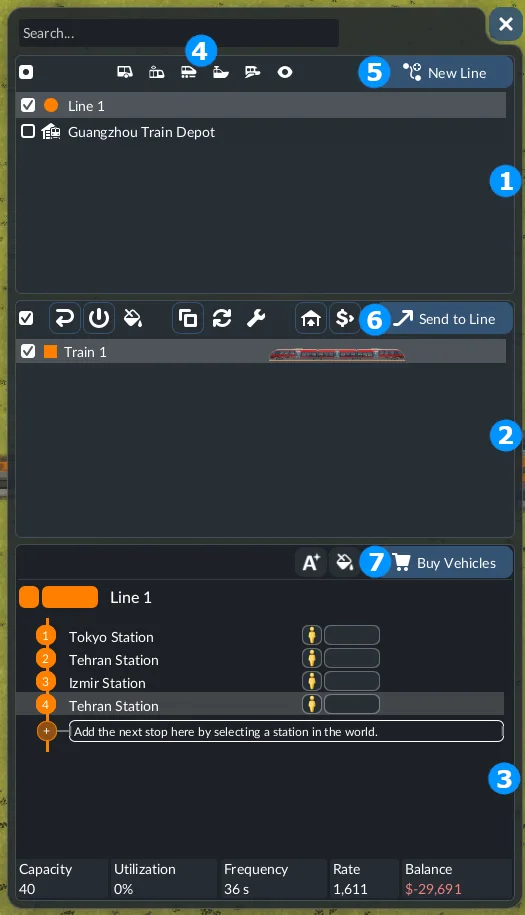
The ordered stop list is shared by transport modes; this example includes an intermediate station again on the return trip.
The stop list is therefore more than a collection of covered neighborhoods. Its order determines the trips that the buses perform. Review every pair of consecutive stops, including the last-to-first leg, whenever you add, remove or rearrange an entry.
Inspect the Route Preview and Terminal Assignment
The line appears in the world when selected. Use that preview to confirm that each segment follows a valid road connection and that the return trip makes sense. Clicking a stop selects the following segment, which also blinks in the world. This helps isolate an unexpected leg without trying to read the whole route at once.
The game assigns terminals automatically according to reachability and utilization. At a larger station, inspect that assignment before assuming that the nearest-looking platform is the one the line uses. You can move a stop to another terminal through the line manager when the automatic choice does not fit the intended service.
Alternative terminals allow a vehicle to use another enabled platform when the primary one is occupied. For road vehicles, that decision occurs at the station entrance. Every selected alternative still needs a valid path. A platform is useful only if the bus can reach it and continue to the next stop.
Connection problems appear beside the line and beside affected segments. Hover the warning for its explanation. Repair the particular segment before adding more buses: an additional vehicle cannot fix an unreachable stopping position or a broken return path.
Buy Buses from a Depot That Reaches the First Stop
Road depots are the purchase point for buses. Place the depot so it connects to the road network used by the line, then open the vehicle store. You can also use the line manager's Buy Vehicles action, which finds a compatible depot and opens its store.
Compare the available buses using their capacity, purchase cost, maintenance cost, passenger comfort and technical properties. The store supports sorting and filtering, so inspect the attributes that matter for the service rather than selecting solely by age or appearance. Do not buy capacity that the route has not shown it can use.
Assign the vehicle to the correct line and inspect the first-stop selection. New vehicles need a reachable path from the purchasing depot to that stop. This is separate from the route being connected between its passenger stations: a complete line can still be inaccessible from a badly placed depot.
Observe the first bus after dispatch. Confirm that it leaves the depot, reaches the expected terminal, boards passengers when available and continues to the next listed stop. That first complete journey is the useful commissioning check before you repeat the purchase for a larger fleet.
Match Service Capacity to Waiting Passengers
Open the line details and compare its capacity, current passenger load, rate and frequency. The transported section records how many passengers the service carried last year and can show a longer history. These measurements describe different parts of the service, so use them together.
A lightly loaded bus is not automatically evidence that its stops are wrong. The route may have more vehicle capacity than present demand requires. Conversely, buses that repeatedly leave people behind suggest that the service needs more carrying capacity or a better delivery rate. Inspect the station's unhappy-passenger information to identify the lines that need attention.
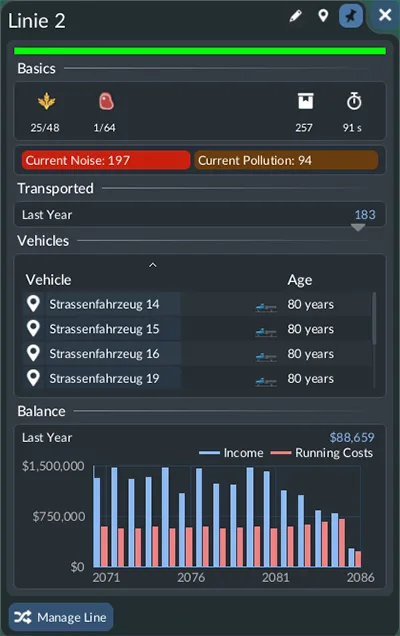
Passenger lines use the same measurements; this panel illustrates where capacity, frequency and balance appear.
Adding vehicles is one available response; replacing vehicles with higher-capacity or faster models is another. Choose according to what the existing buses are doing. If they complete the circuit but cannot clear the queue, capacity deserves attention. If they fail to reach a stop at all, solve the connection first.
Make one service adjustment and watch its effect through complete journeys. Simultaneously moving stops, changing the vehicle model and doubling the fleet makes it harder to know which change helped. Keep a working baseline until the new arrangement has demonstrated useful passenger movement.
Keep Buses Distributed Through the Line
The stop configuration includes additional waiting time that helps distribute vehicles more evenly. This is a line-management control, separate from purchasing more buses. Use it when inspecting how the vehicles are spaced over their route.
Do not impose a long wait everywhere without checking the complete cycle. Waiting changes the time available to serve other stops. The useful result is a regular service that clears passenger queues; a large fleet standing at terminals does not provide that result simply because its total capacity looks high.
When adjusting departure behavior, read the options for the selected stop and vehicle. Full-load waiting can leave a vehicle stationary when demand is low. For an ordinary passenger service, first establish that buses can circulate and collect available passengers, then make timing changes that address an observed problem.
Separate Station Space from Bus Capacity
Passengers wait at stations and their platforms. Larger passenger stations can gain capacity through longer platforms or additional side buildings with shared waiting space. The station window shows terminal capacity and combined waiting-hall capacity.
Additional waiting space can accommodate more people, but it does not itself transport them. If the service carries too few passengers away, a larger waiting hall leaves the operating problem in place. Check the unhappy-passenger count for each line and improve the appropriate service alongside any justified station expansion.
Small roadside stops and larger modular stations serve different scales of operation. Retain a simple stop where it works; consider a larger construction when terminal arrangements or passenger waiting space require it. That decision should follow the stop's actual role, rather than treating every bus line as if it needs a major interchange.
Repair a Line Without Rebuilding the Whole Network
Use the symptom to choose the next inspection:
| Observed behavior | First inspection | Focused correction |
|---|---|---|
| Bus never leaves the depot | Depot path and assigned first stop | Restore a reachable road connection and correct assignment |
| Bus travels past a desired district | Stop order and selected terminal | Add the intended station at the correct position |
| Return trip omits an intermediate stop | Last-to-first leg and repeated entries | Include the return visit in the list |
| Covered buildings remain poorly served | Passenger access path and destinations | Move the stop or change the useful connection |
| Passengers accumulate despite operating buses | Loads, frequency and unhappy passengers | Increase effective capacity or service rate |
| Several buses use an unsuitable platform | Terminal and alternative-terminal choices | Assign valid stopping positions |
After each correction, follow a bus through the affected segment and inspect the line for remaining warnings. Preserve the parts of the route that already work. The commissioning result is a bus that can complete its cycle, serve the intended passenger stops in both directions where needed, and provide measurable passenger transport without unresolved connection errors.