
Transport Fever 3 mission 8, Final Countdown, asks you to prepare the rocket launch at Tanegashima while watching the launch window. Deliver machine parts, kerosene and oxidizer, bring workers to the space center, and respond when the fuel requirements change. For three stars, launch on schedule without increasing the budget. The optional medal is for organizing the watch party.
Pause at the opening and organize the parallel supply chains before advancing the clock. The crucial story change comes after the first kerosene delivery: the fuel must return to the refinery, and an additive must arrive from the chemical plant. If you keep operating only the original outward fuel line, the revised production chain will not work. Preserve the budget and inspect the updated cargo settings immediately.
Separate the launch goal from the score
| Result | Requirement |
|---|---|
| One star | Launch the rocket on schedule |
| Two stars | Launch on schedule without repeatedly increasing the budget |
| Three stars | Launch on schedule without increasing the budget |
| Optional medal | Organize the watch party |
The budget restriction is part of the score. When the story offers additional funding, accepting it changes the conditions for the highest result. The three-star demonstration declines those offers and completes the mission using its existing resources and transport income. Keep that decision separate from the immediate need to purchase another vehicle.
The opening has several industries and transport facilities, but the supply chains are not fully established. Inspect what already exists before constructing replacements. Locate the refinery, chemical plant, machine factory, launchpad, space-center worker destination, hotel and observation area. The mission asks you to connect these specific functions, rather than build a general-purpose network across the entire map.
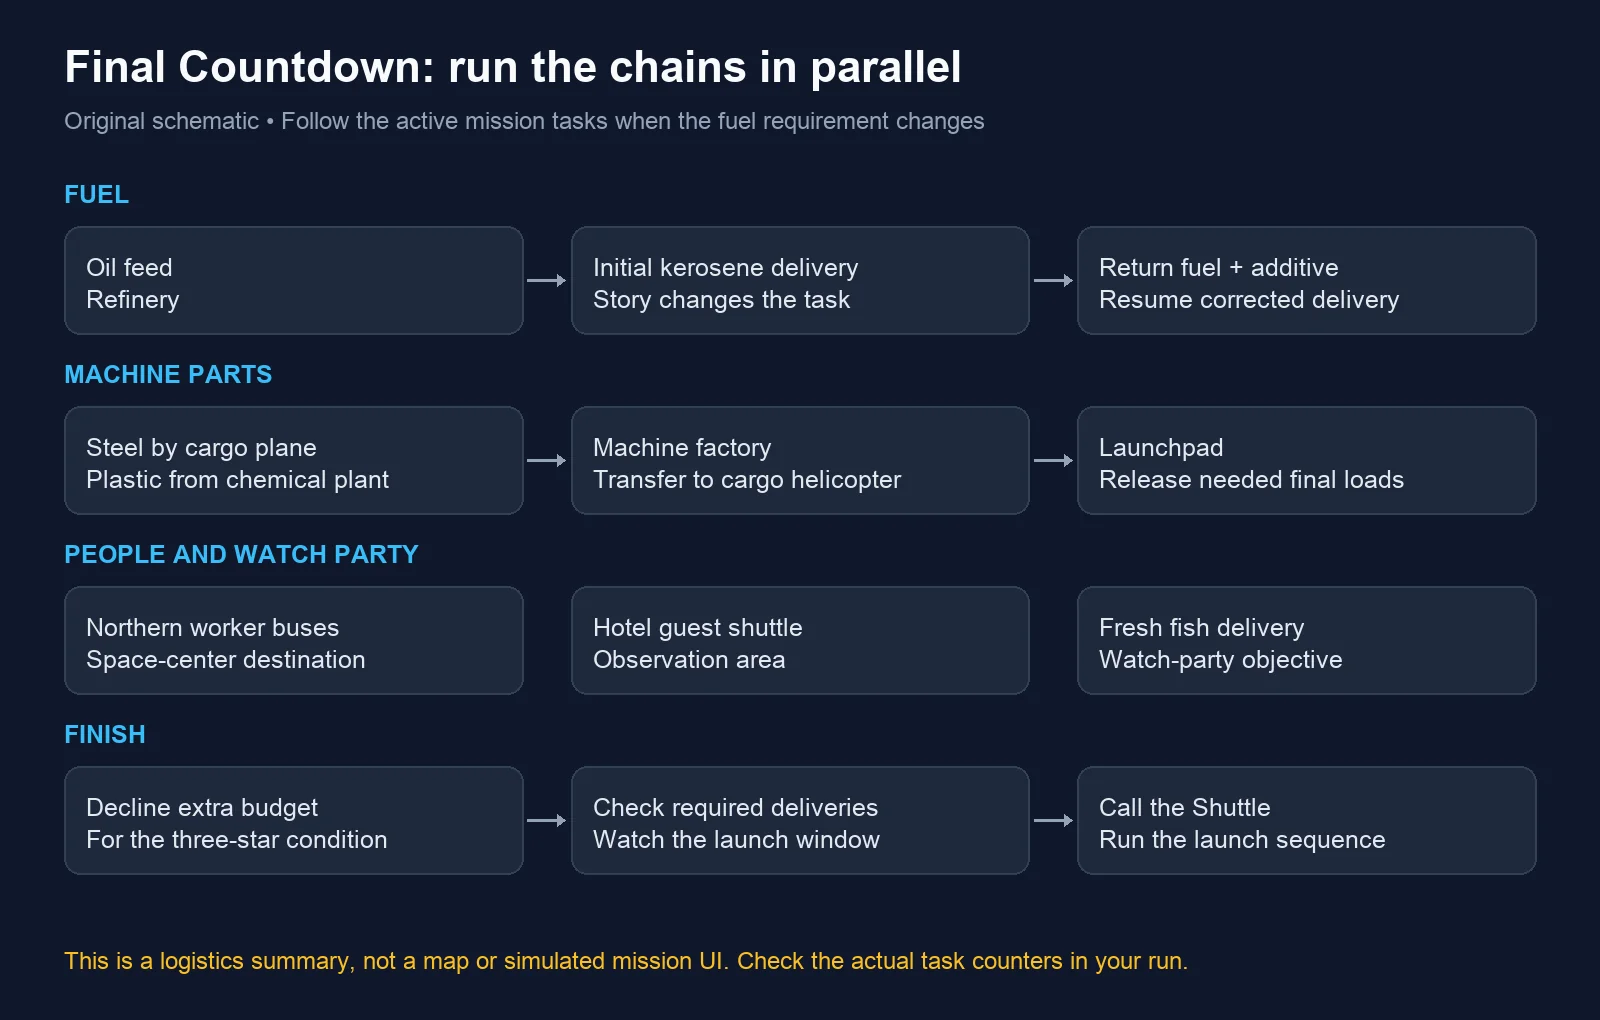
Original schematic based on the mission and update instructions; not a game screenshot.
Build the opening as parallel chains
The rocket needs its machine components while fuel production is also being prepared. The machine factory requires inputs, the refinery needs oil, the chemical plant has its own supply and worker concerns, and the space center needs staff. Do not wait for one complete chain to finish before starting every other chain. Establish the essential routes while paused, then inspect their first trips together.
Use clear line names for oil, fuel, chemicals, plastic, steel, machines and workers. Several of these routes pass through nearby facilities, so names help distinguish a missing vehicle from a missing load setting. Before unpausing, check that each newly created line actually has its intended vehicles assigned. In the demonstration, a purchase without a correct assignment initially obscures the steel-aircraft problem.
Spend on connections that reduce a real delay. A depot close to the required pickup can reduce repositioning time. A direct ground connection may avoid a town detour. Neither improvement is free, so confirm its purpose before committing the budget. The recorded solution does not build for appearance; it builds for timely movement between the task's facilities.
Feed the refinery with nearby oil
Begin the oil service using the nearby producing source and a compatible liquid-cargo vessel. Check the purchase location: the demonstration finds that the existing shipyard would send new vessels on a long repositioning trip, so it establishes a nearer purchase point. This is a time-versus-cost decision within the limited budget, not a reason to place a new shipyard at every harbor.
Provide enough oil transport to feed the refinery while the other routes start. The demonstrated solution later adds another oil pickup route and gives the lines separate terminals. If ships or unloading vehicles wait behind each other, inspect terminal assignments before simply purchasing more vessels. Additional capacity only helps when it can actually reach and unload at the refinery.
Watch refinery stock as the mission progresses. Early in the run, oil may be plentiful while an additive is missing. Later, the additive can be available while oil becomes the limiting input. Use the current stocks to identify the constraint. Continuing to expand oil transport at a moment when another input is absent does not repair that missing production step.
Send an early kerosene delivery
Create the initial kerosene line from the refinery to the launchpad, using a compatible liquid truck and a usable road connection. The demonstration deliberately sends an early small shipment instead of waiting indefinitely for the first truck to fill. That first delivery advances the story and exposes the revised fuel requirement.
Check the launchpad station's access and the truck's actual destination. A quick vehicle on a long or incorrect path will not perform the intended early delivery. Follow it to the launchpad and watch the objective update. Once the story changes, stop treating the original fuel counter as the only measure of success.
Keep the fuel line understandable enough to reconfigure. The underlying cargo changes during the mission, so you need to inspect its load filters again after the revision. A vehicle that was compatible with the initial delivery can still be assigned to the correct route while its pickup or unloading settings are no longer correct for the updated task.
Connect the chemical plant and its outputs
The chemical-plant chain supplies plastic for the machine factory and oxidizer for the launchpad. Create both outward connections. Use a suitable plastic vehicle for the factory line and a compatible liquid vehicle for oxidizer. Inspect each destination separately; these outputs have different jobs and cannot both be delivered to whichever terminal is easiest to reach.
The demonstration keeps the chemicals input route flexible because it will later carry an additive back towards the refinery. That makes cargo compatibility and individual stop settings important. Choose vehicles that can perform the actual revised role rather than assuming a liquid-only specialization is correct for every shipment on that route.
Provide workers where the task and industry state require them. As production develops, inspect the chemical plant's worker situation and plastic output. A line with available vehicles cannot carry plastic that has not been produced. The later walkthrough adds worker access at the plant when plastic becomes a bottleneck, instead of blaming the helicopter carrying finished machines.
Bring workers to the space center
Create usable passenger stops in the northern residential areas and connect them to the space-center worker destination. The recorded run uses several small bus lines to provide coverage. The goal is successful worker arrivals at the specified destination, so check access and the actual route rather than counting how many stops you have placed.
Some pre-existing stop objects do not behave as usable line stops in the demonstration. If you cannot select an apparent stop for the line, inspect it and place an appropriate usable stop with coverage rather than spending time trying to assign buses to an unavailable object. Confirm the new stop can enter the manager's stop list.
Follow the first buses and the worker objective. Once it is satisfied, decide whether the routes should remain: in the demonstrated run they generate useful income, so the player retains them. Their continued operation can support the budget, but the worker objective and the profitability of the lines are distinct checks.
Supply the machine factory through steel and plastic
The demonstrated steel connection uses cargo planes from the steel source to the appropriate airfield, then ground transfer to the machine factory. Confirm that you are selecting an airfield suitable for the planes, rather than a helicopter-only facility. The recording catches that mismatch during setup before correcting the route.
At the arrival end, establish connected transfer storage and road access. Carry steel to the machine factory and bring the finished machines back to a transfer serving the helicopter leg. The walkthrough separates the relevant warehouse specializations so that steel and machines have their intended places in the chain. Follow a load across the connections to confirm that the facilities actually share usable access.
Plastic must reach the same production chain. If machines are scarce, inspect both input supplies and the factory's state before adding another machine helicopter. A full aircraft roster cannot move components that have not yet been made. Conversely, a growing machine stock with slow collection tells you that the outward transport capacity needs attention.
Carry the machine parts to the launchpad
Create a cargo-helicopter line from the machine transfer to the launch destination. Start with a compatible aircraft and verify pickup before expanding. The demonstration adds more helicopters as production increases, keeping the purchase tied to actual components waiting to move.
Inspect loading and departure conditions. Waiting for a full shipment can be useful while production is building, but the final remaining load may be smaller than the aircraft's capacity. Near the end, send a needed partial shipment rather than leaving the final components at the pickup while the countdown expires.
When several helicopters are needed, inspect landing capacity at both ends. Adding aircraft can require additional landing facilities to keep departures flowing. Compare the observed queue and machine stock before buying more. The correct expansion is the one that clears the current bottleneck, rather than the largest possible helicopter fleet.
Repair the revised fuel chain immediately
After the first kerosene arrival, the story orders you to stop the current deliveries, return the delivered kerosene to the refinery, and bring an additive from the chemical plant to the refinery. Treat that as a new network requirement. Read the active task, change the return load settings, and confirm that the intended cargo can unload at the refinery.
Recheck the fuel line's cargo selection as well. In the demonstration, reconfiguring the stop settings restores the route after the game's fuel change. Do not assume an old filter automatically tracks a changed cargo identity. Follow the next pickup and unloading to verify that the repaired line now serves the revised task.
The return shipment can stall if trucks wait for a full load that is not available. Release the needed partial load, inspect maximum waiting behavior, and make sure the additive is delivered before expecting more usable fuel. The walkthrough repeatedly checks and releases stalled vehicles at this stage. Use that observation to identify an unsuitable waiting rule, rather than blindly reversing every truck on the map.
Keep the return and outward movements clear
A truck occupying a pickup while waiting can delay a delivery that must unload there. Inspect the relevant terminal choices, loading targets and force-unload behavior. The objective is to keep chemical input, additive return and corrected fuel delivery moving without one vehicle holding the whole chain in place.
Watch stocks at both factories. If the refinery lacks additive, solve the return movement. If additive is present but oil is missing, solve the oil feed. If plastic is waiting at the chemical plant while the machine factory lacks it, inspect the plastic trucks. These are different bottlenecks that can appear at different points in the same mission.
Avoid adding capacity to a completed requirement. The demonstrated run eventually has enough oxidizer and corrected fuel while machines remain the main task. At that point, direct money and attention towards the unfinished components. Check the objective counters and remaining stocks before continuing to buy vehicles for a line whose contribution is already sufficient.
Organize the watch party and guest shuttle
The observation area needs its visitor service and fresh fish. Establish the fish supply from the harbor and a delivery stop covering the designated area. A specialized fish warehouse protects the load while it waits at the transfer, but the final road delivery still needs to reach the watch-party destination.
Inspect unloading settings so that unwanted returning cargo does not remain in the distribution cycle. The demonstration uses force unload at the delivery end. Follow the actual arrival and the party objective instead of assuming that having fish at the harbor completes the optional goal.
The story also requests a dedicated shuttle between the hotel and the observation platform for distinguished guests. Place the stop within the mission-highlighted hotel area, connect the observation destination and assign vehicles to the line. Keep this guest service separate from the worker routes: both carry passengers, but they answer different mission requests.
Finish the launch sequence
As the deadline approaches, inspect the remaining requirements individually. Look for components stuck at a transfer, a partial load waiting to depart or an input shortage at the machine factory. A small targeted correction is more useful than a late redesign of the entire network.
When the required supplies and preparations are complete, the final task brings the astronauts from the space center to the rocket. Use the mission's Call the Shuttle control and allow the launch sequence to run. Completing the delivery counters is preparation for this final action, rather than the launch itself.
Check the result screen for the star score and watch-party medal. For three stars, the run must have stayed on schedule without accepting a budget increase. Preserve a separate save before the final sequence if you want to review the completed logistics. The walkthrough's successful finish comes from parallel setup, prompt fuel reconfiguration and repeated attention to the current bottleneck.