Transport Fever 3 changes freight handling, vehicle selection, rail reservations and mod management. Transport Fever 2 already provides modular stations, rail signaling, road management, campaigns and extensive modding. Choose between them by the kind of network you want to manage and the content you already depend on, rather than assuming every established feature is new in the sequel.
The biggest practical change for a returning freight player is the need to think about cargo storage, transfer and loading specialization together. The sequel also gives more vehicle attributes to compare and more ways to inspect the network directly in the world. Your Transport Fever 2 mod collection does not transfer unchanged: authors must adapt their packages for Transport Fever 3.
The differences that affect a playing session
| Area | Transport Fever 2 | Transport Fever 3 |
|---|---|---|
| Core transport | Rail, road, air and shipping networks | Continues the multimodal transport focus |
| Construction | Modular stations and airports, signals and road controls | Adds more combined construction possibilities and freight specialization |
| Cargo decisions | Established transport and industry system | Cargo stays at its origin until collected; destinations are not fixed at production |
| Transfers | Build connections between services | Modular warehouses and cargo classes become central choices |
| Vehicle choice | Compare the technical suitability of vehicles | Also weigh loading speed, comfort, noise and pollution |
| Rail reservations | Path-based signals | Retains path-based signaling with revised reservations and alternative-terminal behavior |
| Interface | Network and economic management tools | More direct world editing, cargo overlays and revised line controls |
| Mods | Established community, including Steam Workshop content | In-game Mod Hub; no Steam Workshop integration; packages adapted for the sequel |
This table compares the roles of the systems. It does not promise that every particular Transport Fever 2 workshop creation has a Transport Fever 3 replacement, or that a network built for one game will behave identically in the other.
Cargo handling changes the way you plan freight
In Transport Fever 3, newly produced cargo is not assigned its destination at production. It stays at the producer until collected, and your network determines where it goes. That makes the route you build and the transfer storage you choose more consequential.
An industry's integrated loading dock offers a simple way to begin collecting cargo. Its tradeoff is loading speed. As throughput increases, the same convenient starting point can become the place where vehicles queue. Building additional suitable terminals can improve handling, but also increases construction and operating commitments.
For a returning player, the useful question is “where is the cargo waiting?” before “how many more vehicles should I buy?” Cargo at the producer, at a transfer warehouse and in a vehicle represents different stages. Adding capacity to one stage will not automatically repair the others.
Consider an oil chain with ships and trains. If ships unload successfully but trains leave empty, inspect the transfer's liquid storage, terminal connections and wagon compatibility. If trains are full while ships arrive at a crowded shore hub, the inland cycle may need improvement. The same visible queue can invite different fixes depending on which leg is actually working.
This makes freight a good reason to try the sequel if you enjoy designing logistics hubs. It also means that a familiar-looking route can need new checks. A station's location and a vehicle's nominal capacity are only parts of the plan.
Warehouses and cargo classes are design choices
Transport Fever 3 organizes cargo handling around liquid, bulk, flatbed and goods specializations. Vehicles, loading facilities and warehouses can support those specializations. Oil, loose materials, exposed loads and enclosed goods require different handling choices.
Universal equipment offers flexibility. Specialized equipment can improve handling speed for its supported category, with tradeoffs in costs and environmental impact. Select a specialization for the cargo you intend to move, then inspect how it connects to the rest of the route.
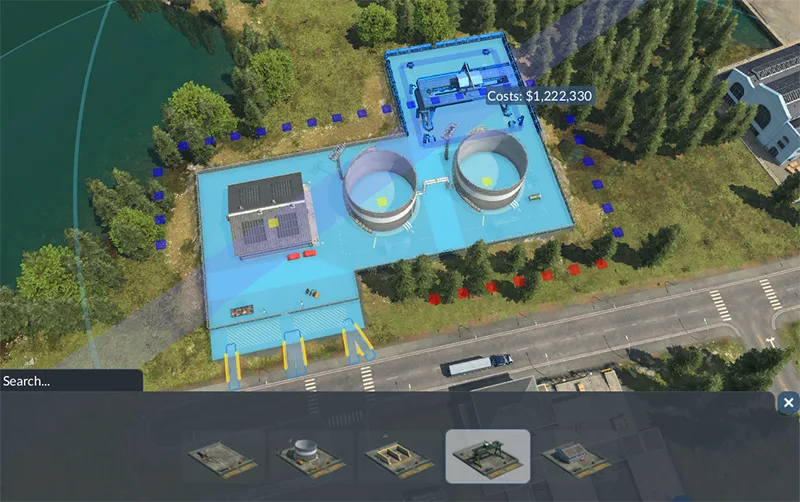
The warehouse configuration view makes the storage and terminal relationship visible. A transfer hub needs the appropriate cargo handling as well as connections to its services.
Do not judge a transfer only by the size of its buildings. A large hub with unsuitable storage can be less useful than a smaller correctly configured one. Similarly, faster loading at one terminal can move a queue to the next stage if the outgoing fleet cannot keep up.
When expanding, make the change that addresses the observed limit. If loading consumes much of the vehicle's cycle, handling speed matters. If loaded vehicles spend their time traveling, route length or capacity may matter more. If they arrive empty, investigate compatibility and access before buying a faster model.
Industry growth creates reasons to revisit old routes
The sequel's economy introduces new production needs as towns develop. A network that handled early, simple demand may need additional products, industries and intermediate transfers later. Industry output can also be supported with workers and relevant production boosters.
This creates a different decision from simply extending every line. Before increasing an industry's output, inspect whether its cargo is already being collected efficiently. More production is useful when output is the constraint; it can enlarge the queue when transport is the constraint.
Supplying workers also means planning passenger access to the industry. You are then managing the relationship between a passenger service and freight output, rather than treating them as entirely separate networks. The benefit needs to justify the added service and infrastructure.
For players who enjoy steady optimization, these relationships give existing routes new jobs. For players who prefer a completed scenic network, they create more systems to monitor. The built-in free-game settings let you choose how demanding a new world should be, but they do not remove the need for valid transport connections.
The vehicle purchase decision goes beyond top speed
Transport Fever 3's purchase interface emphasizes attributes including loading speed, comfort, noise and pollution alongside technical specifications. Its comparison mode helps inspect tradeoffs rather than assuming the newest vehicle is the best choice for every line.
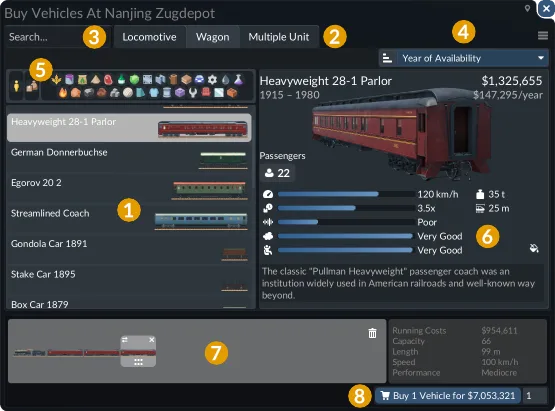
The illustrated coach has its own capacity and speed. A component's specification is different from the specification of an entire assembled train.
On a short freight route, loading can consume a meaningful share of the cycle. On a long route, travel speed and capacity may be more decisive. A passenger service adds comfort and environmental concerns to the choice. Compare the attribute that addresses your route's actual weakness.
For trains, separate the locomotive from the wagons. A locomotive supplies traction; a wagon's cargo compatibility determines what it can carry. Multiple units are a different purchase category again. This distinction matters when reading a vehicle list and when diagnosing a train that runs correctly but cannot collect the intended cargo.
The sequel's broader comparison does not mean older models are useless. A cheaper or more suitable model can still meet the route's needs. Evaluate the whole operating task, including station handling, before replacing a functioning fleet purely for a higher displayed top speed.
Railway signaling is revised, not invented anew
Both games use path-based signaling. Calling it a new signaling system introduced only in Transport Fever 3 would misdescribe the comparison. The meaningful changes are in how reservations handle stops and how trains can consider configured alternative terminals.
In the previous game, reservations could stop at the next stop or a limited signal boundary. A single-track section with multiple stops could therefore require careful design to avoid opposing trains committing to conflicting journeys. The sequel revises reservations beyond the next stop toward a relevant direction-change stop or signal.
For a returning railway builder, inspect the actual route and passing points instead of copying a layout solely because it looked similar in the previous game. Trains still need valid paths, and signals need to support the places where services are intended to pass each other.
Alternative terminals can help when the preferred one cannot be reserved. They are a configured routing choice, not a guarantee that any spare platform will automatically serve every line. Check that the alternative is suitable and reachable for that service.
The practical benefit is more room to design efficient networks with shared infrastructure. It does not eliminate the need to diagnose invalid routes, unsuitable terminals or a junction that carries more traffic than its layout can accommodate.
Line management and visibility change everyday work
Transport Fever 3 expands direct selection and editing in the world, updates the Line Manager and adds clearer cargo information overlays. Stop order can be adjusted by dragging items in the list, while naming options help organize a larger collection of services.
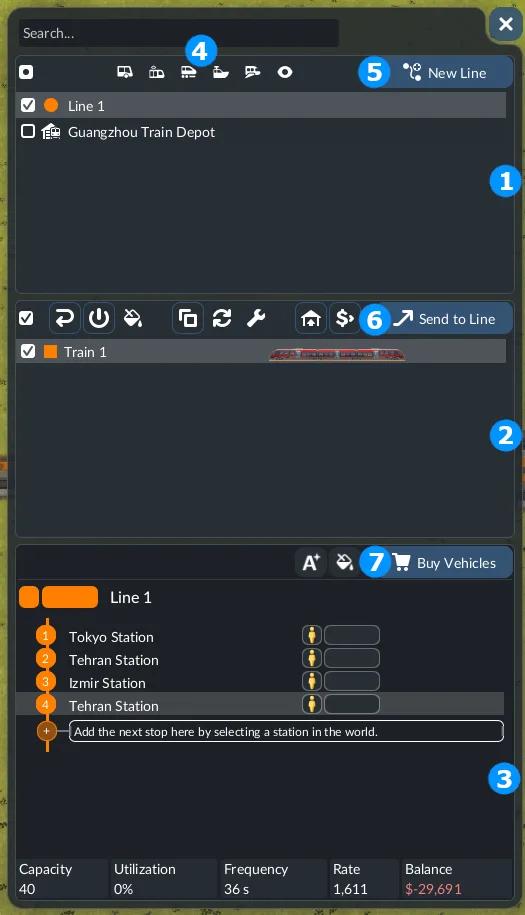
The illustrated manager separates lines, vehicles and stops so you can inspect the service you are changing.
These improvements matter most when your network becomes busy. You can inspect where cargo accumulates, identify a service and return to its route without relying solely on a visual guess. Naming and grouping decisions still help you distinguish similar lines.
For an existing Transport Fever 2 player, this is a workflow benefit rather than a promise that all tasks happen automatically. You still choose the route, terminals and vehicles. Better visibility helps you make those decisions and identify the result.
Use a modest first world to learn the new controls. Set up a simple passenger line and a freight transfer, then inspect their operation. That gives the interface changes context without requiring you to learn them inside a sprawling network immediately.
Mods need a separate compatibility decision
Transport Fever 2 has an established mod community, with content distributed through channels including Steam Workshop. Transport Fever 3 uses its in-game Mod Hub for discovery and management. Its current official support information says Steam Workshop is not included. Search the hub for the exact Transport Fever 3 package you want rather than treating an older Workshop subscription as a sequel download.
Transport Fever 2 mods are not directly compatible with Transport Fever 3. Authors can adapt their work, but the presence of a familiar model or package title in the older game's library does not prove a sequel version exists.
Before moving a mod-dependent project, list the content that matters to it: essential vehicles, stations, map assets and gameplay tools. Search for Transport Fever 3 versions of those packages and read their own requirements. An adapted vehicle does not establish compatibility for every script or construction in the original package.
Curated mods are part of the sequel's official program, with review standards for participating content. Other community mods can still be distributed independently. The program is therefore a useful distinction when browsing, but a package outside it is not automatically absent or unusable.
Save compatibility and mod compatibility are separate questions. Do not treat an adapted model as a promise that an entire older save transfers automatically. Keep your existing world available while evaluating a new project in the sequel.
Choose the game for your next project
Stay with an existing Transport Fever 2 project when its current network and essential mod collection already meet your goal. There is no need to abandon a developed world simply because the sequel offers new systems. Check the missing content that would materially affect your project before deciding to rebuild it.
Choose Transport Fever 3 for a new project when you want its freight transfers, handling specializations, expanded vehicle comparisons and revised network tools. Expect to learn the relationship between storage, terminals, vehicle compatibility and the delivered result.
For a first comparison world, keep the experiment concrete: one passenger corridor, one freight producer and one transfer. Inspect the route's queues and vehicle attributes, then decide whether the additional logistics decisions are the part of the game you want to spend time on.
Hardware suitability also belongs in the decision. Check current system requirements and your intended world size separately; this comparison does not assign a universal frame-rate improvement to the sequel. Simulation load, settings and the network you build affect the experience.
The most useful choice is the one that supports the project you actually want to build: a mature world with established content, or a new network designed around the sequel's handling and management systems.