
To improve town growth in Transport Fever 3, deliver passengers and demanded cargo to their final destinations, then inspect the town's Supplies and Authority ratings. Deliveries generate raw experience, while the ratings affect the growth multiplier applied to that experience. Authority takes its value from the weakest of six ratings, so a busy network can still support slow growth when one municipal problem remains unresolved.
Start with the town window rather than choosing another route immediately. It separates the town's current level, population, progress toward the next level and growth conditions. Use those details to decide whether the next useful change is better passenger access, stronger cargo supply or relief for a low Authority rating.
Read the town's growth situation
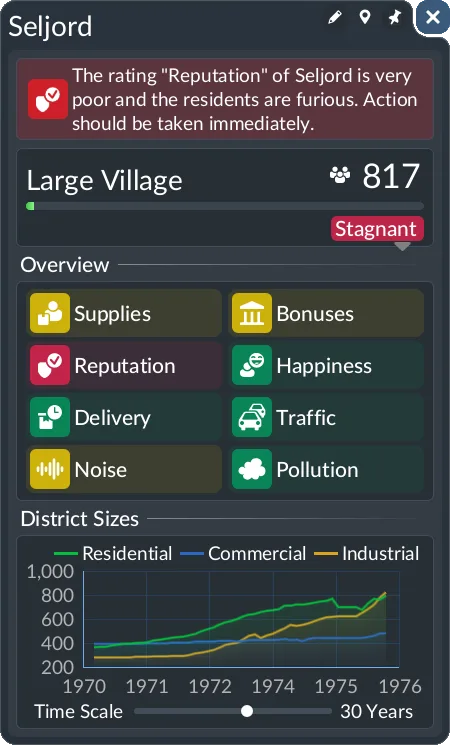
Open the town window and examine its top section. The town level and number of residents appear together, but they describe different things: residents show the current population, while the level identifies the town's progression stage. The progress bar below shows advancement toward the next level and whether the town is growing or stagnating. Expand it to inspect the detailed growth breakdown.
Before altering the network, note the level, progress and weakest rating. This gives you a specific result to compare after the change. A larger population alone does not explain which transport improvement helped; the breakdown is more useful for identifying the current constraint.
Town progression runs through 18 levels. It begins with Small Hamlet, Hamlet and Large Hamlet, then advances through the Small, ordinary and Large versions of Village, Town, Suburb, City and Metropolis. Large Metropolis is level 18. Reaching a new level triggers a celebration.
A town needs 1,000 total XP to reach level 2. Each subsequent level-up requires 1.5 times the XP required for the previous level-up. As a result, the same transport service does not necessarily move a later level's bar as quickly as an earlier one. Check the actual growth breakdown before treating a slower-looking bar as a new service failure.
Understand what earns growth XP
The growth calculation is Final XP = raw XP × XP multiplier. Raw XP is awarded when passengers or cargo arrive at their final destination in a town. The multiplier depends on the town's Authority and Supplies ratings. This gives you two separate improvement paths: increase useful completed transportation, or improve the conditions that determine how much growth experience that transportation produces.
Passenger XP depends on the starting town:
| Passenger's journey origin | Raw XP on arrival |
|---|---|
| Same town | 5 XP |
| Neighboring town | 10 XP |
| A town farther away | 20 XP |
Local journeys therefore contribute to growth as well as intercity travel. A route serving residents' work and shopping trips has a growth role even when it never leaves the town. Longer-distance arrivals provide more raw XP per passenger, but that does not make distance alone a complete route-selection rule. Passengers still need useful destinations, and waiting and travelling time matter to the town's Happiness rating.
Cargo awards 10, 20 or 40 raw XP per delivered item, depending on its complexity level. More complex demanded goods can contribute more per item, but towns require smaller annual quantities of complex goods. Compare the actual demand and supply situation rather than treating the largest XP category as a reason to deliver any available product.
These values describe raw XP. They are not guaranteed final gains because the growth multiplier still applies. Likewise, vehicles passing through a town or cargo being present at an intermediate station do not demonstrate a completed delivery to the town's final destination. For growth planning, check the town's transportation statistics instead of relying only on how busy the infrastructure looks.
Improve Supplies through useful transport
Supplies combines passenger and cargo service: the overall rating is the average of the passenger supplies rating and cargo supplies rating. Inspect both components before choosing a project. Improving the component that is already strong may leave the other component as the more useful opportunity.
Passenger supplies measures public transport use. A line usage of 50% gives the maximum passenger supplies rating. This is a line-usage measure, so use the rating shown in the town's supply breakdown to assess progress. Counting stops, counting vehicles or seeing one crowded platform cannot substitute for that town-level result.
For passenger access, use the land use layer to distinguish the three districts. Residential buildings are green, commercial buildings blue and industrial buildings yellow. Residents live in the residential district, work in the industrial district and shop or spend free time in the commercial district. Consider those destinations together when assessing whether a local service is useful.
Residents tend not to use public transport when no passenger stop or station is nearby. Inspect residential access first, then examine the destinations the service offers. Adding another stop at an already well-served location is less informative than checking whether residents can reach the places their routines require. Use actual public transport usage to evaluate the service after changing it.
Cargo supplies uses the highest rating among districts with cargo demands. Each district's rating reflects how well its own demands are met. This calculation means the town's cargo supplies rating is not an average of every demanded product across both districts. Expand the district information so that a strong town-level cargo result does not hide a weaker district you want to develop.
Residential districts have no cargo demand. Commercial and industrial buildings require cargo, and all buildings within the same district share that district's demands. The two districts demand different cargo types. Read their current demands before selecting a supplier; delivering an unrequested product is not a substitute for meeting the district's needs.
Recheck cargo demand at growth milestones
Towns begin with one cargo demand in the commercial district and one in the industrial district. Their requirements expand at particular levels:
| Town level | Added demand |
|---|---|
| 5 | Second commercial demand |
| 7 | Second industrial demand |
| 9 | Third commercial demand, potentially a most-complex cargo type |
| 11 | Third industrial demand, potentially a most-complex cargo type |
Use a level-up as a prompt to reopen Supplies. An established route may still deliver its original product correctly while the district now has another demand to consider. Check the new requirement and its annual quantity before expanding transport capacity or arranging another connection.
You do not have to deliver every cargo type for a town to grow. However, the goods supplied affect its development, and districts can grow at different rates according to their supply ratings. If your goal is a particular district's expansion, inspect that district rather than assuming the highest-rated cargo district represents the whole town's development.
The Supplies tab includes a rating breakdown and a chart of its development over recent years. Below it, Statistics lists possible passenger destinations and cargo suppliers, alongside actual transportation over the last 365 days. This helps distinguish an available connection from one that is producing useful transportation.
When viewing the cargo list, supplier links also appear in the world. Animated links are actively used; static links are potential connections that are not being used. Select the demanded cargo and inspect these links when you need to identify whether the town is receiving it from an active supplier. A potential supplier's presence alone does not show that the district is being supplied.
Find the weakest Authority rating
Town Authority is determined by the lowest of six ratings. Improving that weakest rating has the greatest effect on the overall Authority result. Read all six, then focus your first intervention on the lowest one. Strong results elsewhere cannot lift Authority past the current minimum.
| Rating | What to inspect for growth |
|---|---|
| Reputation | Changes to terrain, buildings, trees and main intercity connections |
| Happiness | Passenger waiting and travelling time |
| Delivery | Cargo arriving late at its destination |
| Traffic | Congested streets |
| Noise | Noise affecting residential areas |
| Pollution | Pollution across the town area |
For Reputation, examine recent construction work. Landscaping, removing town buildings and breaking main connections to other towns can lower the rating. Celebrations and marketing campaigns can improve it. If tree removal caused a reputation loss, planting new trees can recover that loss. Check the affected rating before undertaking more demolition as your growth intervention.
For Happiness, use the passenger satisfaction layer and inspect individual residents. Waiting at stations and time spent travelling are relevant to this rating. The purpose here is to determine whether passenger experience is the growth constraint; a high passenger supplies rating does not itself establish that those journeys are satisfactory.
For Delivery, use the cargo satisfaction layer to find places where cargo passes its time limit. Delayed deliveries still provide full income, but they lower the on-time delivery rating and hinder town growth. A profitable cargo route can therefore need improvement for growth even when its earnings appear healthy.
For Traffic, inspect the street traffic layer to locate bottlenecks. Reducing the number of congested streets improves the rating. Focus on the congestion shown for the affected town before expanding services that will use the same roads; more transported passengers or cargo is only one part of the growth calculation.
For Noise, examine residential hotspots in the noise layer and rating breakdown. Residential districts are sensitive to noise, while commercial and industrial districts are robust against it. For Pollution, inspect the pollution layer across the town area. These have different spatial scopes, so the same hotspot does not necessarily explain both ratings.
Several ratings depend on effects within town boundaries. Open the town window or the relevant layer to see those boundaries and keep the affected municipal area in view. This is especially useful when nearby infrastructure appears to be the cause: determine which town contains the problem before judging the result of a change.
Match the next project to the actual bottleneck
If Supplies is weak but Authority is healthy, concentrate on transportation that residents or cargo-demand districts can use. Compare passenger usage with district cargo ratings and choose the weaker service opportunity. For example, a town with good cargo supply and poor passenger usage calls for examining residential access and destinations, rather than automatically adding another cargo product.
If useful deliveries are happening but Authority is low, choose the lowest municipal rating as the next target. This avoids spending on extra throughput while the growth multiplier remains constrained by the same problem. When Delivery is lowest, investigate timeliness; when Noise is lowest, inspect residential exposure. The symptoms point to different work even if both towns have slow progress bars.
If one district expands more slowly than another, inspect its own supply rating and current demand. Towns develop through new or larger buildings when utilization is high and land value and accessibility are good. They can also construct or upgrade roads to accommodate additional buildings. A district's visible size is therefore worth examining alongside its transport and supply conditions, rather than using it as a stand-alone measure of delivery performance.
The headquarters adds a bonus to the growth multiplier, starting at 5% and increasing as the headquarters is expanded. Treat that as an additional benefit when planning the town's development. The growth breakdown still matters: a headquarters bonus does not explain away weak supplies, late deliveries or a poor Authority rating.
After completing a targeted change, return to the same town's expanded growth bar and Supplies breakdown. Compare the rating you intended to improve, check actual transportation and review any changed district demands. If another rating is now the lowest Authority component, that becomes the next constraint to investigate. Continue from the town's observed conditions rather than assuming that one successful route or one level-up establishes a permanent growth plan.