The shortest path to a working first network in Transport Fever 3 is to solve one clear transport problem: identify a source and destination, place accessible stops, connect a compatible depot, create a line with at least two stops, buy the right vehicles, assign them to the line, and watch the service operate. Start with a small road route because it lets you learn the full workflow without committing to a large or complicated network.
A moving vehicle does not automatically mean the route is useful or profitable. The stops must cover valid origins and destinations, the line must visit them in the intended order, and the vehicle must be able to carry the required passengers or cargo. Treat the first service as a test: make it work, inspect its results, and only then add capacity or infrastructure.
1. Choose one transport job
Before building anything, decide exactly what the line should move and where it should go. A simple passenger service within a town is a practical first project. Open the town information and inspect where residents, commercial buildings, and industrial buildings are located. Your route should connect areas that give passengers a reason to travel rather than placing two stops beside the same group of buildings.
You can also begin with a short cargo movement, but keep it to one understandable leg. Confirm which location supplies the cargo and which location accepts it before buying vehicles. Do not start by building an entire multi-stage industrial network when you are still learning how stops, lines, depots, and vehicles fit together.
Use this decision sequence:
- Select passengers or one cargo type.
- Identify a valid origin.
- Identify a valid destination.
- Choose the simplest suitable transport mode.
- Sketch the shortest practical connection between the two locations.
This keeps the network testable. If the service fails, you have only a few components to inspect. A sprawling first build makes it much harder to distinguish a demand problem from a stop, route, depot, or vehicle problem.
2. Place stops that actually cover demand
A station or stop is useful only when the relevant source or destination is inside its catchment area. When placing or selecting a station, inspect the highlighted coverage rather than judging the distance by eye. The game marks covered locations according to what can transfer there: blue for cargo, green for passengers, and white when both can transfer.
Passenger access has an additional condition. A building being near the edge of the displayed area is not enough by itself; passengers need a valid path that remains reasonably close to the covered area without a major detour. Roads and paths around the stop therefore matter. If a passenger stop appears close to a neighborhood but nobody uses it, inspect the actual connection between the buildings and the stop.
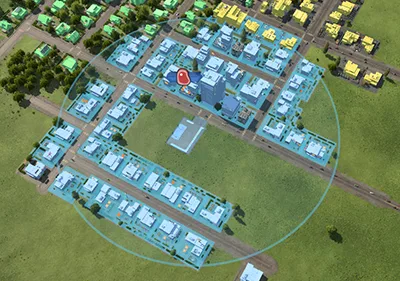
For a basic town route, place stops so that they cover distinct, useful parts of the town. For example, one stop can serve a residential area while another reaches commercial or industrial buildings. Watch the catchment highlights during placement and move the proposed stop until the intended buildings are included.
Small roadside stops can serve both passenger and cargo traffic. Stops on opposite sides of the same street section are grouped into one station. These compact stops are useful for a first road service, although their cargo loading speed is slower than that of larger road stations. You do not need an oversized station simply to prove that a short route works.
Before confirming each stop, check three things:
- The intended buildings or industry fall inside the displayed catchment.
- Passengers have a reasonable connected path to the stop.
- The stop is attached to a road that the chosen vehicle can reach.
3. Add a compatible depot and continuous route
Vehicles must come from a depot for their transport mode. For a road service, place a road depot on a connected road. The depot should have a usable road connection to the network containing your stops; an isolated depot cannot support the route you have planned.
Keep the physical connection simple. Existing roads may already provide everything a first passenger line needs. If you must build a new road, confirm that it forms a continuous connection between the depot and every stop. Avoid unnecessary junctions, long diversions, or major construction until the basic service has completed a trip.
Transport Fever 3 also lets the Line Manager find the nearest compatible depot when you buy vehicles directly for a line. This is convenient, but it does not remove the need for a valid depot and connected network. If the purchase or assignment workflow does not behave as expected, confirm that an appropriate depot exists and can reach the route.
At this stage, your map should contain four functional pieces:
- A valid origin covered by a stop.
- A valid destination covered by another stop.
- A continuous path between the stops.
- A compatible depot connected to that path.
Do not add vehicles yet if any of these pieces is uncertain. Correcting coverage or connectivity first is cheaper and clearer than trying to diagnose several moving vehicles on a broken line.
4. Create the line in the correct order
Open the Line Manager and create a new line. A line is an ordered list of stops and, when needed, waypoints. Vehicles assigned to it attempt to travel from one entry to the next. After reaching the last stop, they return to the first stop in the list. A line needs more than one stop to transport passengers or cargo.
The Line Manager is divided into three working areas. The top area lists lines and depots, the middle area lists vehicles associated with the selected entries, and the bottom area shows the selected line's stops, waypoints, and overview statistics. Select one line when you want to inspect or edit its exact route.
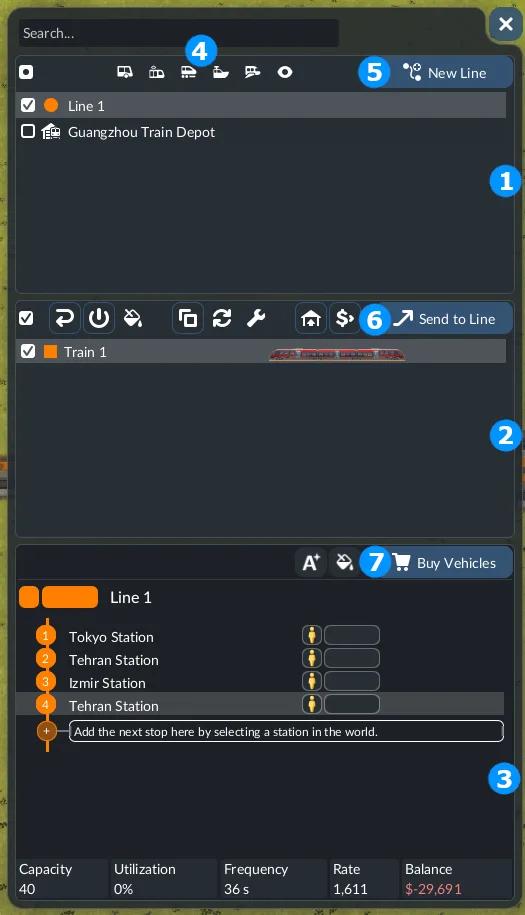
Add the origin and destination stops in the order you want the vehicle to visit them. For a simple two-stop route, the resulting service travels from the first stop to the second and then back to the first. The 3D line preview shows the path the game expects vehicles to follow, so inspect it before purchasing a fleet.

If the preview takes an unexpected road, first inspect the stop order and the available road connections. Stops can be rearranged in the Line Manager, and an additional stop is inserted after the currently selected stop or waypoint. Waypoints can guide a vehicle through a chosen location, but a straightforward first route should not need them unless the automatic path is unsuitable.
Rename the line if that helps you recognize its purpose, but naming is not required for operation. What matters is that the line contains the correct stops, that their order makes sense, and that the preview follows a connected route.
5. Buy and assign compatible vehicles
Select a vehicle that matches both the transport mode and the thing being carried. Passenger vehicles are for passenger service; cargo vehicles must support the cargo required by the route. Do not assume that every road vehicle can carry every load.
You can buy vehicles from a depot or use the Line Manager's vehicle-purchase action. When purchasing through the line, the game finds the nearest compatible depot and opens its store. Use the available filters to narrow the choices to the required passenger or cargo role, then begin with a modest amount of capacity.
After buying a vehicle, assign it to the intended line. A purchased vehicle sitting in a depot is not yet a working service. Check the selected line's vehicle list to confirm that the vehicle appears there.
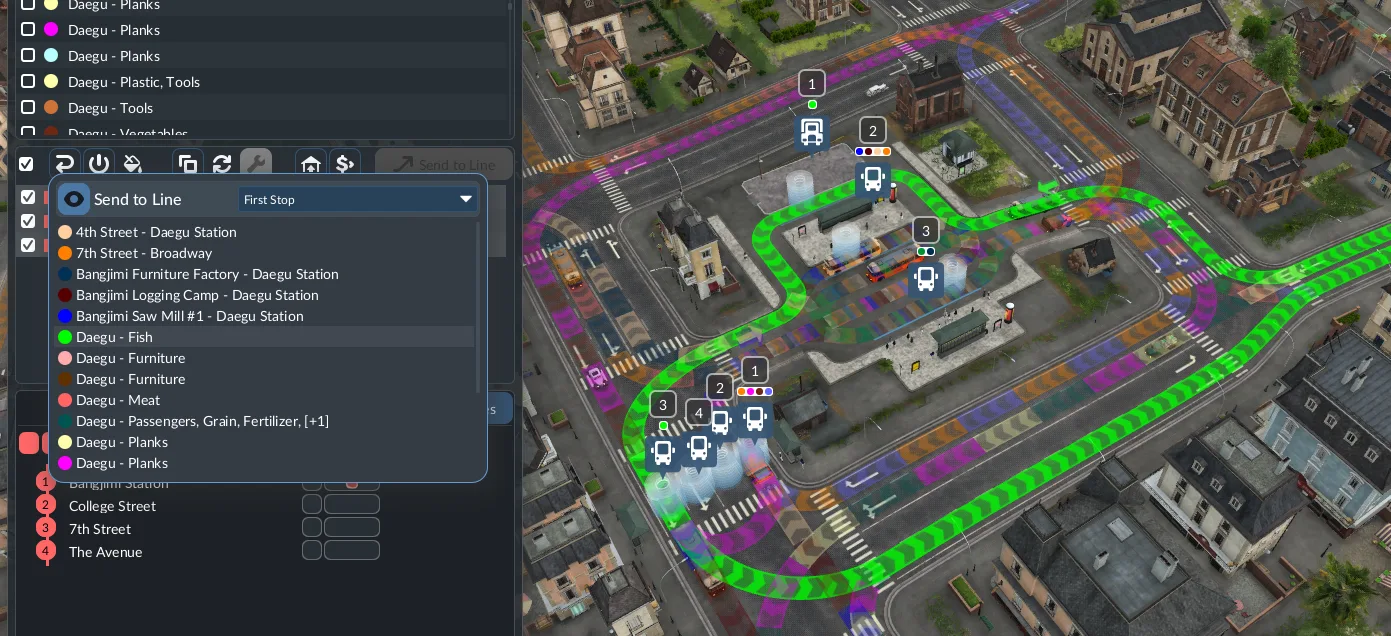
For the first test, adding many vehicles at once creates more uncertainty than value. One correctly assigned vehicle is enough to confirm the basic workflow on a small route. Once it is moving and demand begins to appear, you can use the line statistics to decide whether more capacity is justified.
Before unpausing or waiting for results, make a final assignment check:
- The vehicle appears under the correct line.
- Its mode matches the infrastructure used by the route.
- Its passenger or cargo capability matches the planned service.
- The line still contains at least two stops.
- The depot has a continuous connection to the route.
6. Observe the first complete service cycle
Follow the vehicle after assignment. It should leave its depot, join the line, and begin visiting the listed stops. Do not expand immediately just because it starts moving. Watch long enough to confirm that it reaches both ends of the route and continues through the expected stop sequence.
For a passenger service, look for passengers using the covered stops and being transported by the line. For a cargo example, verify that the correct cargo becomes available at the origin, loads onto a compatible vehicle, and reaches an accepting destination. A successful first cycle proves that demand, catchment, infrastructure, line order, vehicle compatibility, and assignment are working together.
The line details provide more useful evidence than the animation alone. The Basics area shows total capacity, the currently loaded passengers or cargo, rate, and frequency. It also displays the line's noise and pollution. The Transported section reports how many items or passengers were carried during the previous year and can show that value across a longer period. The Vehicles section lists the vehicles on the line and lets you locate them.
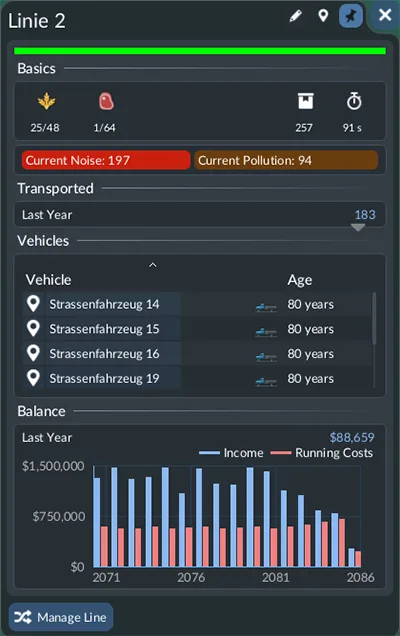
The Balance section compares running costs and income over time and reports the previous year's result. A year in which the blue bar is higher than the red bar was profitable for that line. Do not promise yourself that the first delivery will produce a lasting profit: a route can function correctly while its capacity, distance, demand, or costs still need adjustment.
Use the first completed trips to answer these questions:
- Is the vehicle visiting every intended stop?
- Are passengers or cargo entering the service?
- Is anything actually being transported?
- Does unused demand remain at a stop?
- Is the vehicle mostly empty, appropriately loaded, or overwhelmed?
- What do the line's rate, frequency, transported total, and balance show over time?
7. Diagnose a first line that does not work
When the service fails, inspect it in the same order in which it was built. Changing several parts at once can hide the real cause.
The vehicle never enters service
Confirm that the vehicle was assigned to the correct line rather than merely purchased. Check that the line appears in the Line Manager and contains more than one stop. Then verify that the depot is compatible with the vehicle and connected to the route's infrastructure.
If the vehicle appears under another line, reassign it. The middle area of the Line Manager shows vehicles associated with the selected line, and individual vehicles can be reassigned there.
The vehicle moves but carries nobody
Recheck both stop catchments. A route needs a useful origin and destination, not just two reachable stops. For passengers, verify that the buildings have reasonable paths to the stops without major detours. If both stops cover essentially the same small area, move one so the line connects different parts of the town.
Also inspect the line's loaded capacity and transported total. A vehicle driving correctly with no load usually points back to demand or access rather than a depot assignment problem.
The route follows the wrong roads
Select the line and inspect its 3D preview. Compare the visible path with the order shown in the stop list. Rearrange misplaced stops or remove an unintended entry. If a necessary road connection is absent, correct the physical network before adding complexity.
Waypoints can shape the path between stops, but use them only when the connected network offers multiple routes and the automatic choice is unsuitable. They are not a substitute for a missing road.
Cargo does not appear at a stop
Keep the diagnosis limited to the first route. Confirm that the source or destination lies within the cargo catchment, shown in blue or white. During placement, cargo icons identify the types accepted by a town district or industry. Verify that the vehicle is compatible with the required type and that the line reaches both the supplying and accepting locations.
Do not use a passenger-only demand check to validate a cargo line. Although small road stops can serve both traffic types, the source, destination, and vehicle still have to match the cargo being moved.
The service works but loses money
Operation and profitability are separate checks. First confirm that passengers or cargo are transported. Then observe the Balance chart over a meaningful period rather than reacting to the cost of a newly opened line.
If the vehicle carries little or nothing, repair demand and catchment before adding capacity. If the route works but capacity greatly exceeds use, avoid buying more vehicles. If passengers or cargo accumulate faster than the service can move them, expand cautiously and inspect the statistics again. The evidence from the line should drive the next change.
8. Expand only after the first route is proven
A proven first network has a valid origin and destination, accessible stops, a connected depot, an ordered line, compatible assigned vehicles, and visible transported passengers or cargo. Save that working pattern as your baseline before experimenting with larger stations or additional transport modes.
Make one change at a time. Add capacity when observed demand exceeds the current service. Add a stop when it connects a new useful area, not merely because there is space on the line. Build more infrastructure when the existing route demonstrates a concrete limitation.
This sequence—identify demand, build the connection, add vehicles, observe traffic, and then expand capacity—turns the first route into a repeatable method. Once you can diagnose each component independently, larger Transport Fever 3 networks become a series of understandable transport jobs instead of one opaque construction project.