
If Transport Fever 3 crashes before you reach the main menu, check hardware compatibility, graphics drivers, game-file integrity and interfering software first. A crash that occurs while loading an existing save belongs to a different branch: preserve that save, test without mods, sign out of the Mod Hub and consider rebuilding the shader cache. Record the point of failure before changing anything so each test has a clear purpose.
These checks can resolve common startup problems, but no single setting fixes every crash. An unsupported processor or operating system cannot be made compatible by changing the graphics preset. A damaged installation needs a file check, while a save-specific failure needs evidence from that save. Start with the branch that matches the failure instead of applying every suggestion together.
Identify the last successful step
Write down whether the game never opens, closes with an error, reaches the menu and then fails, or crashes only when loading a particular map. Copy the full error text when one appears. The distinction matters because reaching the menu shows a different failure boundary from immediately exiting, even though both ultimately return you to the desktop.
Use the same launch method and the same action for your first comparison. If the crash is reproducible, change one relevant condition, then repeat the action. Avoid simultaneously replacing drivers, resetting settings and removing mods: a successful restart after those changes would leave you unable to identify which condition mattered.
| Failure point | First investigation | Useful evidence |
|---|---|---|
| No menu, immediate exit | Requirements, drivers and installation | Error text and startup log |
| Menu works, new map crashes | Loading conditions, mods and shader cache | Exact map setup and crash files |
| Only one save crashes | Save-specific dependencies and loading log | Preserved save and reproduction steps |
| Black screen with a running process | Display mode and selected GPU | Recent display change and device log |
| Gameplay becomes slow without closing | Performance bottleneck | CPU, GPU and memory usage |
A low frame rate is not itself a crash. Keep performance tuning separate until the application starts reliably. Similarly, a running game window that has moved off-screen should be recovered as a display problem before you reinstall files or assume the application has stopped.
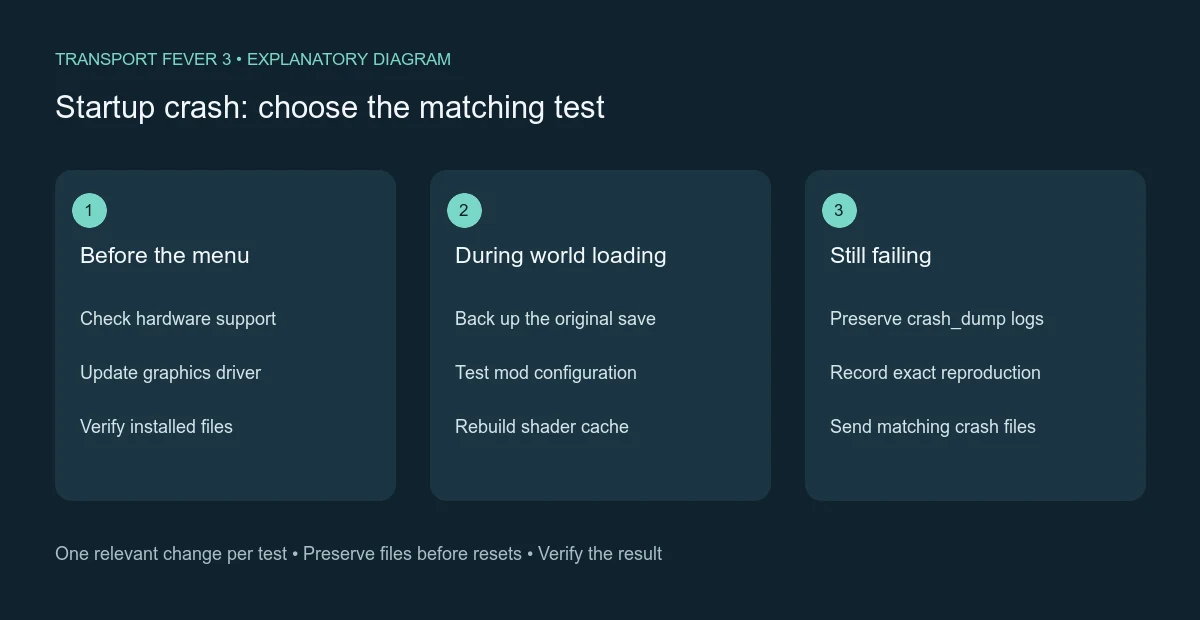
Diagnostic diagram: startup failures and world-loading crashes use different checks.
Check the requirements that prevent startup
Transport Fever 3 requires a supported 64-bit operating system. On Windows and Linux PCs, older processors without AVX2 support cannot run the game. The Mac version requires Apple Silicon; Intel Macs are not supported. Check those conditions before spending time on changes that cannot remove a hardware limitation.
Read the processor model rather than judging the machine solely by its age, price or the performance of another game. The relevant question is whether this computer satisfies the game's requirements. A powerful-looking GPU does not compensate for a missing processor instruction set, and a driver update does not turn an Intel Mac into an Apple Silicon system.
Compare the rest of your hardware with the minimum requirements for the game. Record the CPU, graphics card and installed RAM for the support report if startup remains unsuccessful. On a laptop with multiple graphics devices, record both devices; the existence of a dedicated GPU does not prove that the game selected it.
Stop this branch when you identify an unsupported system. Keep the error and hardware details so you can make a useful compatibility decision. Do not treat repeated crashes on unsupported hardware as evidence that an unrelated mod, save or display option is the cause.
Update the graphics driver and verify the selected GPU
Install a current graphics driver from the appropriate graphics vendor. A clean driver reinstallation may be necessary when a normal update does not resolve a driver-related startup problem, but it is a more involved step than simply checking the installed version. Follow the vendor's installation process and restart when required before testing the game again.
Make the next test specific: launch the game through the same store client and see whether it reaches the main menu. Record whether the error disappeared, changed or remained identical. A changed error is useful evidence even when the game still fails; it helps distinguish the original problem from the next failure boundary.
On a system with integrated and dedicated graphics, inspect stdout.txt inside the user-data crash_dump folder. Find the entry containing “Selected device” and compare its number with the graphics devices listed above it. This is a direct check of the renderer's choice rather than a guess based on where the monitor cable is connected.
On Windows, the preferred GPU can be configured under Settings, System, Display, Graphics. The NVIDIA or AMD software may also offer device preferences. Configure Transport Fever 3 for the intended dedicated device, then repeat the launch and check the new log. Preserve the old log before restarting because stdout.txt is reset at each game start.
Verify the installed game files through your store
A verification checks the installed game data. It is useful when files are missing or damaged, but it does not make a save's missing mod available and does not reset every user setting. Choose the method for the store that actually owns your installation.
For Steam, open the game's Properties from the Library and use the game-file verification option. Allow the verification to complete before launching again. For Epic Games, open the game's library options through the three-dot menu and choose Verify. For GOG Galaxy, use Manage Installation and Verify / Repair.
A GOG offline installation can also be repaired with the installer from your GOG library. The installer detects an existing installation and reinstalls the game files while retaining save games and settings. Keep a separate copy of your user data anyway before undertaking larger repairs; the installed game folder and the saved world are different sets of files.
After verification, launch with the same baseline conditions used before it. If the menu now appears, the next task is to check the operation that previously failed, such as creating a map. Do not immediately add several mods or change display settings, because those changes would obscure the value of the clean installation comparison.
Reinstalling the application is not a guaranteed reset of its settings. User-specific display and other settings are stored outside the installation folder. If a graphics-setting change preceded the failure, investigate that file separately instead of repeating downloads that leave the same problematic configuration in place.
Isolate overlays and background software
Third-party overlays, monitoring tools, recording software and security software can interfere with startup. Relevant examples include OBS Studio and RivaTuner. Close an interfering application for a controlled test, then repeat the launch without changing the saved world or graphics configuration at the same time.
Keep the test reversible. Record which program was active and which one you closed. If the game starts, reintroduce software individually only when needed, checking the result after each change. That makes the outcome useful: you can identify a particular conflict rather than permanently abandoning every background application without knowing why.
If security software is involved, inspect its messages and quarantine history rather than assuming every failure is a false alarm. Use the security application's supported controls for the test. Do not download an unofficial executable or replace game files with a claimed crash fix simply because an unrelated video recommends it.
When closing an overlay does not change the failure, restore the ordinary configuration and continue with the next relevant branch. A negative test still reduces uncertainty if the baseline remained consistent. Keep that result in the support notes so you do not repeat the same unsuccessful check later.
Use the loading branch only when startup succeeds
If the menu opens and the crash happens while loading a save or creating a new game, test that loading operation separately. Preserve the existing save before changing its mod configuration. Disable mods for the diagnostic attempt, sign out of the Mod Hub and restart the game before trying again.
If a modded world loads only with a different configuration, do not immediately save it over the original. The purpose of the first attempt is to identify a dependency or conflict. Keep the original world available while you investigate which content is required and which change makes loading possible.
Rebuilding the shader cache is another documented troubleshooting option for loading crashes, broken rendering and startup failures. Close the game first, locate shader_cache inside the correct user-data folder and remove that cache rather than deleting the entire folder tree. The cache and your save directory serve different purposes.
A fresh world that loads successfully while one old save crashes narrows the problem to that save or its dependencies. It does not establish that the save is permanently corrupted. Preserve both the successful test conditions and the failing file before moving to the dedicated save-loading workflow.
Reset settings only when the evidence points there
The game stores user-specific options in settings.lua. With the game closed, backing up that file and removing the active copy resets the settings. This is relevant when startup or rendering failed after a configuration change, or when the settings menu itself cannot be used.
A settings reset is different from deleting keybindings, campaign progress or saved worlds. settings_keys_v3.lua stores key mappings, while profile.lua stores profile information such as campaign progress. Do not remove those files as part of a display reset. Identify the named target before making any change.
After the reset, test startup with the regenerated configuration before restoring your preferences. Reapply necessary settings gradually, particularly the one that preceded the crash. If the original failure returns after one specific change, that sequence is more useful for support than a report that the game “sometimes works.”
Collect a support report that can be investigated
Open the user-data folder from Advanced settings when the menu is accessible, then find crash_dump. If you cannot reach the menu, locate the store-specific user-data directory through the file-location guide. Preserve the latest relevant crash files before another launch overwrites the active startup log.
Crash evidence can include machine-readable .dmp data, .json hardware and settings metadata, and .txt log events. Not every crash produces all three types. Send the latest available set with the same base name rather than combining unrelated files from several attempts.
Include the CPU, GPU and RAM, the exact error, the last successful step, the action that triggers the crash and the tests already completed. Add the last save before the problem when available. On Linux or Mac, launching from a terminal can also reveal missing-library messages or other startup errors.
For Linux, verify that Vulkan is installed correctly and compare with another application that uses Vulkan. Record that result alongside terminal output. A useful report preserves what actually happened; it does not label an unproven driver, mod or save as the cause. Once the relevant evidence is saved, contact support with the reproducible sequence instead of continuing broad resets without a new reason.