

Transport Fever 3 photo mode is handled through its advanced Camera Tool. On desktop, open Settings, Advanced and enable Enable Advanced Camera Tool. The game also offers a free camera and a normal Take Screenshot action, whose default PC key is F9. Choose the tool that matches the result you want: a quick current-view image or a deliberately positioned capture and camera sequence.
Camera Tool controls include capturing a frame, adding keyframes, playing a sequence and starting a recording. The camera output directories are inside user data: screenshots, recordings and keyframes. Use Open User Data Folder in Advanced settings to find the active location instead of searching the installation directory for your pictures.
Choose a quick screenshot or a camera-tool session
For a quick record of the current view, use the Take Screenshot action. Its default keyboard mapping is F9, but check the actual mapping if you have customized controls. This is useful when you want to record a construction state or preserve a view without first planning a moving-camera sequence.
The advanced Camera Tool is better suited to a deliberate capture session. Enable it before looking for its controls, then inspect the Camera Tool entries in the Keyboard settings. These entries are separate from the normal game's quick-save and screenshot actions, even when some keys are reused in different contexts.
A free camera allows movement through the world without the ordinary restrictions. The Use Free Camera action has no fixed default key listed, so assign or inspect its binding rather than assuming a universal opening shortcut. Normal camera movement and Camera Tool playback are different sets of actions.
| Goal | Starting choice | Result to inspect |
|---|---|---|
| Record the current perspective quickly | Take Screenshot | The captured current view |
| Position a deliberate image | Enable Advanced Camera Tool | Subject framing and the capture output |
| Plan a moving view | Camera Tool keyframes | The camera path before recording |
| Find saved output | Open User Data Folder | Screenshots, recordings or keyframe data |
Do not interpret an action key outside its context. Return is listed for both Camera Tool Capture and Start Recording; what it does depends on the active tool operation. It is not a universal instruction to record video whenever you press Return during normal gameplay.
Enable the tool and check your input mapping
Open Settings from the main menu or the pause menu and switch to Advanced. Enable Advanced Camera Tool activates the tool. On consoles, not every advanced option is available, so use the controls shown by the current platform rather than assuming the desktop interface is reproduced exactly.
On PC, open the Keyboard tab and inspect the relevant actions before capturing. Most mappings can be changed. The default mappings are a starting point, not a guarantee that a customized setup uses the same keys.
- Enable the advanced Camera Tool in Advanced settings.
- Check the camera and Camera Tool actions in the input settings.
- Enter the desired camera context and frame the subject.
- Confirm which operation is active before using Capture or Start Recording.
- Make a small test capture or short sequence.
- Open the output directory and inspect the actual result.
This initial test prevents a long capture session from ending with files you cannot locate or a sequence that frames the wrong subject. Confirm the complete path from the tool action to the saved output before spending time on a more elaborate shot.
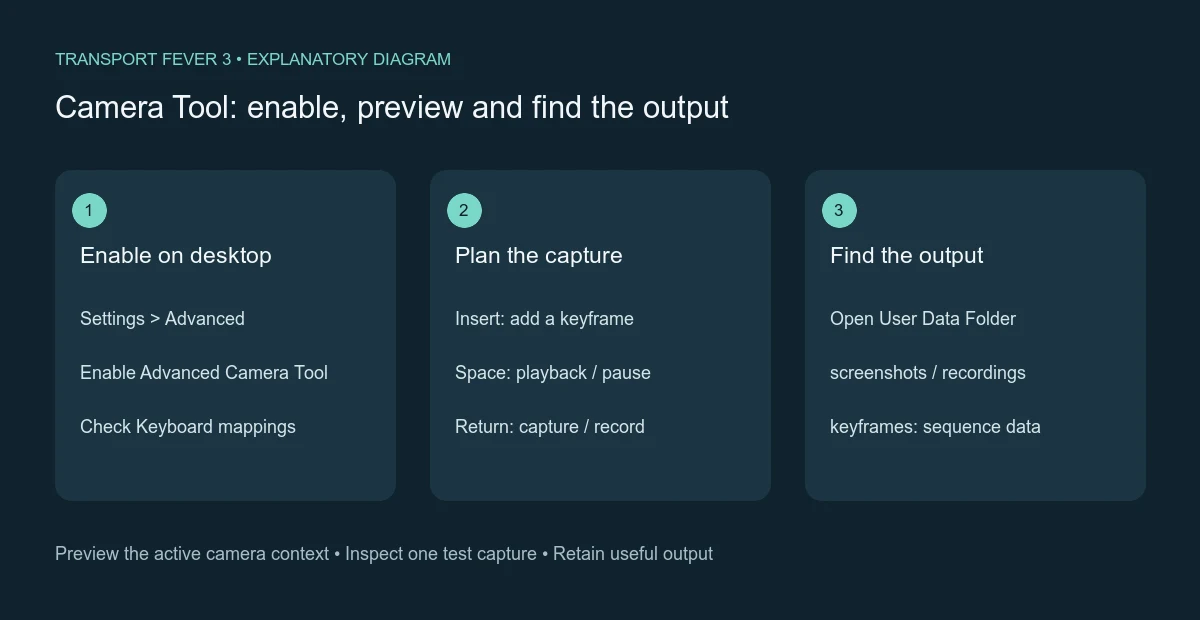
Camera workflow diagram: the active tool context determines the capture action.
Position the view before adjusting its detail
For the normal camera, W, A, S and D move the view. Q and E rotate it, R and F change its tilt, and the zoom actions are mapped to X and Y in the keyboard table. Check the mapping on your keyboard layout and use the on-screen response to confirm the direction.
The normal mouse controls include dragging with the right button to move the view, holding the middle button to rotate and tilt, and rolling the wheel to zoom. These describe the ordinary camera. Do not assume that every mouse gesture has an identical effect in a different camera context.
Frame the subject around the information the picture should show. A station layout may need a higher angle to reveal its connections, while a vehicle portrait may need a lower view that makes the vehicle itself readable. These are composition choices rather than additional game mechanics.
Inspect the edges as well as the center. A picture can contain the intended train but cut off the platform or approach that explains the layout. Move or rotate the camera until the relationships you want to show are visible, then use zoom to refine the framing instead of relying on zoom alone to fix the viewpoint.
Use stable camera movement for repeatable framing
Camera controls can be adjusted in the input settings. Keyboard Camera Movement Speed changes sensitivity for keyboard movement. Mouse settings include wheel sensitivity, inverted panning, rotation, tilt and zoom, so a reversed gesture can be a configured preference rather than a broken camera.
If movement feels inconsistent, inspect those settings before repeatedly correcting the view. A lower or otherwise suitable movement speed can make small framing changes easier. The purpose is controlled positioning, not a particular sensitivity value that should be copied to every computer.
Cursor-based zoom options change whether the camera zooms toward the pointer or the center of the screen. Check which behavior is enabled when a close-up moves away from the subject you expected. Keep the cursor in a deliberate place while testing the view.
For repeatable comparisons, preserve the same composition as far as practical. If you are documenting a station change, use a comparable angle and distance before and after it. A large viewpoint change can hide the very difference the pictures are meant to explain.
Capture and inspect one still image first
The Camera Tool Capture action has Return as its listed default. Use it in the relevant capture context after checking your mapping. Begin with one image so you can confirm framing and find the file before taking a series of similar pictures.
Inspect the resulting image outside the capture view. Check that the subject is identifiable, that important connections are not hidden and that the image shows the state you intended. The view on screen and the saved result are separate checkpoints, so do not infer the final output merely from a successful key press.
If you are taking an instructional image, retain the information needed to understand the action. A close view of a vehicle is useful for identification, while a route explanation may need the surrounding junction or station. Avoid framing a scenic view so tightly that the operational relationship disappears.
Take another frame only when the change serves a purpose: a clearer angle, a different step or a distinct comparison. A large group of almost identical images makes the useful result harder to identify. Name or organize your retained output around the scene or operation it documents.
Plan a short keyframe sequence
A camera sequence needs a beginning, a route through the scene and a clear ending. Plan those viewpoints before building a long path. A short sequence is easier to inspect and correct than a tour that combines several unrelated subjects.
The current keyboard mappings include Camera Tool Add Key Frame on Insert, Clear Key Frames on Home, Stop on Backspace and Toggle Play/Pause on Space. Play, Pause and other actions can be inspected or remapped in the same input settings.
| Camera Tool action | Listed default | Use in the active tool context |
|---|---|---|
| Add Key Frame | Insert | Preserve a point in the planned sequence |
| Clear Key Frames | Home | Remove the existing keyframe list |
| Stop | Backspace | Stop sequence playback |
| Toggle Play/Pause | Space | Inspect motion without continuously recording |
| Start Recording | Return | Begin the selected recording operation |
| Capture | Return | Capture in the selected still-image operation |
Add the viewpoints that explain the scene, then preview the path before recording it. Inspect the space between viewpoints as well as the keyframes themselves. A beginning and end can both look good while the intervening movement passes behind a structure or loses the main subject.
Do not clear the keyframe list merely to pause playback. Home and Space are different actions. Check the active context and the intended operation before using a destructive list action, especially when you want to retain the sequence for another recording.
Preview before starting the recording
Use playback to inspect whether the camera keeps the subject visible along the planned route. Pause where the framing needs attention, then adjust the sequence before starting a full recording. The preview is an opportunity to detect an awkward transition without filling the output directory with repeated unsuccessful captures.
Keep the first recording short enough to inspect comfortably. Check that it begins with a useful view and ends where you intended. A sequence that technically records but spends most of its time looking away from the scene does not meet the purpose of a camera tour.
Separate camera motion from the simulation state when planning the result. Ordinary gameplay can be paused or run at the available speed settings. If the image needs a particular vehicle position, choose that state deliberately instead of assuming the camera tool will arrange the world for you.
The recording action produces camera output, but do not assume that the output is already an encoded video in a particular file format. Inspect the files actually created in the recording directory. Organize them before any separate editing or conversion step, and retain the sequence data if you want to reuse its camera path.
Find screenshots, recordings and keyframes
Open Settings, Advanced, Open User Data Folder. This is the active directory for the running installation and avoids guessing the Steam account number or an operating-system username. Camera-related output uses three distinct directories beneath that root.
screenshots holds camera screenshots, recordings holds recording output and keyframes holds camera sequence configurations. Look in the directory matching the operation you performed. A keyframe configuration is not the captured picture, and the recording directory is not the ordinary saved-world directory.
Check the newest relevant files after a small test. If you cannot find the expected output, confirm that you used the intended action in the active camera context and that you opened the active installation's user data. Searching another store's folder can produce an empty result even though the capture was created elsewhere.
Keep capture output separate from troubleshooting cleanup. shader_cache, saved worlds and camera output have different purposes. A display or cache reset should target the relevant file or directory, while a camera backup should preserve the images and sequences you want to retain.
Keep the capture reliable on a busy world
If the game becomes slow while framing a large network, distinguish rendering load from simulation load. The Graphics settings offer presets, resolution scale and display resolution. Lowering those can reduce rendering demands, but it does not necessarily resolve a CPU-limited simulation on a highly developed map.
For a still image, pause the simulation when that suits the result and check the view again. Low frame rate while paused points toward rendering rather than world progression. Inspect hardware usage if you need to understand the bottleneck instead of assuming every slow camera movement is caused by the same setting.
Finish the session by checking the actual files and keeping only the useful captures. A successful workflow has a visible subject, an intentional viewpoint, a saved output you can locate and, for a sequence, a path you have previewed. Those checks matter more than copying an unverified preset or a fixed lens value from another version's interface.