

Transport Fever 3 tunnels are proposed when a road or track is sufficiently below the terrain. Select the construction type, lower its height or control the incline, and inspect the underground proposal before confirming. Use Underground Mode from the construction panel, or the default G shortcut on PC, to see the underground network and work on its connections.
Underground Mode also changes snapping: new roads and tracks do not snap to above-ground infrastructure while the mode is active. Turn it off when connecting back to a surface segment. A tunnel that looks correct beneath a hill still needs usable portals, valid gradients and the intended connections at both ends.
Plan the entrances before digging the central section
Choose the two places the tunnel must join to the existing network. Those connections determine whether the route is useful, not merely the shortest distance through the mountain. A central underground span can fit while an entrance requires an unsuitable bend or an approach that is too steep for rail.
Inspect the terrain and leave room for the approaches. Tracks have a minimum curve radius and cannot use slopes as steep as roads. A road tunnel proposal therefore does not prove that a railway can follow the same alignment. The relevant geometry depends on the selected infrastructure.
The track preview displays speed restrictions caused by curves. Read the entrance and exit curves as part of the proposal. Moving the tunnel closer to the station may shorten the line while introducing a restrictive bend, so compare the complete connection rather than the length of the hidden section alone.
| Planning check | Road tunnel | Railway tunnel |
|---|---|---|
| End connections | Join the intended road network | Join the intended tracks |
| Gradient | Use the road's construction constraints | Rail cannot be as steep as road |
| Curvature | Select the relevant road building mode | Inspect rail curve restrictions |
| Depth | Affects the tunnel proposal and cost | Affects the tunnel proposal and cost |
| Surface connection | Disable Underground Mode when needed | Disable Underground Mode when needed |
Do not begin by altering the whole hillside. First see whether the construction controls can make a valid route through the existing terrain. Landscaping and tunnel construction are different tools, and substantial terrain changes can be unnecessary when the desired connection already fits underground.
Understand height offset and fixed incline
Height Offset controls the construction level relative to the ground. Changing height before placing the first point also lets you control the start height. Fixed Incline controls the slope of the proposed segment instead. Choose according to whether the problem is its level or its gradient.
A tunnel appears only after the proposal is far enough below the surface. Lowering a segment slightly is not a guarantee that the tool will create the structure you expect. Inspect the visible proposal and its portals as you adjust it; that feedback is more reliable than counting a remembered number of key presses.
The construction controls can also bend a road vertically. That allows a short underpass rather than requiring every underground connection to be a long, uniformly sloping tunnel. Use the bend only when its preview creates the intended shape and leaves both ends usable.
Terrain following changes how the proposed construction reacts to the surface. A route that follows the hillside and a route that holds a chosen incline can produce very different amounts of tunneling. Compare their actual previews and displayed costs rather than assuming one setting is always best.
Build a road tunnel with a readable proposal
Open Roads and choose the street type. Select straight or curved building mode in the side panel. Straight mode connects the chosen points directly subject to the tool's connection behavior; curved mode establishes a direction before the end point. Pick the mode that gives the entrances the alignment you need.
- Select the street type and building mode.
- Set the start height if the entrance must begin below the surface.
- Place the first point and extend toward the destination.
- Adjust height, incline or vertical bend until the proposal enters the terrain.
- Select the tunnel model in the left options panel.
- Inspect the underground section, portals and both connections.
- Check cost and any demolition warnings before confirming.
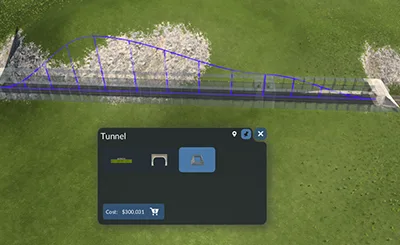
Inspect the portal shape and model choices alongside the underground road.
The ordinary construction mode can build when the end point is placed. If you want an additional opportunity to inspect and reposition the proposal, enable Drag-and-Confirm Construction Mode in Advanced settings first. Decide how confirmation works before treating every placement as an uncommitted preview.
Watch for buildings highlighted in yellow and a demolition warning. The tunnel may avoid surface obstacles along its central span while its entrances or approaches still affect existing structures. Cancel an unsuitable proposal instead of accepting the central tunnel and trying to solve the damage afterward.
Keep the road's connections visible while adjusting its depth. A lower underground section is only useful if vehicles can enter and leave it. Finish the alignment before adding unrelated road changes, so any connection problem remains easy to locate.
Use Underground Mode at the right stage
Enable Underground Mode from the left construction panel when building a road or track, or use G with the default PC mapping. It lets you see existing tunnels and interact with them more easily. Use it to check the hidden route and select the actual underground segment you intend to work on.
While it is active, newly built infrastructure does not snap to roads and tracks above ground. If the construction refuses to join an obvious surface end, check this mode before redrawing the network. Turning Underground Mode off restores the opportunity to snap to the surface infrastructure.
You can change the mode during construction. That makes it possible to inspect the underground span and then return to the surface connection without treating the two views as separate building tasks. Select the view that exposes the point you are currently trying to align.
A visible crossing beneath the surface is not automatically a junction. Inspect which segment the proposal joins and whether the connection is valid. For rail, a crossing at a steep angle can be a crossing rather than a switch, so visual overlap does not guarantee that a train can change tracks there.
Build a railway tunnel around rail limits
Open Tracks and select the required track type. The rail tool creates arcs and smooth transitions rather than separate straight and curved road modes. The direction in which you extend the track influences the shape, and existing ends can snap together at suitable angles.
Lower the construction height before placing the first point when the tunnel should start underground. Alternatively, establish the approach and adjust its incline until it enters the hill. Watch the contour lines and the track preview so you understand how the route meets the terrain.
Rail gradients are more restrictive than road gradients. If the tunnel will not fit, revise the approach length or alignment rather than copying a valid road slope. The track's minimum curve radius is another independent limit; a sufficiently deep tunnel can still have an unsuitable entrance curve.
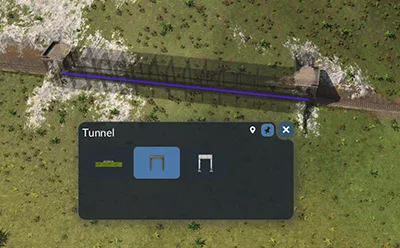
The model selector changes the structure; approach geometry still needs its own check.
Inspect the displayed speed restrictions through the approaches. A straight central tunnel does not remove a sharp curve just outside it. Use the proposal's values to identify the constraint before extending more track, because changing the tunnel model alone will not redraw that curve.
Tunnels can be curved and partial, and railway tunnels can contain switches and signals. Use those capabilities only when the intended layout is clear. This page addresses construction and physical connections; signal placement and train priority need their own operational checks after the route exists.
Use Drag-and-Confirm for deliberate adjustments
Drag-and-Confirm leaves the proposal available for inspection before the final build. You can move the end point and select manual incline control from the slope indicator. Shift gives smaller adjustment increments for finer control, and selecting the indicator again returns to automatic alignment.
Manual slope control can stop the tool automatically adjusting the end back toward the ground. This is useful when you want the construction to remain underground. It does not remove the geometry limits of the street or track type, so the preview must still form a valid segment.
Select a tunnel model for the whole proposal from the left panel. In Drag-and-Confirm, the icon above a particular structural section also lets you choose a model for that section before finishing. Confirm which section is selected rather than assuming every change applies only to the tunnel nearest the pointer.
Complete the build only after the underground section and the return to the surface are correct. Cancel when an adjustment produces the wrong geometry. The extra confirmation stage is valuable because it gives you time to review consequences, not because it guarantees a valid transport route by itself.
Compare the cost of the complete connection
Construction cost combines the chosen road or track cost per meter, tunnel depth and relevant upgrades such as railway catenary. There is no single universal price for tunneling through a mountain. A deeper or differently aligned proposal can change the price even when the tunnel model has the same name.
Compare an underground shortcut with a route around the terrain using the displayed proposals. The shorter line may require more expensive tunnel work, while the longer route may introduce additional curves. The useful comparison includes entrances, approaches and the final connections rather than only the central span.
Avoid fixing a budget problem by lowering an entire route without inspecting its depth. The tunnel component depends on how far below the terrain the proposal sits. A visually direct connection can therefore have a different construction cost from a shallower route nearby.
Once the corridor is built, separate construction cost from later operating questions. The tunnel's existence does not prove that the assigned vehicle or line uses it. Check the line preview after completing the physical network so you can verify the route that services will actually take.
Change a railway tunnel model without demolition
An existing railway tunnel model can be replaced without first demolishing the structure. Select the tunnel, choose the new model in its selection window and read the cost on the Replace For button before confirming. The model is replaced directly on the existing structure.
Use replacement when the tunnel's alignment is already correct and the model is what you want to change. It does not relocate portals, redraw a curve or create a missing junction. Those are physical layout problems and need construction changes instead.
Replacement cost depends on the existing structure's length and depth together with the selected new model. Read the actual quoted value. A remembered price from another world is not a reliable cost for this tunnel.
After building or replacing, inspect both portals, the underground connection and the adjacent infrastructure. Toggle the underground view as needed, then inspect the intended line's 3D route. If it still takes another path, confirm the connectivity before adding routing waypoints. A waypoint can select a reachable route, but it cannot repair disconnected infrastructure.