
Transport Fever 3 cargo chains can deliver a basic cargo directly or carry materials through processing industries before reaching a town’s demand. A working chain therefore needs more than a connection to a factory: every required input must reach the correct producer, the finished cargo must have a valid destination, and each transport leg must use a suitable vehicle configured for that cargo.
The safest way to build a chain is backward. Start with a product that a town currently demands, identify the industry that produces it, inspect that industry's required inputs, and repeat until you reach raw-material producers. Then connect the stages from the raw end toward the town and verify each stock before expanding capacity.
The examples below are selective. They cover production paths without assuming that every cargo or industry is available on every map. A cargo’s production role and its town destination are separate properties: some materials or booster products can also be demanded by towns.
Read a cargo chain from the destination backward
A cargo chain is easier to understand when each cargo is treated according to its role.
| Cargo role | Where it comes from | Where it goes | Planning consequence |
|---|---|---|---|
| Raw material | Primary production; inspect its required inputs rather than inferring them from the raw-cargo label | A processing industry or a town that demands it | Some sources can produce without cargo inputs, while others need an upstream supply. |
| Intermediate product | An industry that consumes one or more inputs | Another processing industry | The chain stops if any required input is missing. |
| Booster product | A separate producer | A raw-material industry that can use it | A booster can increase production, but it is not the basic path that turns an input into an end product. |
| End product | Its producing industry | An industrial or commercial district that demands it | Confirm the relevant town demand; not every town-bound cargo is classified as an End Product. |
Town requirements change as settlements grow, and not every cargo type is present in every climate. Do not design a large upstream network around a cargo merely because its producer exists somewhere on the map. First confirm that a reachable town currently requests the product.
Start with current town demand
Select the town and inspect the cargo it currently wants. Town-bound cargo is delivered to either commercial or industrial districts according to the requested type. For example, books, canned food, and clothes go to commercial districts, while furniture, cement, tools, and vehicles go to industrial districts.
Choose one requested product and treat the receiving district as the final node. This prevents a common planning mistake: constructing several productive factory legs without establishing where the final output should be delivered.
Town growth can introduce additional and more complex requirements later. That means a valid early network may cover only a short chain, while later demand can justify products with several processing stages. Build for the demand visible now and leave physical room for later connections instead of assuming every product will be needed immediately.
Inspect input and output stocks
Open the relevant industry and expand its Input Stocks and Output Stocks. These sections show stored quantities and their upper limits. They also identify potential sources or destinations for the selected cargo, while symbolic links in the game world visualize those relationships. Active relationships are animated; unused possibilities remain static.
Use this information in both directions:
- Expand an input stock to find industries that can supply the missing material.
- Expand an output stock to find industries or destinations that can consume the product.
- Follow the links backward until every processed input ends at a raw-material producer.
- Follow the final output forward until it reaches a district that currently demands it.
The displayed relationship is a planning lead, not proof that cargo is already moving. You still need a line, an appropriate pickup point, a suitable vehicle, and the correct cargo configuration for each leg.
Build a working cargo chain
Once the complete path is visible, connect it in a controlled order.
- Choose the demanded cargo. Begin at a town's current industrial or commercial demand rather than at an arbitrary raw producer.
- Identify the final producer. Inspect its production rule and record every required input. Do not substitute a similarly named cargo or assume that one input is optional unless the rule explicitly presents an alternative.
- Trace every required input upstream. Expand the input stocks and locate potential suppliers. If a supplier also needs processed materials, continue tracing backward.
- Confirm map and climate availability. Some industries are climate-specific. The Paper Mill and Printing Press, for example, appear only in the subarctic climate.
- Connect the raw-material legs first. Begin with producers that do not require incoming cargo. A raw-cargo classification alone does not prove that its producer is input-free; check the production rule.
- Connect each processing stage. Deliver all materials shown by the production rule, then provide a configured outbound line for the resulting cargo.
- Complete the town delivery. The final line must reach the appropriate district for a product the town currently requests.
- Observe stocks before adding vehicles. Confirm that inputs are being consumed and outputs are appearing. Extra vehicles cannot repair a missing supplier or destination.
- Scale the constrained leg. Use the industry's recent consumption, production, stock limits, and theoretical annual maximum to identify the actual bottleneck.
Cargo remains at the producing industry until a suitable vehicle collects it on a line configured for that cargo at or near the industry. If output is not collected and the stock reaches its limit, production continues, but excess cargo is destroyed. A factory that appears productive can therefore still waste output when its pickup capacity is too low.
Selective cargo-chain recipes
The following production paths use the displayed production rules. They are planning examples rather than a complete industry database. Tools remains a booster product even though it can also serve industrial town demand; this table groups cargo by its destination, not by the official End Product classification.
| Town-bound cargo | Production path | Final destination |
|---|---|---|
| Cement | Stone → 4 Stone → 2 Cement | Industrial District |
| Furniture | Logs → 4 Logs → 4 Sawdust + 8 Planks; Sand → 4 Sand → 2 Glass; then 4 Planks + 1 Glass → 2 Furniture | Industrial District |
| Canned Food | Iron Ore and Coal → 6 Iron Ore + 6 Coal → 4 Sheet Metal + 3 Steel; then 2 Fish or 2 Meat + 1 Sheet Metal → 2 Canned Food | Commercial District |
| Clothes | Wool → 4 Wool → 4 Fabric; Chemicals → 6 Chemicals → 2 Dyes + 5 Plastic; then 4 Fabric + 2 Dyes → 3 Clothes | Commercial District |
| Tools | Logs → 4 Logs → 4 Sawdust + 8 Planks; Chemicals → 6 Chemicals → 2 Dyes + 5 Plastic; then 4 Planks + 2 Plastic → 5 Tools | Industrial District |
| Vehicles | Iron Ore and Coal → 6 Iron Ore + 6 Coal → 4 Sheet Metal + 3 Steel; Chemicals → 6 Chemicals → 2 Dyes + 5 Plastic; then 7 Steel + 4 Plastic → 7 Machines; Rubber → 4 Rubber → 2 Tires; finally 1 Tire + 4 Sheet Metal + 1 Machine → 1 Vehicle | Industrial District |
| Books | Logs → 4 Logs → 4 Sawdust + 8 Planks; then 4 Sawdust → 2 Paper; Chemicals → 6 Chemicals → 2 Dyes + 5 Plastic; finally 4 Paper + 2 Dyes → 4 Books | Commercial District |
A displayed recipe is a conversion rule, not a guaranteed annual output. Plot-based producers such as mines and logging camps are affected by their surrounding plots, and a well-served raw industry can expand by adding plots around itself. Blocking that surrounding area or removing existing plots can restrict or reduce production.
This distinction matters when estimating capacity. For example, the Saw Mill recipe tells you how logs are converted into planks and sawdust, but it does not prove that one Logging Camp will continuously provide enough logs for every downstream factory. Observe the actual annual figures and stocks on the current map before duplicating routes or buying a large fleet.
Match transport legs to cargo specialization
Different parts of one chain can require different cargo specializations. Cargo in the supported examples includes Bulk, Liquid, Goods, and Flatbed types. Cement is Bulk, chemicals are Liquid, clothes and tools are Goods, and vehicles are Flatbed cargo.
Treat each leg independently. A vehicle appropriate for the finished product may not be appropriate for its upstream material. The vehicle collecting vehicles from a Vehicle Factory does not establish that the same equipment can carry coal, chemicals, rubber, or tires on the preceding legs.
For every line, verify these four points:
- The vehicle can carry the selected cargo type.
- The line is configured to pick up that cargo.
- The pickup stop is at or near the producing industry.
- The next stop serves a valid consumer for that cargo.
Specialized vehicles and station facilities can improve efficiency when they match the cargo, but specialization should follow a working chain. First prove that cargo can move from source to consumer; then invest in faster loading or more specialized infrastructure where the observed flow justifies it.
Use the industry window to confirm production
The Production section of the industry window shows the active production rule. It also reports cargo consumed and produced during the last 365 days and the theoretical maximum per year. Input Stocks and Output Stocks then show whether material is waiting on either side of that rule.
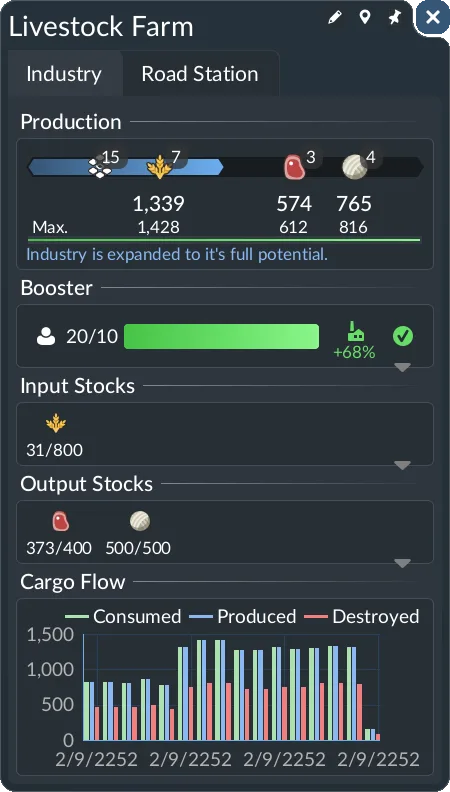
Read those sections together rather than relying on vehicles alone:
- No upstream output: inspect the raw producer, its available plots, and whether output is accumulating there.
- Input stock remains empty: verify that the correct cargo reaches the industry's pickup area and that the line actually unloads at this consumer.
- One required input accumulates while another is absent: repair the missing input leg before increasing deliveries of the material already in stock.
- Inputs are consumed and output rises: the production rule is operating; move attention to the outbound line.
- Output stock keeps approaching its limit: increase pickup throughput or remove a downstream blockage before more cargo is destroyed.
- Output is collected but final delivery does not satisfy the town: confirm that the destination district currently demands that exact cargo.
The Cargo Flow chart reveals destroyed excess cargo, while the cargo layer provides a broader view of yearly supply and demand across the map. Use the industry window for one factory and the cargo layer for network-level comparisons.
Balance a multi-stage chain
Do not turn recipe numbers into a fixed promise about map-wide throughput. Several conditions can change what a chain actually supplies: available raw-industry plots, present stock, transport capacity, collection frequency, downstream consumption, climate, and the industries generated on the map.
A practical balancing pass follows the cargo itself:
- Check the final factory's output stock and recent production.
- If final output is scarce, inspect every required input stock.
- Follow the empty or declining input to its immediate supplier.
- Check whether that supplier lacks materials, lacks pickup capacity, or has reached an output-stock limit.
- Continue upstream until the first constrained stage is found.
- Improve only that stage, then watch the next production cycle before expanding elsewhere.
This prevents overbuilding. If a factory lacks plastic, adding more vehicles to its steel route cannot solve the missing input. If a raw producer has abundant output waiting, increasing its production is less useful than improving pickup. If a final factory is full while the town receives little cargo, the constraint is downstream rather than upstream.
For branching production, account for co-products without assuming they will all have equal demand. A Saw Mill produces planks and sawdust from the same log input. A Steel Mill produces sheet metal and steel from iron ore and coal. A Chemical Plant produces dyes and plastic from chemicals. One branch can be healthy while the other accumulates, so inspect each output stock separately.