
Use Transport Fever 3's Map Editor heightmap generator to create terrain from settings and a seed, or import an external 16-bit grayscale PNG through the Import Heightmap tool's Heightmap tab. Each heightmap pixel represents 4 by 4 meters in the game. Set the climate, map size, and format when creating the editor map, because those choices cannot be changed inside the editor.
For real-world terrain, prepare the elevation image separately and use the import preview to set black-pixel minimum height, white-pixel maximum height, and water level. Biome masks are separate inputs. An image that depicts terrain materials or a map's colors is not automatically a usable elevation heightmap.
Choose generation or import before making the map
The built-in generator is useful when you want a playable landscape shaped by generation controls rather than a particular real-world location. The same seed and the same settings reproduce the generated map. A seed alone is not a complete description when size, format, climate, or generator options differ.
Import is the appropriate route when you already have a grayscale elevation image or have prepared external terrain data. The importer uses the image's grayscale values to determine height within the minimum and maximum values you set. It does not reconstruct detailed elevation from an ordinary satellite photograph.
| Starting material | Suitable route | Important condition |
|---|---|---|
| Desired terrain style, no external elevation image | Built-in Generate tab | Save the generator settings together with the seed |
| Externally generated elevation terrain | Import heightmap | Prepare a fitting grayscale PNG and height range |
| Real-world elevation data | Prepare elevation image, then Import | Check area, dimensions, grayscale values, and the water preview |
| A previously made editor map | Load that map in the editor | Preserve the existing work before generating or importing replacements |
| Terrain material or biome masks | Biome import | Keep biome data separate from the elevation image |
Decide the map's proportions at this stage. A long regional corridor and a roughly square area lead to different useful dimensions and transport layouts. Importing the same image into an unsuitable map format can undermine the area you intended to represent.
Create the editor map with fixed dimensions
Open Map Editor from the main menu. For a new map, choose the climate and then the size and format in the map settings. Add any intended terrain-generation mods through the relevant mod settings before starting the editor.
Once inside the editor, climate, map size, and format cannot be changed there. If those choices are wrong, correct the starting configuration before spending time placing towns and industries. A later terrain import is not a replacement for choosing the intended map shape.
The editor does not provide the same operational toolset as a normal game. Its documented omissions include station and depot construction, track construction, vehicle and line management, warehouses, and perks. Plan the terrain and settlement positions here, then test the transportation network when playing the map.
This distinction matters when judging whether a valley will support rail or a coast will support a harbor. You can inspect and prepare the landscape in the editor, but a complete operational service requires a playable game with its own infrastructure and vehicles.
Generate a terrain with the built-in controls
Open the heightmap generator tool and select Generate. Adjust the available settings for the chosen climate and generator, then enter a seed if you want to preserve a reproducible result.
Before generating again, inspect the four preservation choices: Keep Heightmap, Keep Assets, Keep Towns, and Keep Industries. These refer to different parts of the existing map. Retaining towns is not the same decision as retaining the terrain, and retaining terrain does not necessarily preserve every asset.
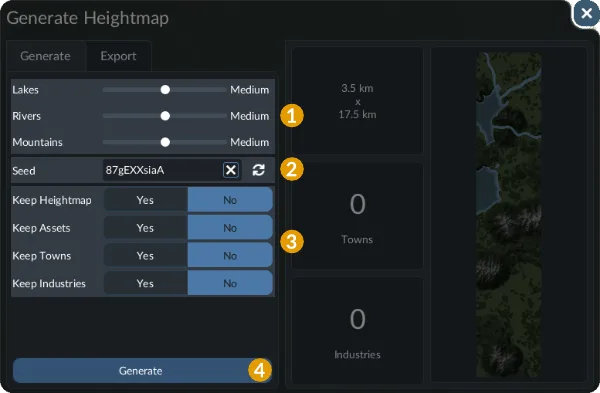
Set the seed and choose which existing map elements to preserve before generation.
Use the preview and inspect the resulting landscape before placing a large set of towns. Consider where the map offers buildable plains, unavoidable crossings, and useful connections between separate regions. These are practical route-planning observations rather than a guarantee of profitable lines.
If you change the generator's settings, record those changes with the seed. Reusing the seed while switching to a different generator or a different set of options does not preserve the original generation setup.
Additional terrain generators can be provided by mods through the Mod Hub. Their settings belong to those generators. Do not assume that every optional generator uses the same controls or supports every climate.
Prepare an external heightmap
The heightmap should be a PNG with 16-bit grayscale values. Use a suitable image resolution for the map size and format; the game's map-size documentation defines the fitting resolutions. The editor's 4-meter-per-pixel scale helps you relate an elevation image to the intended area, but it is not a reason to ignore the required file dimensions.
Preserve grayscale precision when preparing the file. A visually similar screenshot or an ordinary color PNG may not retain the intended elevation information. Renaming another file to a PNG extension does not convert it into the required heightmap.
Keep the elevation range meaningful for the selected area. If the image encodes a relatively flat region but you map black and white across an excessively large height range, the result can become much steeper than the landscape you wanted. Conversely, a compressed range can flatten important landforms.
Prepare the whole selected area consistently. Abrupt image borders, unwanted elevation artifacts, and an unsuitable water threshold can create problems along coastlines or rivers after import. Use a test import and its preview before treating the external image as a finished playable map.
Keep an unmodified copy of the source elevation image. This allows you to adjust the conversion or range without relying on a previously exported game map as the only remaining copy of the terrain.
Import and calibrate the terrain preview
Open the Import Heightmap tool, select its Heightmap tab, and select the PNG from the heightmaps folder in the game's user data directory. The menu's folder button opens the relevant location, avoiding assumptions about a path that differs by operating system or installation.
Set the three main height values around the image you prepared:
| Import setting | Meaning | Preview check |
|---|---|---|
| Minimum Height | Height assigned to fully black pixels | Low land is at the intended elevation |
| Maximum Height | Height assigned to fully white pixels | High terrain is neither exaggerated nor unexpectedly flattened |
| Water Level | Height of the water plane | Coastlines and flooded areas match the intended result |
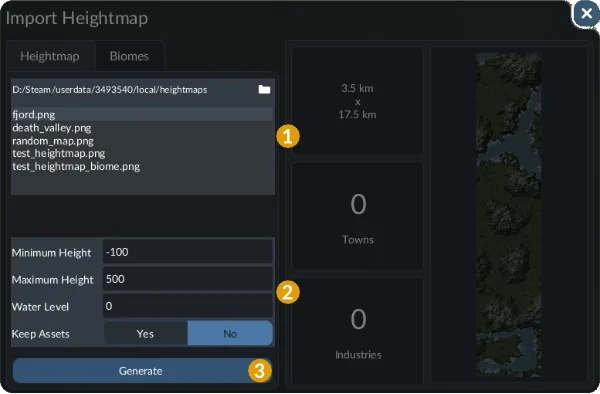
Use the preview to inspect minimum height, maximum height, and water level.
The manual recommends aiming for a water level of 0 for good results with materials and biomes. Use that guidance alongside the actual import preview; do not copy another map's minimum and maximum without understanding its elevation image.
Inspect the Keep Assets choice when importing onto an existing map. Preserving previously placed assets is a separate decision from replacing the terrain underneath them. Trees and other objects that suited the old landscape may no longer be appropriate after a major import.
Apply the import only after examining the preview. Check the terrain itself before building towns or composing biome masks. If the landform is wrong, correct the elevation image or height settings rather than covering the problem with trees and scenery.
Import biome masks separately
Biome masks control material and environmental distribution; they do not replace the heightmap. Open the biome import controls and select matching masks from the biomes folder in the user data directory.
The available masks depend on the generator used by the selected climate. The Biomes mask is grayscale, with its full range divided into equal intervals based on the number of biomes. Other masks use individual black-and-white inputs.
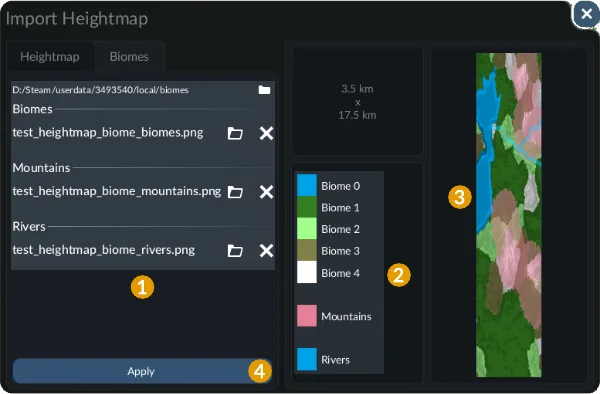
Biome masks are assigned separately from the elevation heightmap.
Use the legend and preview to understand which areas each mask changes. A white region in a biome mask does not have the same meaning as a white region in an elevation image: the latter maps to maximum height, while the former belongs to the selected mask's material or biome function.
A useful starting exercise is to generate a random map and export its biome masks. That gives you compatible examples for the chosen climate and generator before you prepare matching data for an imported landscape.
Apply the masks to the current terrain and inspect their placement. If materials look wrong while the relief is correct, investigate the biome inputs separately. Re-importing the same elevation image is unlikely to repair a mismatched mask.
Export a reusable heightmap
Use the generator menu's Export tab to save the current terrain as a grayscale PNG. Choose an existing file to overwrite or enter a new name. Use a new filename when you want to preserve both the original and a revised terrain.
The export menu offers 16-bit or 8-bit grayscale depth. For a reusable heightmap intended for the documented import workflow, preserve the 16-bit version. A lower-precision export is a separate choice, not an improvement in terrain detail.
Enable Biomes Data if you need the additional biome textures for advanced import. Save those alongside your terrain planning records so you can distinguish the elevation file from its companion material masks.
Exporting a heightmap does not export a complete operational network. The editor can separately import or export town and industry positions, and the map save preserves its own setup. Decide which part you are sharing: terrain, position data, or the complete editor map.
Use Ultimate Terrain Generator within its limits
The optional Ultimate Terrain Generator is a Map Editor tool whose first release supports Temperate finishing. Its approach organizes rivers and valleys, then the surrounding relief. It offers map types including river valleys, rolling plains, lake districts, bays, peninsulas, island chains, coastal regions, and mountain passes.
Its settings include Relief, Water, Ship rivers, and Seed, followed by more detailed terrain parameters. Generate, inspect the report and preview, and then apply the result to the map. Place towns and industries after applying the terrain.
Applying this generator replaces the whole terrain and its trees. Its Undo restores the previous terrain shape, but not the trees, and only reverses the last Apply in the current session. Keep a saved map before replacing work you need to preserve.
The generator's button is hidden in normal games. It is not a new-game generator in this release and is not a real-world elevation downloader. On other climates, its current Apply changes the terrain shape without the completed forest and biome pass. Choose it for the supported workflow rather than assuming planned features are already available.
Add towns and test the playable map
After the terrain and biome work is satisfactory, distribute or place towns and industries. The editor provides separate generators and position import options, which let you control settlement placement without regenerating the entire landscape.
Pay attention to the number and proximity of towns. More towns, streets, vehicles, and reachable destinations increase pathfinding work. A geographically accurate cluster is therefore also a hardware and simulation planning choice, especially when preparing a large region.
Save the map and start it through the game's map-playing workflow. Verify the actual transport opportunities in that playable copy. A valley that looks promising in the terrain preview still needs practical track approaches, station locations, and useful destinations.
Keep the editor original separate from the played copy so you can revise the terrain without losing the operational experiment. That makes the next iteration about a specific problem, such as a coastline or a town position, instead of requiring you to reconstruct the whole map.
Related guides
Use Map Size for map dimensions, Maps to distinguish complete maps from generators, and Temperate Map Seeds when you want reproducible procedural terrain without preparing an external PNG.