When cargo is not loading in Transport Fever 3, trace the pickup in this order: confirm that the industry has output waiting, verify that the origin stop is configured to load the intended cargo, check that the assigned vehicle can carry it, and make sure the vehicle can reach the correct terminal. If this is the second leg of a route, also confirm that the cargo can enter a connected warehouse and reach the next pickup stop.
Do not begin by rebuilding the station. A vehicle remaining empty can be caused by missing production, a disabled cargo filter, an incompatible vehicle, an unreachable terminal, or a broken handoff. These faults can look identical from the map, but each leaves different evidence in the industry, line, vehicle, or warning panels.
First establish which problem you actually have:
- No cargo enters the vehicle: use the full checklist below.
- Cargo enters slowly: inspect platform length and loading specializations rather than pickup eligibility.
- Cargo is already aboard but will not leave the vehicle: loading has succeeded; troubleshoot the destination and unloading settings separately.
- The first vehicle loads but the next vehicle remains empty: inspect the transfer connection and second pickup configuration.
Quick diagnosis for an empty cargo vehicle
| What you observe | Checkpoint | What to inspect next |
|---|---|---|
| The industry's Output Stocks value is zero | Production and existing pickups | Compare recent production, required inputs, and output before vehicle visits |
| Output cargo exists, but the intended cargo is absent from the origin stop configuration | Stop cargo filter | Enable that cargo at the pickup stop and confirm its load percentage |
| Cargo waits at the origin, but the vehicle never accepts it | Vehicle compatibility | Inspect the vehicle's displayed cargo capability or specialization |
| The line displays a warning or cannot reach its assigned platform | Terminal or route connection | Open the line manager and inspect the marked segment and terminal assignment |
| The first leg loads, but the next line does not | Transfer access | Check the warehouse acceptance, physical connection, second stop filter, and second vehicle |
| The loading indicator appears but progresses slowly | Throughput rather than eligibility | Compare platform length, vehicle length, and specialization modifiers |
Work from the cargo source outward. This avoids changing downstream stations when the industry has nothing ready, and it prevents vehicle replacement from hiding a stop-filter mistake.
Step 1: Confirm the industry has cargo ready to collect
Open the producing industry and inspect its Output Stocks. Produced cargo remains at the industry until a suitable vehicle on a correctly configured line collects it. A platform, station, or vehicle cannot load cargo that the industry has not produced.
The industry's production rule matters. Raw industries such as farms, mines, and logging camps can produce without receiving another cargo input. Processing industries such as sawmills, steel mills, and breweries require the appropriate cargo in their Input Stocks before production can begin. If a processing industry's output is empty, follow its production rule backward and check the required input instead of modifying the outgoing line.
Expand the Input Stocks and Output Stocks sections when you need more detail. These sections show the current stored amount, the upper limit, and potential source or destination relationships. Active relationships are animated in the game world, while inactive ones remain static. Those links help distinguish an industry that has cargo ready for your route from one that is not actively connected as expected.
Run the simulation briefly and watch the output number:
- If output stays at zero, compare the recent Production figures and required input stocks. Check whether existing pickups are already collecting the output before treating zero stock as proof of missing production.
- If output accumulates while your vehicle stays empty, production is working and the fault is farther along the pickup path.
- If output falls as a vehicle visits and that vehicle departs carrying the intended cargo, the origin pickup works. Any later failure belongs to a downstream leg.
- If the output stock reaches its limit, production can continue while excess items are destroyed. A full output stock warrants checking collection throughput and downstream movement; it does not mean production has stopped or prove a broken loading setting by itself.
The number displayed above an industry can also reveal waiting output, but use the industry window when you need to separate input, output, and production behavior.
Step 2: Enable the cargo at the origin stop
Each stop has its own cargo-loading configuration. Open the line manager, select the origin stop, and use the stop configuration or its cargo icons to inspect what that stop is allowed to load. A line reaching the correct industry is not enough if the intended cargo is excluded there.
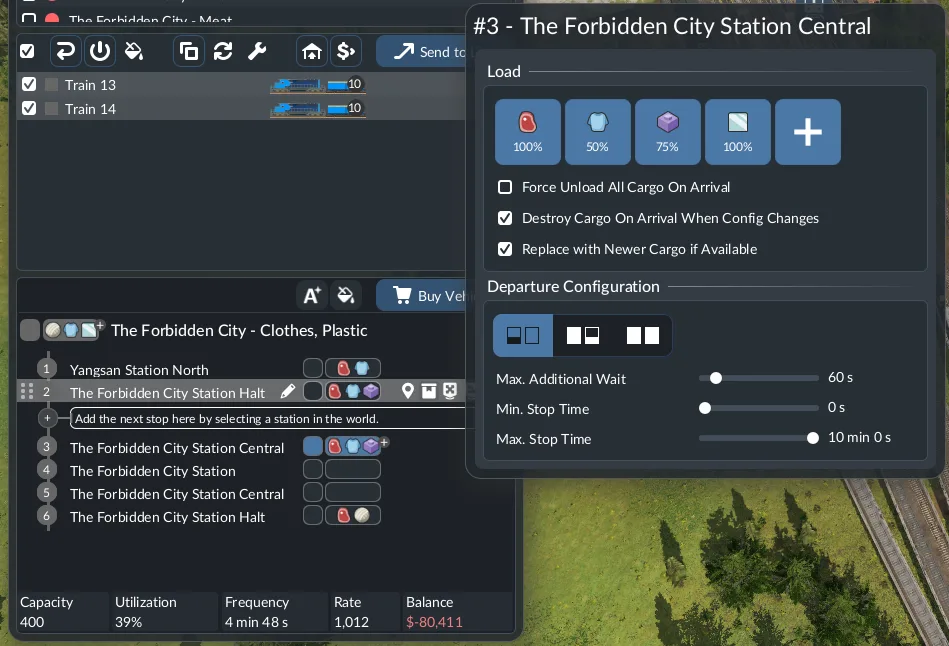
The cargo filter shows whether the intended freight is enabled at the origin stop.
Check all of the following at the origin:
- The intended cargo type is selected for loading.
- Its load percentage is not set in a way that prevents the pickup you intend.
- You are editing the actual origin stop used by the vehicle, not another stop with a similar name.
- The cargo is enabled at the source rather than only at a later stop.
- Other selected cargo types are not distracting you from the one whose movement you are testing.
The line manager shows configured cargo types for each stop, so compare the origin and destination rows directly. For a simple diagnostic run, focus on one intended cargo and one vehicle. Watch whether the cargo appears aboard after the vehicle completes its stop.
The departure mode changes how long the vehicle waits, but it does not create cargo or override compatibility. Load if available lets the vehicle collect compatible cargo and leave. Full load (any) waits for one cargo type to fill. Full load (all) waits for the vehicle to become fully loaded. In the unmodified game, the distinction between “any” and “all” applies to trains and ships because they can have multiple compartments or wagons; other vehicle types wait for a full load in either full-load mode.
If a vehicle waits indefinitely under a full-load setting, temporarily judge the route by whether any cargo enters it at all. Zero units loaded points back to stock, filters, compatibility, terminal access, or transfer access. A partially filled vehicle that continues waiting is a departure-condition issue rather than a total loading failure.
Step 3: Check the vehicle's displayed cargo capability
A vehicle must support the exact cargo you are trying to collect. Do not assume that every freight vehicle can carry every product, or that a newer or more expensive model is automatically suitable.
Open the vehicle store or the existing vehicle's details and inspect its cargo specialization. In the store, the cargo buttons can filter the list to vehicles that can transport all selected cargo types. Use the displayed capability of the actual truck, wagon, tram, ship, or aircraft assigned to the line.
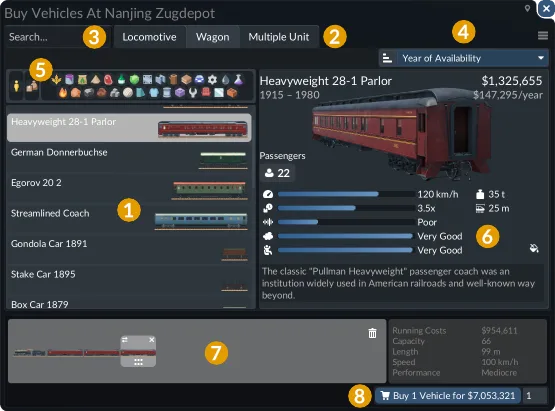
Use the cargo filter buttons to narrow the vehicle list, then confirm the selected vehicle carries your required freight. The coach selected in this example carries passengers.
For trains and trams, inspect the complete consist rather than the locomotive alone. Their store interface allows individual units to be combined, moved, or removed. The powered unit may make the train move, but the relevant cargo-carrying units determine whether the consist can accept the intended load.
Use this decision sequence:
- Select the cargo you need to move in the vehicle-store cargo bar.
- Confirm that the chosen vehicle or consist remains eligible.
- Inspect the vehicle assigned to the failing line rather than only a vehicle you plan to purchase.
- Run one visit to the origin and watch the vehicle's cargo display.
Loading specialization and cargo eligibility are related but not identical checks. Matching vehicle, terminal, and warehouse specializations can improve loading speed. A mismatch can reduce the rate. Neither a speed bonus nor a speed penalty proves that an otherwise incompatible vehicle can carry the cargo, so confirm the displayed cargo capability first.
Step 4: Verify the assigned terminal is reachable
Transport Fever 3 assigns terminals to line stops automatically based on reachable platforms and their utilization. Automatic selection normally reduces manual setup, but an edited terminal assignment, changed track, changed road, or altered signal arrangement can leave a line unable to reach its stop correctly.
Open the line manager and inspect the failing stop. If necessary, use the move-stop control to place that line stop on a reachable terminal. Do not judge reachability only by how close the platform looks on the map.
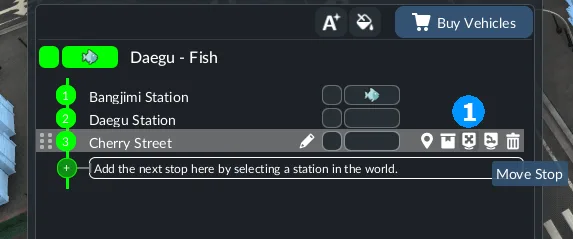
Use the stop-move control when the line is assigned to an unreachable pickup terminal.
Look for the game's connection evidence:
- A problem icon beside the affected line.
- A red exclamation mark on a problematic segment in the line manager.
- A warning explaining whether the vehicle cannot reach or depart from a terminal.
- An arrow in the terminal-selection dialog identifying the side of the connection problem.
- A warning created after tracks, roads, or signals were changed outside the line manager.
Alternative terminals can increase station throughput by allowing vehicles on the same line to use more than one stop at a station. Every enabled alternative still needs to be reachable from the relevant decision point. For trains, that point is the last signal before the station; for road vehicles it is the station entrance; for ships it is the waiting point outside the harbor; and for aircraft it is the end of the runway.
For an empty pickup, first make sure the primary terminal works. Treat alternative terminals as a throughput feature after the basic route is valid. Enabling more terminals cannot compensate for a broken approach or a stop that is not configured to load the cargo.
Step 5: Confirm the pickup point reaches the industry
The vehicle must stop at a pickup point that can access the producing industry. An industry-integrated cargo stop is the clearest case. A separately built station can also collect from an industry when it is actually connected and close enough for the game to recognize the relationship.
Do not rely on visual proximity alone, and do not assume a fixed universal catchment distance. Inspect the connection shown by the game. Use the station’s actual catchment or recognized connection feedback to check its access to the producer. The industry’s stock relationships and symbolic links identify potential or active suppliers and consumers; they do not independently prove that a particular pickup station is in range.
If the line visits a cargo station near the producer but the relationship is not recognized, the waiting output will remain at the industry and the vehicle will stay empty. Adjust the recognized access or terminal assignment based on the in-game connection evidence. Rebuilding the entire station is not a universal fix and should not be the first diagnostic action.
Also confirm that the stop is cargo-capable. A route reaching a passenger-only facility does not establish a freight pickup. Where the industry provides its own integrated station, that station is specialized for the cargo required at the industry.
Step 6: Trace one complete pickup visit
After correcting the visible settings, test one vehicle instead of watching the entire network. A controlled pickup makes the first broken stage easier to identify.
Keep the industry stock panel, the origin stop configuration, and the assigned vehicle visible while one vehicle visits. Compare available output before the visit with the cargo aboard after it leaves, and check any connection warning if the movement fails.
A successful origin pickup produces two matching changes: the vehicle departs carrying the intended cargo, and the producer's waiting stock falls. This proves the first loading step. It does not prove that a later warehouse transfer, second vehicle, or final delivery works.
If neither value changes, return to the first checkpoint that lacks visible confirmation. If the vehicle loads only part of its capacity, check its departure configuration before declaring the pickup broken. If the loading indicator advances slowly, inspect throughput conditions rather than repeating eligibility checks.
When the next line will not load transferred cargo
If the first vehicle carries cargo successfully but a truck, train, or ship on the next line remains empty, the original pickup is fixed. The failure is now at the handoff or second pickup.
For a line-to-line transfer, verify this short chain:
- The first vehicle reaches a connected receiving location.
- A warehouse that accepts the cargo can receive it when storage is needed for the change of line.
- The next cargo stop has access to that warehouse.
- The second stop is configured to load the intended cargo.
- The second vehicle supports that cargo.
A warehouse does not correct a disabled stop filter, an incompatible vehicle, or an unreachable terminal. Likewise, placing a warehouse nearby does not prove that the game recognizes a connection. Inspect its incoming or stock display and the visible connection feedback.
Some connected consumers can receive cargo directly, so storage is not required for every direct delivery. Keep this page's diagnosis focused on the empty pickup: find the first point where the cargo stops appearing, then inspect the setting or connection responsible for that stage.
For a one-way Fish delivery example, enable Fish pickup at the Fishing Grounds. Inspect any unintended Fish loading or fill target at the receiving harbor separately. This illustrates why each stop’s pickup choices must fit the intended service; it is not a universal prohibition on collecting cargo at a destination. The rest of the Fish transfer and destination-unloading setup is a separate problem from an empty origin pickup.
Separate slow loading from no loading
A vehicle that displays a loading indicator is not experiencing the same fault as a vehicle that accepts zero cargo. Loading and unloading speed can be reduced when a train or tram is longer than its platform. The vehicle window, station window, and terminal-selection dialog display a warning when platform length slows the operation.
Speed also varies by cargo type and vehicle. The vehicle window shows loading speed as a percentage, and the detailed cargo-loading row explains its modifiers. Matching specializations across the vehicle, terminal, and applicable warehouse can provide a speed bonus; mismatches can impose a penalty. The loading HUD indicator changes color to show whether the current rate is normal, increased, or decreased.
Use the evidence to choose the right repair:
| State | Meaning | Correct focus |
|---|---|---|
| Zero cargo enters despite waiting output | Pickup eligibility or connection is broken | Stop filter, vehicle capability, terminal, or industry access |
| Cargo enters, but the vehicle waits | Loading is working | Departure mode and requested fill level |
| Cargo enters at a reduced rate | Pickup is working slowly | Platform length and specialization modifiers |
| Cargo is aboard but remains aboard at the next stop | Origin loading succeeded | Destination consumer, storage, and unloading configuration |
| First vehicle loads, second vehicle does not | First pickup succeeded | Warehouse handoff and second pickup settings |
Preserve an unresolved pickup state
If every condition through terminal access is visibly correct but the vehicle still accepts nothing, save the industry stock panel, stop cargo configuration, vehicle capability, terminal assignment, and any warning text together. Those screenshots preserve the exact failing state and are more useful for investigating a release-build issue than rebuilding several connected facilities without knowing which link failed.