
Transport Fever 3 modding uses a self-contained mod folder rather than edited files inside the game installation. A current mod is identified by mod.json; it can also contain resources under content, executable functions in mod.script.tl, descriptive metadata under _metadata, and translations in strings.json. Keep the original installation untouched so updates do not overwrite your work and mistakes remain isolated from the base game.
Start with the Transport Fever 3 file contract. Older Transport Fever 2 tutorials use different definitions and resource layouts, so they cannot establish that an existing mod will work unchanged. The publishing manual also contains an old revision: use the preparation checks below, then verify the current publishing interface before uploading.
A practical first result is a small mod that adds one asset, changes one supported configuration value, or imports one model. Finish that narrow loop—structure, load, inspect, validate, and test—before expanding the project.
What Transport Fever 3 modding can change
The supported scope ranges from additional models to scripts that reach into game mechanics. The best starting point depends on the work you want to do:
- A vehicle repaint reuses an existing model with a different visual treatment. The official introduction presents this as an approachable entry into vehicle modding for creators who are not yet comfortable with original 3D modelling.
- A new vehicle or decorative asset is primarily a modelling and texturing project. The amount of code needed to expose this content can be limited.
- A configurable construction combines models with parameters such as rotation, scale, or selectable variants. It demands more scripting than a fixed decorative asset.
- A configuration mod changes supported base values without replacing installation files. The official demonstration does this through
mod.script.tl. - A rebalance applies consistent changes to existing resources. This is a scripting task; choose it only when you have a current reference for the resource types and functions you intend to change.
Choose one observable outcome for the first version. For example, make one static asset appear and place correctly, make one imported vehicle render with its intended materials, or make one documented setting change. A small target makes it much easier to distinguish a folder problem from a resource, model, material, or script problem.
Use the current Transport Fever 3 mod structure
A mod is a directory containing its technical definition and any resources or metadata it needs. A useful starting layout is:
mods/
└── your_mod_folder/
    ├── mod.json
    ├── mod.script.tl
    ├── strings.json
    ├── content/
    │   └── ...game resources...
    └── _metadata/
        ├── modinfo.json
        ├── description.html
        ├── 0.png
        └── 1.png
Each part has a separate responsibility:
| Path | Purpose | When it is needed |
|---|---|---|
mod.json | Defines the mod’s stable technical identity and compatibility behavior | Always |
content/ | Holds vehicles, models, scripts, textures, constructions, and other game resources | Whenever the mod adds or replaces resources |
mod.script.tl | Holds executable functions referenced by mod.json | Only for a mod that needs those functions |
_metadata/modinfo.json | Supplies the display name, summary, description, authors, tags, and publishing metadata | When the mod needs complete browser or publishing information |
_metadata/description.html | Replaces the plain metadata description with a formatted description | Optional |
_metadata/0.png | Provides the grid preview image; further numbered images can appear in the detail view | Optional but useful for presentation |
strings.json | Maps text keys to translated strings by language | When the mod exposes localizable text |
The folder name itself is not the functional identity of the mod, although keeping it aligned with the ID reduces confusion. Store game resources below content in a structure similar to the base game. This makes references easier to understand and reduces the chance of putting metadata or content in the wrong branch.
Define a stable identity in mod.json
The modId inside mod.json identifies the project independently of where it is installed. It may contain only lowercase a-z, digits, and underscores. Transport Fever 3 does not use the older major-version suffix convention at the end of this ID.
Keep the ID stable after users begin depending on the mod. If staging, manual, and subscribed copies share the same ID, the game treats them as the same mod and prefers the staging copy, followed by the manually installed copy, then the subscribed copy. A forgotten staging build can therefore mask the version you expected to test.
The main definition fields have distinct jobs:
| Field | Meaning | Safe use |
|---|---|---|
modId | Permanent technical identity | Choose a unique lowercase ID before distributing the mod |
revision | Integer update number shown in mod details | Increase it when publishing an update |
severityAdd | Expected save-game risk when the mod is added | Use None, Warning, or Critical according to the real effect |
severityRemove | Expected save-game risk when the mod is removed | Treat missing simulation resources more seriously than cosmetic changes |
visible | Whether the mod appears in the normal mod list | Set false only for content that should remain hidden, such as supporting campaign content |
cosmetic | Declares that the mod affects appearance only | Do not use it for faster vehicles, higher capacity, production changes, or any other simulation effect |
If a severity field is omitted, the documented behavior is equivalent to None for adding the mod and Warning for removing it. Do not accept those defaults automatically when your project adds cargo types or other save-critical resources.
Dependencies can identify another mod by modId and optionally constrain minimum or maximum revisions. They can also be marked optional and can control whether the dependency loads first. Incompatibilities use the same identity and revision concept to warn about known conflicts. Define these relationships only when you can name the real dependency or conflict; do not add speculative entries.
When an update is incompatible with old saves or with the previous project contract, the official guidance recommends using a new mod ID and publishing it as an independent mod. Merely increasing revision implies that the update remains compatible enough to replace the earlier revision.
Create content for the chosen mod type
For a static asset or vehicle, prepare the model, meshes, materials, textures, metadata, and any supporting resources under content. For a configuration project, keep the change in the mod and reference its script through the current TF3 definition instead of altering the base configuration in the installation directory.
A first project should avoid mixing several failure domains. Import and validate one model before adding multiple vehicles. Confirm one configuration change before building a larger rebalance. If a construction will eventually expose parameters, first prove that its underlying models and fixed placement work.
The resource-modifier reference is explicitly marked as not yet adapted for Transport Fever 3. Its runFn and mod.lua examples describe an older contract. For a new TF3 project, use mod.json and mod.script.tl, and confirm the specific current scripting API before implementing a modifier. Renaming an old file does not, by itself, migrate its functions or references.
Likewise, the Model Editor contains a conversion tool for Transport Fever 2 models, but conversion is not proof that an entire old mod can be imported unchanged. The tool can restructure resources from res into content, adjust material files, set a legacy flag, and modify model metadata. New metadata values may still need to be added manually, and scripts or unsupported resource contracts require separate review.
Set up the creator workspace
Text resources can be edited with a normal text editor or an integrated development environment. The official tools page names Visual Studio Code as a cross-platform option and Notepad++ as a Windows option. Teal support can add syntax highlighting, autocompletion, navigation, and compile-time type checking when its executable and editor extension are configured correctly.
Start the Model Editor once before preparing the VS Code workspace. It generates staging-area workspace configuration, including tlconfig.lua and .vscode/extensions.json. If the configuration is missing, copy the development-workspace files provided with the game and adjust the configured folders. The tool instructions use different suffixes for the workspace definition in different sections, so check the files actually generated rather than creating a guessed filename.
Open the game’s main menu, choose Settings, then Advanced, and use Open User Data Folder to locate the user-data directory. Find the staging area there and use that actual location for the creator workspace. Where the Model Editor configuration accepts userDataPath, use forward slashes. Avoid copying an absolute directory from a predecessor tutorial; your configuration needs to point to this game’s user data.
For 3D work, Blender is a supported source for FBX import and can also create bone animations and bake texture maps. Modo FBX is supported as well, but its vendor has stopped supporting the application, so the official tools page does not recommend adopting it for a new project. GIMP and Paint.NET can export DDS textures; other listed commercial tools may also be used, but none is required for a basic mod.
Import and inspect a 3D model
The Model Editor is the central tool for importing models, editing model metadata, inspecting materials, previewing animations, validating common errors, and generating icons or screenshots. Drag an .fbx file into the editor to import one model, or drag a folder to import several related files.
For an FBX model import, include a _lod0.fbx file. Higher numbered LOD files are optional. The importer supports FBX output from Blender and Modo, but vendor differences mean an arbitrary FBX file is not guaranteed to import correctly. Enable the Blender coordinate-system option when importing FBX files exported from Blender.
After import, inspect the result systematically:
- View the model with materials, as a plain solid, and as a wire mesh. These modes separate texture problems from geometry problems.
- Select explicit LOD levels instead of relying only on automatic switching. Confirm that every included level contains the intended parts.
- Open the model tree and inspect the node hierarchy, mesh references, material assignments, and animation counts.
- Check the bounding box and simulation extent. Incorrect bounds can make an otherwise visible model behave or cull incorrectly.
- Open the material editor and verify that every material references existing textures and uses a compatible material type.
- Preview animations and, for vehicles, use the available age, passenger, cargo, particle, label, and load controls that apply to the model.
- Save into the intended target mod. The editor does not provide an extra confirmation before overwriting existing files, so confirm the selected mod and save options first.
The FBX importer recognizes albedo, opacity, normal, metal/gloss/ambient-occlusion, color-blend, emissive, and other textures through documented filename suffixes. Consistent material and texture names make automatic matching more predictable. When re-importing, decide deliberately whether meshes, animations, materials, placeholder transparent materials, and textures may be overwritten.
Inspect the model tree
Open the Model window to inspect the loaded resource path, bounding box and hierarchy. Its tabs separate the levels of detail. Select a node or hover over its row to isolate that part in the viewport; this helps distinguish an incorrectly positioned mesh from a missing or wrongly assigned material.
The hierarchy shows node names and mesh references, with material and animation counts alongside them. Compare these names with the metadata references before changing a validation field. If metadata points to a node that is absent, the relevant repair is the reference or the missing model part, rather than a cosmetic change to the preview.
Use the per-LOD views to confirm that the intended parts exist at each included detail level. Check the visible ranges deliberately, then return to automatic LOD rendering to inspect the model as the camera distance changes.
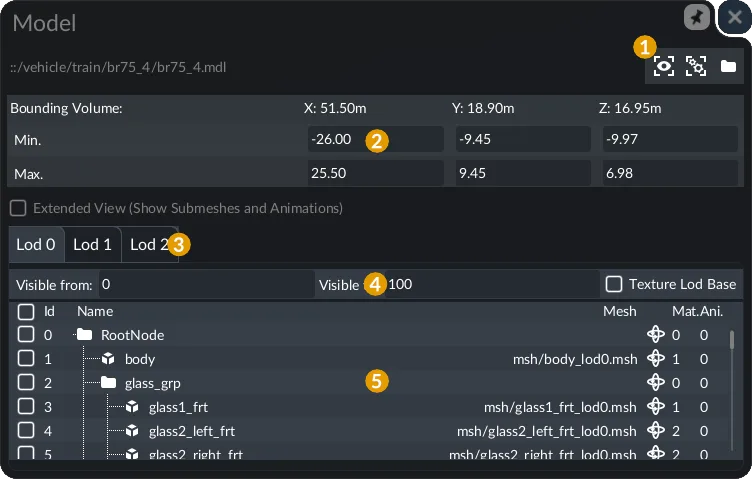
The model tree exposes node and mesh references for comparison with metadata.
Validate before an in-game test
Run the Model Editor validation after import and again after each correction. It stops to report an issue, so repeat the validation until no further documented problem is found. Passing this check is an intermediate result, not proof that the mod works in every game situation.
Common validation failures point to specific resource relationships:
| Failure area | What to inspect |
|---|---|
| Missing mesh node | A metadata property refers to a node name that does not exist in the model tree |
| Invalid cargo bay or slot | The bounding box is too small, or a load configuration references an unavailable slot |
| LOD configuration mismatch | Vehicle configuration lists do not match the number of LODs |
| Missing wheel or axle partner | Aircraft landing-gear metadata defines one side of the required pair without the other |
| Invalid seat index | A load configuration points beyond the available seat definitions |
| Missing cargo type or class | The vehicle or category resource refers to an identifier that is not present |
| Missing texture | A material points to a texture file that cannot be found |
| Material group mismatch | The number of mesh groups and assigned materials differs |
| Skinning mismatch | A skinned mesh uses an incompatible unskinned material, or the material expects absent mesh attributes |
| Broken animation | Timestamp and transform counts differ, no keyframes exist, or the first keyframe begins after time zero |
Use the editor’s material and metadata views to fix the underlying reference rather than suppressing the symptom. For visual debugging, show node names, axes, bounds, colliders, seats, lights, cargo bays, cargo slots, bogies, normals, or tangents as appropriate. A reference model can help compare size and placement, and it is excluded from generated screenshots.
Be careful with automatic reload. Unsaved changes are lost when the model reloads, and a texture can appear black or trigger a crash if the editor reads it while the graphics program is still writing it. The documented On Focus behavior is a safer choice when continuous reload races with texture export.
Prepare metadata and presentation
Use _metadata/modinfo.json for the player-facing identity. It can hold default text, localized text, authors and roles, supported tags, mod.io dependency identifiers, and an optional information URL.
Keep the display fields within their documented limits:
nameshould be no longer than 32 characters and contain no line breaks.summaryshould be no longer than 100 characters and contain no line breaks.descriptioncan be longer and can contain line breaks, but it is ignored whendescription.htmlis present.- The description itself should contain information players need, because a linked website may not be accessible from a console.
Use strings.json for in-game text keys. It groups key/value pairs by language. If a key is missing in a selected language, the English value is used; if the English value is also missing, the key itself is displayed. Test that fallback deliberately so raw identifiers do not reach players.
Numbered PNG files in _metadata provide browser imagery. 0.png is used for the grid, while later images appear in the detail view. The documented target is 1920×1080 pixels. The Model Editor can generate UI icons and multiple screenshot types, including perspective, orthographic, and viewport images. Configure the output types before pressing the screenshot control so it does not generate unwanted batches.
Prepare the release package and update identity
Publishing preparation begins with the package you have tested. Confirm the content rights, describe the promised behavior, and ensure the project metadata matches the resources that will be distributed. Check the current host and platform requirements before upload. The old publishing manual is not confirmation of today's upload buttons, automatic console approval or service policies.
Make the description usable without a separate website. Console players cannot open the optional information URL from within the game, so dependencies, required settings and important save restrictions need to be understandable from the mod's own description. A good preview should show the actual asset or change, rather than promising behavior that the package does not contain.
For updates, separate compatible revisions from incompatible replacements. Increase revision when releasing a compatible update under the same modId. If an update cannot remain compatible with the previous version, use a new ID and release it as an independent mod, as the mod-definition guidance recommends. This gives existing users a distinct project rather than silently replacing resources their saves depend on.
Before upload, confirm which existing listing the current publishing interface identifies. Older instructions describe a stored mod.io reference, but that historical flow should not be treated as a current button-by-button procedure. Preserve the publisher information generated for your project and verify the target listing before submitting an update.
Separate editor validation from game testing
The Model Editor checks resource relationships, while an in-game test checks the promised result in the simulation. Treat them as separate stages. A model can pass structural validation yet still need inspection for its visual appearance, placement or chosen metadata. A configuration change requires a game check of the setting it is supposed to alter, rather than a screenshot of a model.
For a first release, keep the test tied to the small outcome you selected at the beginning. Confirm that the staged copy is the one being loaded, exercise the added asset or changed behavior, and inspect any relevant dependencies. If you change a resource after testing, repeat the affected validation and game check before preparing that build for other players.
Record the limitations in the player-facing description. A narrow, accurately described mod is easier to use and update than a broad package whose untested behavior is presented as complete.
If you want to use an existing mod rather than create one, follow the mod activation guide. If your project is an authored world layout, inspect the map tools and selection guide.