

Transport Fever 3 bridges appear when the proposed road or railway is sufficiently above the terrain. Select a road or track, set the construction height or incline, and inspect the raised proposal before confirming it. Choose the bridge type in the left options panel. For an existing railway bridge, select the structure to open its replacement window and check the displayed replacement cost before committing to a different model.
A bridge is more than a visual choice. Construction cost depends on its height above the ground, and railway bridge types have speed limits that can constrain an otherwise faster track. Plan the approaches as part of the same crossing: a valid raised span does not remove the slope and curve constraints of the railway leading into it. This guide concerns the physical crossing. Signaling, train priority and route profitability have separate guides.
Choose the crossing and its approaches together
Start by identifying the two pieces of network the bridge must connect. A road crossing needs usable road approaches, while a railway crossing must respect rail gradients and curve geometry. Tracks cannot be placed as steeply as streets, and their minimum curve radius limits how sharply you can turn into or away from the span. A road proposal that fits a hillside therefore does not prove that a railway can use the same alignment.
Look beyond the narrowest point of the river or gap. The place where the span fits may leave an awkward connection on either bank. Preview both the crossing and the return to ground level before building the central structure. You are checking whether the entire link is workable, rather than purchasing a bridge first and trying to repair its approaches afterward.
The bridge proposal is produced by the distance between the construction level and the ground. Raising a line only slightly above the local terrain may not produce the structure you expect. Watch the preview as you adjust height; the visible proposal is the confirmation that the tool has switched to a bridge. A keyboard command by itself is not that confirmation.
| Planning check | Why it matters |
|---|---|
| Road or railway | The available geometry and gradient constraints differ |
| Start and end connections | A span must fit the networks on both sides |
| Height above terrain | Height affects the proposal and construction cost |
| Curves on a rail approach | Tight radii can reduce the permitted speed |
| Bridge type | Its speed limit can be lower than the selected track limit |
| Required demolition | The proposal can affect buildings beyond the visible span |
Treat the first crossing as a complete corridor with a clearly defined purpose. You do not need to reconstruct the surrounding network just to inspect a suitable bridge proposal. Resolve the crossing geometry first, then use the appropriate signaling or line guide if the completed network needs an operating change.
Build a road bridge with a controlled preview
Open Roads and select the street type the crossing will use. The side panel provides straight and curved building modes and the height controls. Straight mode normally connects the start and end points directly, although existing connections and parallel alignment can affect the result. Curved mode lets you establish the direction before placing the end point.
- Select the road and the intended building mode.
- Choose Height Offset when you want to control the construction level relative to the terrain, or Fixed Incline when you need an explicit slope.
- If you need a raised start, adjust height before setting the first point.
- Set the start and end positions so the proposal crosses the intended gap.
- Inspect the bridge section and both approaches.
- Select the bridge model from the left options panel.
- Check the proposed demolition and construction cost before confirming the road.
Height Offset controls the height of the end point above the ground. When you change it before placing the first point, it can also control the start height. Fixed Incline controls the slope of the segment. Choose the setting that matches the problem: an unwanted drop toward the terrain is a different issue from an approach that needs a controlled gradient.
The tool can also bend the construction vertically. That allows short arched crossings rather than requiring every raised road to remain at one flat level. Inspect the entire shape after making the bend adjustment. The value of this control is the visible geometry it creates, so retain it only when the proposal improves the crossing you are building.
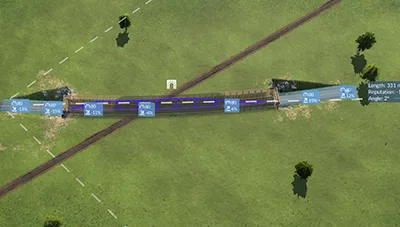
Use the height and bend controls to inspect the approach geometry before confirming.
Watch for the yellow demolition warning and highlighted buildings. Those objects are part of the proposal's consequences, even when the bridge itself looks suitable. Cancel instead of confirming if the affected buildings or approaches do not fit your plan. In ordinary construction, placing the end point can build immediately, so decide which confirmation mode you want before treating a preview as a harmless draft.
Use Drag-and-Confirm for more detailed selection
The Advanced settings include Drag-and-Confirm Construction Mode. It separates the proposal from the final confirmation and provides an opportunity to reposition the end point. Use it when you need to inspect a more complicated crossing or choose different structural models for separate sections of the same proposal.
In this mode, the end point can be moved before committing. The slope indicator at the end of the segment switches to manual incline control when selected. You can adjust the slope with the available controls and use Shift for smaller increments. Selecting the slope indicator again restores automatic slope alignment.
The bridge or tunnel model can be chosen for the full proposal in the left panel. Drag-and-Confirm also allows you to select the icon above a specific section and choose the model for that section before finishing. This distinction matters when the proposal contains more than one structural portion. Inspect the section you are changing instead of assuming every model selection affects only the portion nearest the pointer.
A deliberately set incline avoids an automatic adjustment back toward the ground. That can be useful when the desired span should remain elevated. It does not bypass the construction limits of the selected road or railway. If the result is still unsuitable, revise the positions, height or shape rather than confirming merely because you have enabled manual control.
Finish by confirming the proposal only after the relevant section, approaches and model are correct. If you need a different alignment, dismiss the proposal and establish a new one. The extra confirmation stage is useful because it leaves time to inspect a crossing; it is not a substitute for checking the geometry.
Build a railway bridge without hiding approach limits
Open Tracks and select a track type. Track construction uses an arc and smooth transitions rather than separate straight and curved road modes. The tool attempts to fit the track to its connections, and dragging direction influences the result. A bridge proposal uses the same height controls as street construction, so you can raise the starting height in the left panel before beginning the track.
The preview shows speed restrictions resulting from curves. Read those values on the approaches as well as the selected bridge's maximum speed. A high-speed bridge does not remove a tight curve that was necessary to join it to an existing line. Likewise, selecting high-speed track does not make a bridge with a lower limit behave as a faster structure.
Build the bridge as a continuous part of the railway. Inspect whether each approach joins the intended track, whether the gradient is acceptable and whether the shape imposes an unwanted speed restriction. Bridges can be partial and curved, and railway bridges can contain switches and signals. Those possibilities provide construction flexibility; they do not establish that every complicated junction is a suitable design for your line.
For parallel railway construction, begin next to an existing track where the cursor snaps to the parallel position, then build along it. Review the proposal across the raised section rather than assuming the alignment stays correct throughout the span. Keep the first crossing readable enough that you can identify which track each approach connects to before adding further branches.
Select a bridge model by year and speed
The available models differ in their year of availability and maximum speed. Use the table to compare the selected model with your intended railway. The relevant result is the permitted speed of the complete route segment, which can still be limited by track type or curve radius.
| Bridge type | Available from | Maximum speed |
|---|---|---|
| Stone Bridge | 1900 | 90 km/h |
| Steel Bridge | 1940 | 140 km/h |
| Suspension Bridge | 1940 | 180 km/h |
| Concrete Bridge | 1970 | 280 km/h |
| Cable-Stayed Bridge | 2000 | 220 km/h |
| Tied Arch Bridge | 2010 | 350 km/h |
Do not read the models as a single sequence in which the newest bridge always has the highest limit. Cable-Stayed Bridge is available later than Concrete Bridge but has a lower listed maximum speed. Choose according to the actual values and your crossing requirements, rather than treating the availability date as a performance ranking.
A bridge model's limit is also separate from vehicle capability. Replacing a stone bridge with a higher-speed model removes that structural constraint, but it does not raise the top speed of a slow train or repair a restrictive approach curve. Check which part of the crossing is limiting the result before paying for a replacement.
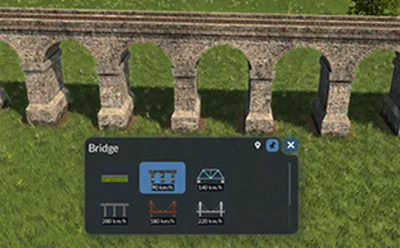
The bridge selection interface offers structural models with different speed limits.
The construction cost combines the road or track cost per meter with bridge height and any additional infrastructure such as railway catenary. There is no single universal price for a bridge model. Compare the actual proposal shown in your world; the same named structure can have a different cost when its length or height changes.
Replace an existing railway bridge model
You can change an existing railway bridge or tunnel model without demolishing the structure first. Select the bridge to open its model selection window, choose the intended replacement, and read the price displayed on the Replace For button. Confirming replaces the existing model with the selected type.
Use this option when the physical alignment is already suitable and the bridge type is the part you want to change. Model replacement is a direct swap of the structure. It should not be treated as a way to redraw its approaches, remove an underlying curve or reroute a line. Those are separate construction changes.
- Select the existing railway bridge you intend to change.
- Review the currently available replacement models.
- Choose a model whose speed and appearance fit the crossing.
- Read the displayed replacement cost.
- Confirm the replacement only when the model and price are the intended ones.
- Inspect the bridge and adjacent tracks after the change.
Replacement cost depends on the structure's length and height or depth, together with the new model. The displayed price is the useful decision value. Do not substitute a generic cost from another map or assume that a bridge type has one fixed replacement charge.
After construction or replacement, inspect the entire crossing once more. Confirm the physical connections, the selected structural model and the visible railway speed restrictions. If a later train cannot follow the intended route, examine its path and network connections in the appropriate rail guide. A bridge that has been built successfully proves the construction is present; it does not, by itself, prove every service is assigned to the desired line or that every junction has been configured correctly.