
To install a Transport Fever 3 update, use the client that manages your copy of the game. Steam, the Epic Games launcher and GOG Galaxy download the latest available build automatically. GOG owners using the standalone installer can obtain the updated build from their games library. On consoles, updates are rolled out and installed at the next possible opportunity.
After installation, open the main menu and compare the build number in its bottom-right corner with the official release notes for the version you intend to use. That final check matters because reading a patch announcement, completing a download and running the updated build are separate steps. Also distinguish the regular release from Steam's optional preview branch before assessing what changed.
The October 8 stability update
Urban Games announced the first stability update on October 8, 2026. The announcement describes improvements to a number of stability and performance issues, while explicitly saying that the update does not address every issue. Treat it as a maintenance release with a limited scope, rather than a promise that every crash or performance problem is solved.
At the time of that announcement, the update addressed PC, Mac and Linux players on Steam. The developer said GOG and Epic Games Store rollout would follow in the coming days, with future updates for PlayStation 5 and Xbox Series X|S. That is the announcement's rollout status. Check the actual client and installed build for your platform instead of assuming that all storefronts received the same build at the same moment.
The same announcement discussed reducing unnecessary interface clicks, improving localisation, addressing anachronistic content and investigating Mod Hub improvements. Those statements describe work the developer was undertaking. They are not a list of features confirmed delivered by the first stability patch. Use the release notes for the installed build to identify an implemented change.
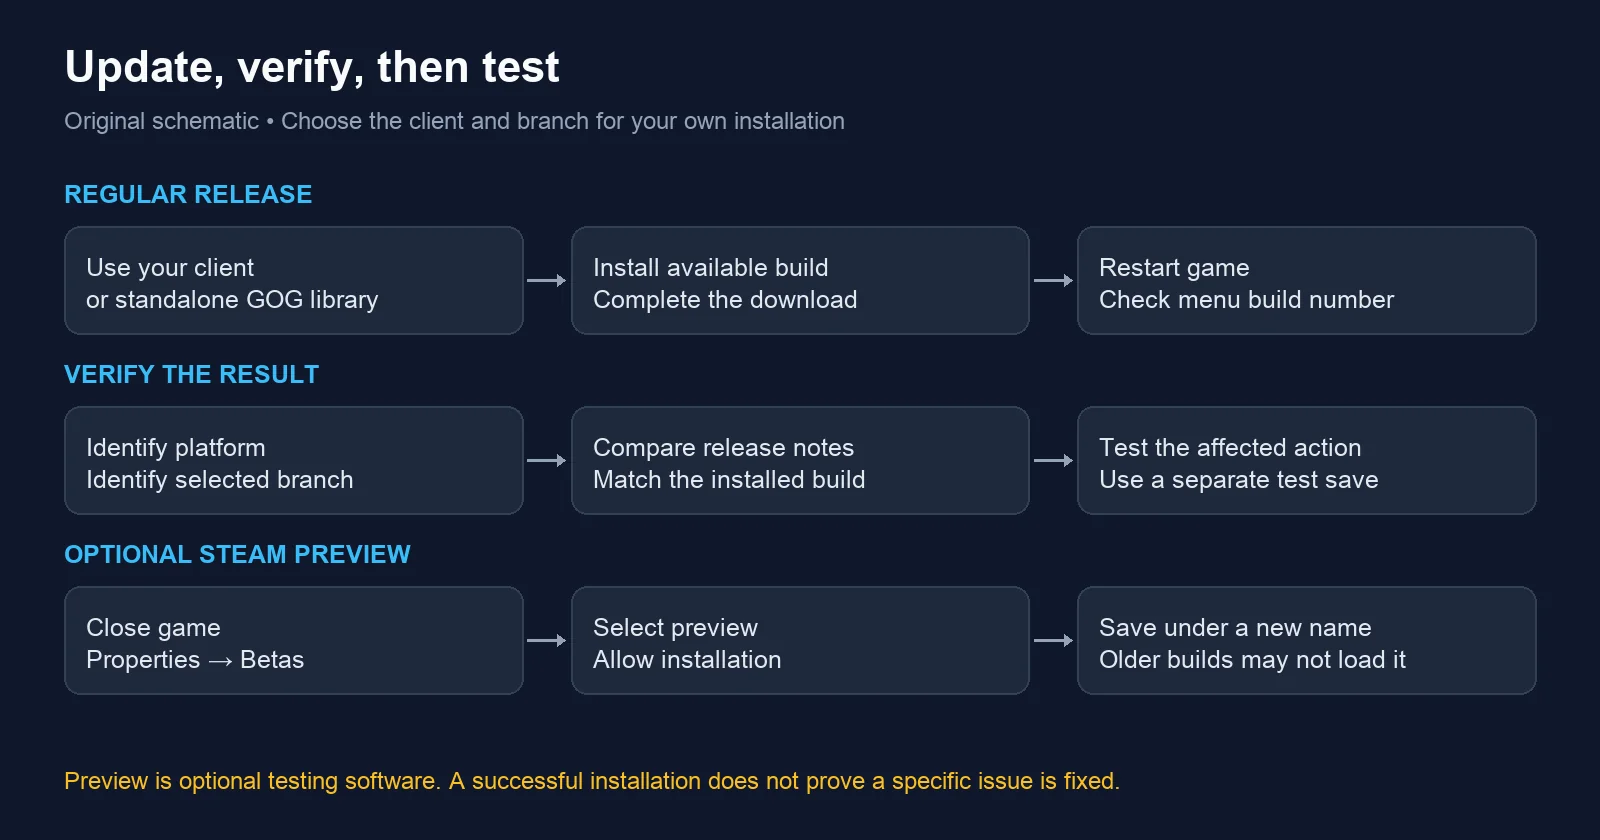
Original schematic of the official update and verification steps; not a game screenshot.
Establish which copy you are updating
Start with the storefront or console account that supplied your game. A Steam installation is managed through Steam, an Epic Games installation through the Epic launcher, and a Galaxy-managed GOG copy through GOG Galaxy. A standalone GOG installer has a different update path from Galaxy. Identifying that path avoids looking for a Steam branch option on a copy managed by another storefront.
Close the running game before changing its installed version. A client can show an available update while the old game process is still open, and changing the Steam preview selection specifically requires closing the game first. Complete the client-side installation, then start the game again before checking the build number. Do not use the previous session's main menu as proof of a newly installed version.
If you own more than one copy or use more than one computer, inspect the installation you actually launch. An announcement about Steam does not establish the state of a standalone installer or a console. The relevant comparison is the version displayed by that running copy against the applicable release notes, rather than the version mentioned by another player.
Install the regular update
| Installation | Update path |
|---|---|
| Steam | Let the Steam client download the latest available build |
| Epic Games Store | Use the Epic Games launcher for the available update |
| GOG with Galaxy | Let GOG Galaxy manage the updated build |
| GOG standalone installer | Download the updated build from the GOG games library |
| Console | Allow the platform's rolled-out update to install when available |
Use the regular release when your priority is continuing the current game on the main published version. Complete any outstanding client installation before launching. Then inspect the main-menu build number. If it does not match the release you expected, check the selected Steam branch where applicable and confirm that you launched the intended copy.
The official update instructions do not provide one permanent build number that will always represent the latest version. A guide cannot replace the current release notes with a fixed number indefinitely. The reliable procedure is to compare the menu value with the notes for your branch and platform each time you assess an update.
Check the build number after restarting
The build number appears in the bottom-right corner of the main menu. Record it before an update if you want to compare the change, then record it again after the download and restart. This gives you a concrete identifier when evaluating a fix, discussing a remaining issue or checking whether you are on preview.
Compare like with like. A preview can be equal to or newer than the Steam main branch, so a difference between two players' numbers may reflect a branch difference rather than an unsuccessful download. A platform rollout can also differ from the status described in an earlier announcement. Identify the branch and platform alongside the number before concluding that the installation is wrong.
When reviewing release notes, connect the specific change to the symptom you are testing. A patch focused on stability may improve some crashes without changing a particular interface interaction. Likewise, an interface improvement does not establish that a large simulation will run faster. The build number tells you which software you are testing; the notes tell you which changes the developer claims for that software.
Enter the Steam preview branch
Steam's preview branch allows players to try upcoming changes before a game update. It is optional testing software. The preview version is equal to or newer than the version on the main Steam branch, and it may be unstable. Choose it when you intend to test that version, with separate saves that protect your existing progress.
- Close Transport Fever 3.
- Open the Steam Library.
- Right-click Transport Fever 3 in the game list and select Properties.
- Open Game Versions & Betas.
- Select
previewfrom the branch list. - Allow Steam to install the selected version, then launch and check the menu build number.
The branch choice can be reverted. However, the ability to change the installed branch does not guarantee that a save written by a newer testing build will load in an older release. Installation selection and save compatibility are separate issues. Preserve an earlier save before testing rather than relying on switching the menu option back afterwards.
Keep preview saves separate
Save under a new name when using preview. The official instructions specifically warn that games saved in a newer testing version may not be loadable in an older release. An independent save lets you assess the new version without replacing the progress you expect to continue on the regular build.
Use a name that identifies its purpose, such as a preview test of a particular network. Keep the original save available and verify which file you are loading before beginning a long session. A clearly separate test makes it easier to return to the earlier version without guessing whether the file was subsequently saved by a newer build.
Avoid making your only important save the experiment. Load a separate copy, inspect the relevant lines and try the behavior the patch changes. Save the test separately if you need to compare later. Returning to the regular branch should include choosing an appropriate earlier save, rather than assuming a newer file will become compatible because the installed software changed.
Understand installation files and user files
The installation folder contains the game's static files and embedded content. The userdata folder contains settings, profiles, saved games and other player-created information. Updates can reset the installation directory to its original state, so manual edits there are a poor way to preserve a lasting customization across patches.
Before a substantial version change or preview test, locate the userdata folder used by your installation. The game provides an Open User Data Folder control in advanced settings. Use the actual folder for your copy rather than guessing a path from a different storefront. Preserve the files you need for continuing progress before experimenting with versions or settings.
Keep this distinction when investigating a failed test. Reinstalling or changing game files concerns the installation, while a particular save, mod setup or preference belongs to the user side of the setup. Record both the build and the save you tested. That makes the result more useful than saying simply that the game was updated.
Check mods after a version change
Updates can break some mods. A previously working customization is therefore part of the compatibility assessment after a patch, especially when using a newer preview. Inspect the affected save and its required content before deciding that an update failed to install. The game version can be correct while a mod no longer works with it.
For a controlled test, keep the original modded save and use a separate test file. Check whether the reported problem occurs in a simpler setup that does not depend on the suspect modification. This is a diagnostic comparison, not a claim that every modded save can safely lose its required mods. A file depending on unavailable content needs its own compatibility assessment.
Do not manually alter the game-managed Mod Hub content directory as an update workaround. The official file-location guidance distinguishes managed downloads from the userdata directory used for manually installed mods. Keep a record of the content involved and the build under test so that you can identify what changed, rather than rewriting managed files and losing a clear baseline.
Test the behavior that matters to your network
After confirming the build, load the intended test save and inspect a complete example of the affected behavior. If a route was previously failing, follow a vehicle through its relevant stops. If you are assessing performance, use the same map and comparable conditions. If the issue concerns an interface action, repeat that action and observe the result.
Change one major variable at a time. Updating the build, replacing the mod list and redesigning a busy station together makes it difficult to know which change affected the outcome. A separate test save and a recorded build let you compare a specific condition. They also make a remaining problem easier to explain when you request help.
The first stability announcement explicitly allows for unresolved issues and further updates. If your symptom remains, record that result with the installed build, platform and test conditions. Do not describe the entire patch as absent solely because one issue persists. Equally, successful installation is not evidence that the symptom was fixed; the actual test is necessary.
Update questions
Where is the latest build number? The running build is shown at the bottom right of the main menu. Compare it with the current release notes for the version you are assessing.
Does preview have every upcoming fix? The branch provides testing versions and can be equal to or newer than the main release. Read the notes for its actual build rather than assuming a particular fix is included.
Can I return from preview? You can revert the Steam branch choice. Keep earlier saves, because newer testing saves may not load in an older release.
Did the first patch finish the planned interface and Mod Hub work? The October 8 announcement separated the released stability update from continuing improvement work. Confirm an implemented feature in the relevant release notes before treating a plan as delivered.