
The Transport Fever 3 campaign contains eight historical scenarios that introduce the game’s major features through directed transport challenges. Complete a mission to unlock the next one. Every scenario can end with one, two, or three stars, while a separate optional objective awards its medal. Critical objectives can also fail, so decide before starting whether you want basic completion, a higher star rating, or a medal attempt.
For a first campaign run, prioritize the stated one-star condition and treat the optional medal as secondary. Higher ratings introduce stricter targets involving deadlines, vehicle losses, competing deliveries, contract totals, voter support, or budget decisions.
How the campaign works
Open the campaign from the CAMPAIGN card on the main menu. The missions form a fixed progression: finishing the current scenario unlocks the next one. If you already have a mission save, you can resume it from that mission’s individual page instead of beginning again.
The campaign is designed for both newcomers and experienced players. The first missions introduce major features step by step, while later scenarios place more pressure on planning, efficiency, and decision-making. Tasks can offer multiple ways to reach the required result, so the objective defines the destination without always prescribing a single route.
A campaign result has three separate layers:
- Mission completion: Accomplish the primary goal and avoid failing any critical challenge.
- Star rating: Meet the scenario’s one-, two-, or three-star condition. Higher ratings use stricter versions of the main goal.
- Optional medal: Complete the named bonus objective. This is distinct from the primary star conditions.
Do not assume every mission measures performance in the same way. Some use absolute totals, such as passengers, attendees, or completed contracts. Others judge elapsed time, vehicle survival, an opponent’s progress, voter approval, or budget increases. Reading the exact star wording before building anything prevents you from optimizing for the wrong result.
Choosing a completion, star, or medal target
Choose one primary target before committing resources. A one-star completion is the safest choice when learning a scenario because it lets you focus on the central objective. A two- or three-star run requires you to protect the metric that differentiates the higher rating from ordinary completion.
Use this sequence when reviewing a mission:
- Identify the non-negotiable result. This is the core action that completes the scenario, such as saving Mardi Gras, completing excavations, launching the rocket, or convincing every voter.
- Find the rating variable. Look for the number, deadline, loss limit, opponent threshold, or budget restriction that separates one star from three.
- Separate the medal from the rating. The bonus goal may demand attention that does not directly advance the main star condition.
- Protect the critical challenge. A failed critical objective can end the mission regardless of progress elsewhere.
The safest escalation is to complete the scenario first, then pursue a stricter star condition once you understand its decisions and timing. If your goal is only to unlock the next mission, do not let the medal divert attention from the primary result.
All Transport Fever 3 campaign missions
| Order | Mission | Location | Rating focus |
|---|---|---|---|
| 1 | Saving Mardi Gras | New Orleans, United States | Help the city hold its festival |
| 2 | Alpine Crossing | Domodossola, Italy | Tunnel passengers and deadlines |
| 3 | Desert Adventure | Wadi Rum, Jordan | Excavations and truck preservation |
| 4 | Biggest Festival Ever | Bethel, United States | Concert attendance |
| 5 | Oil for the People | Ekofisk Oil Fields, Norway | Oil deliveries ahead of the competitor |
| 6 | Island Expansion | Manila, Philippines | Successfully completed subsidy contracts |
| 7 | Big City Problems | Adelaide, Australia | Voter support and elapsed time |
| 8 | Final Countdown | Tanegashima, Japan | Scheduled launch and budget restraint |
Mission-by-mission planning priorities
1. Saving Mardi Gras
A major storm has disrupted New Orleans shortly before Mardi Gras. The primary objective is to clean up the damage and help the city so the festival can proceed. This opening scenario introduces the campaign through a guided sequence of tasks rather than immediately demanding a tightly quantified optimization plan.
The second and third stars ask you to help New Orleans a little more or a lot more. Follow the active objectives for the work involved. The optional medal asks you to subdue the alligators quickly. Treat speed on that bonus task as separate from the work required to save Mardi Gras.
2. Alpine Crossing
Alpine Crossing moves the campaign to the Simplon Pass, where the railroad between Brig and Milan needs to be expanded and its passenger service improved. All three ratings require 300 passengers through the tunnel, making passenger throughput the fixed completion measure.
The difference is time. One star has no stated year limit beyond completing the total. Two stars require the 300th passenger before 1924, and three stars move that deadline to before 1923. If you want a higher rating, evaluate every early decision by whether it helps reach the passenger total sooner. The medal objective—bringing skiers to Zermatt—is an additional destination rather than a replacement for the tunnel target.
3. Desert Adventure
Desert Adventure follows Nasra Ramahi’s expedition in Wadi Rum. The core goal is to complete the excavations and uncover artifacts. The higher-star conditions do not increase the excavation total; they restrict how many trucks may be lost before the work is complete.
Ordinary completion earns one star. Losing fewer than three trucks while completing the excavations earns two, while losing no trucks earns three. That makes vehicle preservation the decisive rating variable. Keep the excavation objective and the survival condition in view at the same time. The optional medal is awarded for recovering the remains.
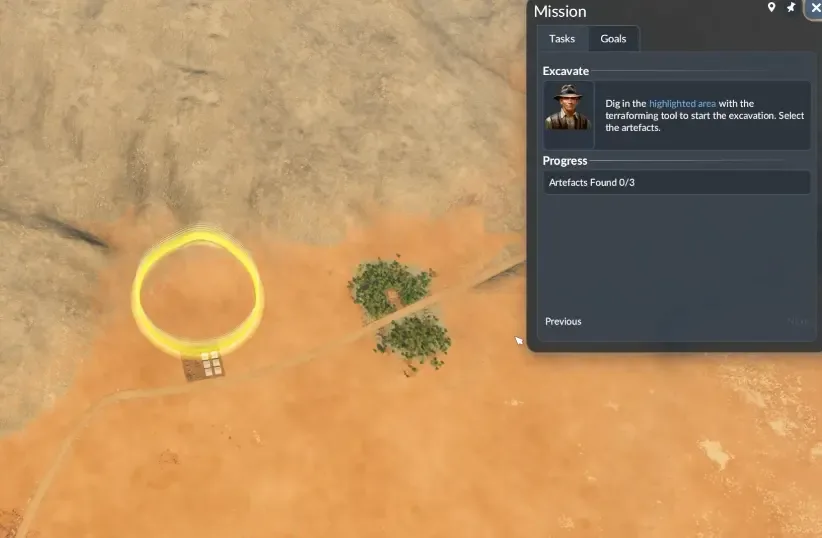
Mission 3 asks you to complete the excavations.
4. Biggest Festival Ever
This Bethel scenario centers on preparing a major music festival and getting the band onto the stage. Its rating system is straightforward: the concert must begin with 500 attendees for one star, 750 for two, or 1,000 for three.
Choose the attendance threshold you intend to reach before starting the concert. Merely advancing the story is not the same as meeting a higher attendance rating. The optional medal asks you to find the instruments, so it can compete for attention with the work that increases the final audience. Complete supporting tasks with the chosen attendee threshold in mind instead of assuming that every available activity contributes equally to the star result.
5. Oil for the People
Oil for the People is a direct competition in the Ekofisk Oil Fields. Your company must extract its first 1,000 units of oil before the rival operation to secure the exclusive drilling rights. Unlike a simple production target, the higher ratings depend on how far Astrid has progressed when you finish.
One star requires delivering the oil faster than Astrid. For two stars, finish before she delivers 750 units. For three, finish before she reaches 500. The stricter target therefore reduces the amount of progress you can allow the competitor to make. Monitor the comparative objective rather than judging success only by your own oil total. Rescuing Lasse is the separate medal goal.
6. Island Expansion
Island Expansion places you in Manila and asks you to improve the Philippine economy, social services, and tourism through subsidy contracts. The rating is determined by how many contracts you successfully complete: 5 for one star, 8 for two, and 12 for three.
This is a threshold mission, so decide which contract total defines the end of your run. Reaching five completes the lowest rating, but it does not satisfy the higher targets. A player seeking three stars must continue until twelve contracts have been completed successfully. Constructing the Trans-Philippine Railroad is the optional medal objective and should be tracked separately from the contract count.
7. Big City Problems
Adelaide faces smog, traffic, and noise while its mayor tries to regain public trust. Your main task is to satisfy the needs of the districts long enough to convince all voters. Every rating requires total voter approval; the higher ratings add increasingly strict time limits.
Convincing all voters earns one star. Doing so within four years earns two, and finishing within two years earns three. The distinction is not partial voter support but the speed at which complete support is achieved. For a basic clear, concentrate on reaching every voter without imposing an unnecessary deadline on yourself. For a higher rating, treat the clock as part of the main objective from the beginning. The medal objective is named Cheers.
8. Final Countdown
The final campaign mission takes place at the Japanese space center on Tanegashima. Rocket components, fuel, and the crew must be brought together while the launch window approaches. The base requirement is to ensure that the rocket launches on schedule.
Higher ratings change how you use the budget. Two stars require an on-time launch without repeatedly increasing the budget. Three stars require the same scheduled launch without increasing the budget at all. The wording matters: the two-star condition allows more flexibility than the three-star condition, but it still rejects repeated increases. If you are pursuing three stars, regard the original budget as a fixed constraint rather than assuming it can be expanded later. Organizing the watch party is the optional medal goal.
Campaign completion checklist
Before considering a mission finished, verify the following:
- The primary objective has been completed, not merely started.
- No critical challenge has failed.
- The displayed result matches the star target you selected.
- Any deadline was met before the specified year or time limit.
- Any loss, opponent-progress, contract, voter, attendee, or budget restriction remained within its stated condition.
- The optional medal objective was completed if the medal was part of your plan.
- The next campaign mission has unlocked, or your current mission save is available to resume from its mission page.