Transport Fever 3 signals control when a train may reserve and enter a route. They do not create missing track connections, repair an unreachable platform, or give a train a crossover that was never built. The reliable setup order is therefore: finish the railway, confirm that every line can travel in both directions, and only then add signals at deliberate waiting points.
The key limitation is that every train must have a physically valid route before signaling can improve the network. If a working line reports No path after signals are added, inspect one-way signal direction and crossover access before rebuilding the railway.
Signals are especially important where trains must pass on a single-track route, follow one another on a busy corridor, or approach a shared junction or station throat. Correct placement keeps a waiting train clear of the infrastructure that another train needs.
How Transport Fever 3 Signals Reserve Paths
Transport Fever 3 uses path-based signaling. An approaching train attempts to reserve its specific route through the railway. A signal turns green when that route can be reserved; otherwise, the train waits at the signal.
This differs from treating every junction as one indivisible block. Two trains can move through the same general junction area at the same time when their intended paths do not overlap. If their paths cross or share track, one train must wait until the conflicting route is released.
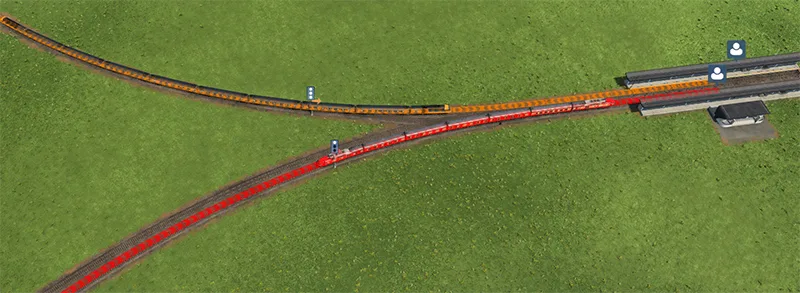
The colored routes show where two approaches converge onto shared track.
A reserved path ends at the first relevant boundary on the train's route: the next signal, a tram lane, or a stop where the train reverses direction. An ordinary stop does not necessarily end the reservation. Transport Fever 3 can reserve beyond a non-reversal stop, which helps prevent opposing trains from entering a single-track section that cannot safely accommodate both of them.
This leads to three practical rules:
- Put a signal where it is safe for an entire train to wait.
- Use signals to define passing opportunities before trains enter shared single track.
- Do not assume that a station automatically performs the work of a signal. Stations are stops, but they do not automatically divide the railway into signal-controlled sections.
Semaphore and light signals have the same signaling function. The visual type changes with the era, but the layout logic remains the same.
Build the Railway Before Placing Signals
Separating track construction from signal placement makes errors much easier to isolate. Use this order whenever you create or substantially rebuild a line:
- Build the complete running track between the required stations.
- Connect every station approach and assigned platform.
- Add the crossovers or slips needed for both the outbound and return journeys.
- Create the line and inspect the displayed route in each direction.
- Confirm that the route can reach and leave every assigned terminal.
- Add signals only after the unsignaled route works.
- Recheck the line immediately after adding one-way restrictions.
If the line fails before step six, the fault is in the railway, station access, or line configuration. Signals cannot solve it. If the line works before step six but fails afterward, signal direction or the newly divided paths become the leading suspects.
A visual inspection should follow the exact route rather than merely checking whether rails appear to touch. At every junction, identify the track used on arrival, the crossover used to reach the platform, and the route needed to depart. A tiny missing connection can be difficult to see from a distant camera, while an absent return crossover can leave only one direction usable.
Passing Siding Layout for a Single-Track Railway
A passing siding needs more than two parallel pieces of track. It must create separate reservable paths so opposing trains do not both claim the shared route through the siding and toward the far terminal.
Build and test a passing siding as follows:
- Split the single track before the passing area.
- Provide enough usable track for trains to clear the switches at both ends.
- Rejoin the tracks after the passing area.
- Confirm that both routes through the siding connect to both ends of the railway.
- Place signals at the ends of the siding so approaching trains can reserve compatible paths.
- Observe two trains approaching from opposite directions and verify that neither stops across a switch.
Without suitable signals, opposing trains can reserve paths that overlap through the single-track section. Each train may then block the route needed by the other, creating a deadlock even though the siding itself appears complete. Signals at the passing area provide reservation boundaries that let one train wait while the other clears the shared track.
The stopping position matters as much as the number of signals. A train waiting too close to a switch can leave its rear cars across the junction. The second track may look open, but another train still cannot use it. Leave enough clearance for the full length of the longest train that will use the siding.
Do not rely on a universal spacing formula. The necessary space depends on the trains using the route and on where their paths conflict. Judge the complete consist, not only the locomotive or the signal's distance from the switch.
Double-Track Corridors and Station Approaches
A straightforward double-track corridor is easiest to understand when each track carries traffic in one direction. The tracks provide the routes; signals enforce the direction and determine where following trains wait.
Crossovers near a station are still necessary when trains must change tracks to reach assigned platforms. Before signaling the approach, confirm that each service can reach its platform from the track it uses and can return to the correct departure track afterward.
Station throats deserve special attention because several movements can compete there:
- an arriving train crossing toward its platform;
- a departing train crossing toward the running line;
- another service using a neighboring platform;
- or a train entering from a depot connection.
Place the controlling signal before the shared throat or crossover, with enough room for a waiting train to remain clear of nearby switches. A signal placed inside the conflict area can turn a routine wait into a network-wide blockage.
Additional platforms only help when the approach tracks can reach them. If every service must use the same crossover or only one assigned platform is accessible, the shared approach remains the bottleneck. Treat track access and platform access as one layout problem rather than assuming that a larger station automatically increases usable capacity.
Signals can divide a longer double-track corridor into shorter sections so multiple trains traveling in the same direction can follow one another. Shorter sections may reduce the distance between following trains, but every signal also creates a possible stopping point. Add a section only when a complete train can wait there without blocking a junction, crossing, or station approach.
One-Way Signal Direction
A normal signal facing away from a train's direction of travel is ignored. A signal configured as one-way is different: trains cannot pass it from the back. This makes one-way signals useful for keeping double-track traffic consistently on the right-hand or left-hand track.
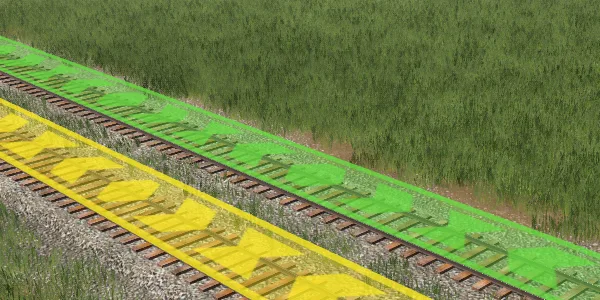
The directional overlays distinguish the two running directions.
To configure the restriction, select the signal and set the One-way option to YES in its detail window. Check the signal's facing direction at close zoom before continuing along the route. A one-way signal placed on the wrong side or facing the wrong direction can break an otherwise connected line.
Apply one-way signaling consistently. For a paired-track corridor, follow the entire outbound route in the direction of travel, then inspect the return route separately. Pay particular attention to crossovers, station entrances, and the first signal after a platform. Those are the places where a restriction can prevent a train from reaching the track it needs.
If you are unsure whether a one-way restriction is causing a failure, temporarily inspect the line without that restriction. A route that becomes valid after the relevant one-way signal is removed or corrected points to signal direction rather than missing rail.
Safe Signal Placement Around Conflicts
A useful signal location is a safe waiting location. Before placing one, imagine the longest train on the route stopped with its front at that signal. Then check everything behind and beside the consist.
The stopped train should not occupy:
- a switch required by another route;
- a crossover in the station throat;
- a road crossing that must remain usable;
- the entrance to another platform;
- or the track needed by a train leaving the station.
Clearance after switches is equally important. When two intended paths overlap, a train waiting immediately beyond the crossing may still obstruct the other path. Move the signal farther from the switch until the entire train can clear the conflict before stopping.
On a lightly used railway with one train, closely spaced signals provide little benefit. Spacing becomes important when several trains share the route. Longer sections keep trains farther apart, while shorter valid sections allow closer following. The correct balance comes from the actual conflict points and train lengths, not from placing signals at a fixed universal interval.
Use signals before areas where you want trains to wait, such as a busy junction or station throat. Avoid using them as decoration after every small piece of track. Each placement should answer a concrete operational question: where may this train safely stop while another reserved path is occupied?
Fixing No Path Errors
A No path error means the complete required journey is not currently valid. The cause may be physical track access, platform assignment, or a one-way signal restriction. Diagnose those categories in order rather than demolishing the route immediately.
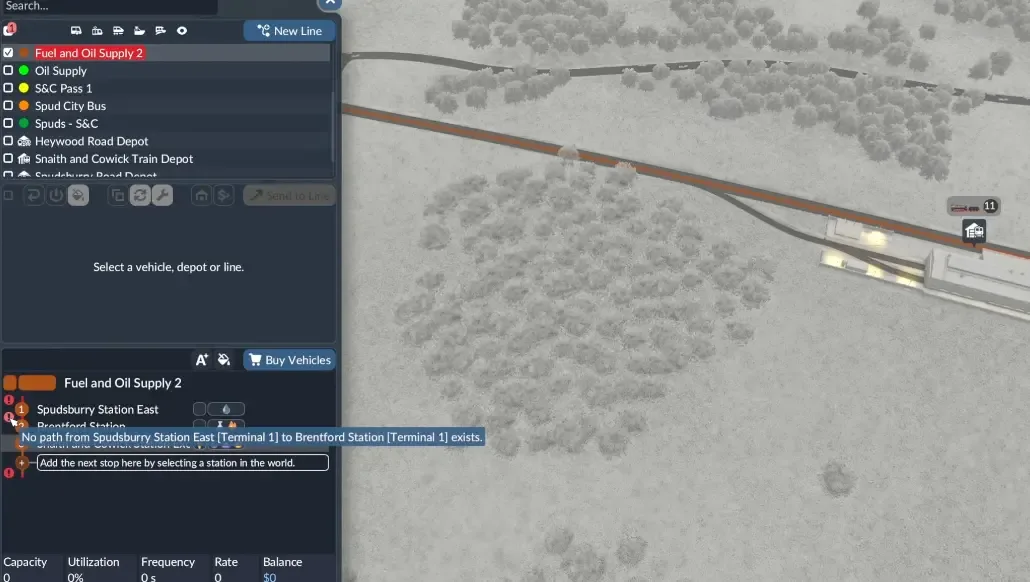
Read the connection warning before investigating track and signal direction.
Use this sequence:
- Inspect the line's problem indicators. Select the affected line and look for marked segments or terminals. Connection problems can identify whether the failure occurs while reaching or departing a terminal.
- Trace the outbound journey. Follow the exact track from the previous stop to the assigned platform. Verify every switch and crossover.
- Trace the return journey separately. A railway can support arrival but lack the crossover needed for departure in the opposite direction.
- Check platform reachability. Confirm that the assigned terminal is connected to the running track actually used by the line.
- Inspect every one-way signal on the failing segment. A single reversed restriction can invalidate the route while the rails still look continuous.
- Compare with the unsignaled route. If the route worked before signals were added, concentrate on signal direction and reservation boundaries.
- Restore signals gradually. After correcting the route, add or verify signals section by section so the first failing change remains identifiable.
| Symptom | Most useful first check | Likely layout issue |
|---|---|---|
| The line cannot reach a platform before signals are placed | Follow the physical rails and crossovers | Missing or incorrect track access |
| The line breaks after one-way signals are added | Inspect signal facing and one-way state | Reversed one-way restriction |
| A train arrives but cannot complete the return route | Trace departure from the assigned platform | Missing return crossover |
| An empty-looking platform cannot be entered | Check access from the train's current running track | Platform is not reachable from that approach |
| A train stops across a road | Inspect the previous controlling signal | Waiting point is too close to the crossing |
Clearing Rail Deadlocks
A deadlock occurs when trains prevent one another from reserving the paths they need. On single-track routes, the usual structural issue is that opposing trains enter or attempt to reserve the same shared area without a properly signaled passing point. Around junctions, a stopped train may physically occupy the switch required by another movement.
First identify the earliest point where each train's desired path overlaps. Then determine whether one train could have waited safely before entering that conflict. That location is the candidate for the controlling signal.
For a passing siding, verify that signals create reservation boundaries at the passing area and that both trains fit clear of the switches. For a station throat, move the waiting point back far enough that a stopped train does not cover the crossover. For a long single-track line, confirm that trains have a genuine place to pass; signals alone cannot turn one track into two usable opposing paths.
After changing the layout, watch a complete encounter rather than declaring success when the first train moves. Both trains must clear the shared section, continue toward their next stops, and remain able to repeat the movement when they meet again.
Alternative Terminals at a Signaled Station
Alternative terminals can let a train use another enabled terminal when its primary terminal is occupied. For trains, the terminal decision is made at the last signal before the station. Every enabled alternative must be reachable from that decision signal.
This has a direct signaling consequence: place the final approach signal before the tracks diverge toward the alternative terminals. If the signal sits after the relevant split, the train may no longer have access to every enabled option. Alternative terminals can reduce queues only when the approach layout provides valid routes to them; they cannot compensate for missing crossovers.
Final Signal Layout Check
Before adding more trains, verify the completed railway:
- Every line has a valid outbound and return path.
- Every assigned platform is reachable from the appropriate approach track.
- One-way signals face the intended direction.
- Passing sidings have signals that prevent overlapping opposing reservations.
- A waiting train fits completely clear of switches, crossings, and station throats.
- Stations are not being treated as automatic signal boundaries.
- Alternative terminals are reachable from the last decision signal.
- Two trains can complete a full passing or junction encounter without deadlocking.
If all of these checks pass, additional signals should be added only to create another safe waiting point or to divide a busy same-direction corridor into useful sections.