
Run ships in Transport Fever 3 by building usable harbor landings, placing a shipyard with navigable access, creating a line between compatible stops and assigning a vessel that carries the intended passengers or cargo. Large ships require large landing areas. Before buying a fleet, check the path from the shipyard to the first stop as well as the path between the line's stops.
A ship waiting outside a harbor, a ship that cannot leave its purchase location and a ship sailing empty represent different problems. Inspect the landing assignment, route preview and vehicle's supported load in that order. Increasing vessel capacity does not repair a small landing, an unreachable terminal or a service without useful demand.
Choose the Service Before Choosing the Ship
Begin with a passenger connection or a cargo movement that your water route can complete. The useful question is where the vessel will load, where it will unload and whether those places are connected by navigable water. A long stretch of water on the map is an opportunity for travel, but it does not by itself create a transport job.
Passenger service requires accessible origins and destinations around the harbors. Cargo service requires suitable supply and a valid receiving location within station coverage. Inspect those relationships before investing in a large vessel, because its running costs continue even when the route cannot make useful deliveries.
Keep the first service easy to inspect. A line between two useful harbors gives you a clear outward and return movement. Once you have verified it, you can decide whether additional stops serve the same purpose or turn the route into an unnecessarily long circuit.
Build the Harbor with All Three Parts in the Right Terrain
A harbor spans the shoreline. Its landing area belongs in navigable water, its building and pier can cross the land-water boundary, and its street-access area belongs on solid land. Check those separate placement requirements when rotating and positioning the construction.
The visible harbor building is only part of the facility. The ship uses the landing area as its actual terminal. During editing, landings are marked with a yellow anchor, which helps identify the stopping point rather than judging compatibility from the shape of the building alone.
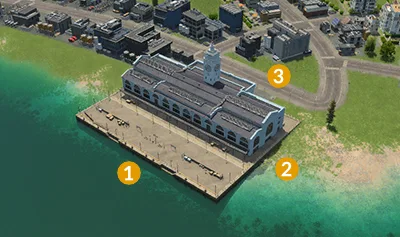
Inspect street access after construction as well. A passenger harbor needs useful access to the surrounding area; proximity on the map is not the whole passenger connection. For passengers, the catchment requires a valid path that remains reasonably close to the covered area without a major detour.
A harbor is available from 1900, but availability does not remove its terrain restrictions. If the location cannot place its landing in navigable water while keeping street access on land, choose a workable position along the shore instead of forcing the building into an invalid layout.
Match the Landing Size to the Vessel
Harbor landings come in two sizes, and large ships can stop only at large landings. Check the terminal you intend to assign before buying a large model. An existing harbor can look substantial while the line still selects a smaller landing.
There is no separate passenger-versus-cargo distinction for water terminals. That simplifies the harbor's physical stopping options, but the ship's own load compatibility still matters. A shared landing does not turn a passenger vessel into a cargo carrier or make every cargo vessel accept every material.
Where a harbor has several landings, inspect the primary terminal selected by the line and any alternatives you enable. Every alternative needs the correct size and a reachable approach. Adding an unsuitable landing to the alternatives creates a choice the vessel cannot use correctly.
Do this compatibility check at every stop, not only the home harbor. A ship that can depart one harbor may still fail to complete the route when its destination uses an unsuitable terminal. The full service requires compatible stopping positions at both ends.
Place a Shipyard with a Reachable First Stop
Ships are purchased through shipyards. The shipyard must be near navigable water, and a newly assigned vessel needs a navigable route from it to the line's first stop. This purchase path is separate from the line's own harbor-to-harbor path.
That distinction matters when expanding into another lake or coastline. A valid route between two harbors does not establish that a shipyard elsewhere can launch a vessel onto it. Inspect the water connection from the actual purchase location before assuming that a clone or new vessel can join the service.
Open the vehicle store from the appropriate shipyard, or use the line manager's Buy Vehicles action to find a compatible purchase point. Compare the available vessels there and confirm the first stop when assigning the purchase to a line.
Watch the first vessel leave the shipyard. If it remains unable to reach its assigned start, repair that connection or choose a valid purchase location. Buying another ship at the same inaccessible place simply repeats the commissioning problem.
Compare Capacity, Loading and Costs in the Vehicle Store
The vehicle store displays purchase price, maintenance cost, availability, cargo specialization and technical properties. Use its filters to find ships that support the service's intended load, then compare the relevant properties instead of treating the largest capacity as automatically best.
Capacity describes what the ship can carry, not how much the route will produce or attract. A vessel with a large hold can spend a long time waiting if the selected departure rule requires more cargo than the source can provide. A smaller vessel may complete more regular trips on the same developing service.
Loading speed also matters. The vehicle and terminal specializations influence the time spent loading particular cargo. Inspect the vehicle's detailed loading information when a vessel seems slow at a harbor rather than assuming that sailing speed is the only factor affecting the route.
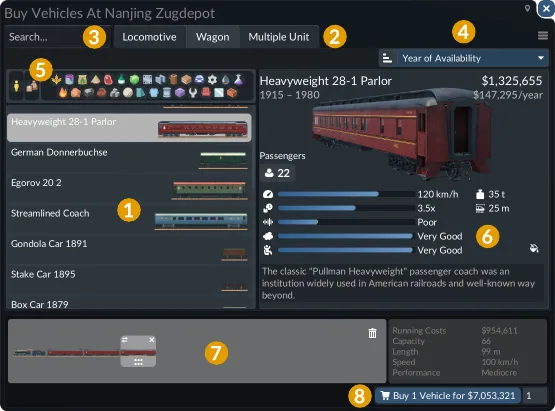
The shared vehicle-store layout is illustrated with railway vehicles; select a shipyard for the vessel roster.
The store uses the same core information fields for independent vehicles such as ships, buses and aircraft. Filter for the actual load you need, inspect the selected model's properties, and purchase from the shipyard that can serve the route. A compatible ship on a reachable route is the foundation for the later capacity decision.
Create the Stop Order and Check the Water Route
Open the line manager, create the ship line and add the harbors in their travel order. A vehicle visits each listed stop, then returns from the last stop to the first. For a two-stop service, that makes a straightforward return journey; a multi-stop line needs you to inspect the complete cycle.
Click each segment in the stop list and check its preview in the world. The line manager marks connection problems beside affected segments. Hover the warning for the specific reason, then inspect the assigned terminal and its water approach.
Ships normally choose the shortest route between stops. If you need the vessel to pass through a particular area, a waypoint can guide that segment. A waypoint changes the path but does not become another loading stop. Keep those two functions distinct when editing the list.
After adding a waypoint, check that the vessel can still reach the following harbor. A path-control point is useful only when it preserves a valid navigable connection. Avoid adding several speculative points before observing what the original route actually does.
Configure What the Ship Collects at Each Stop
For cargo service, inspect each stop's loading configuration. The line manager allows cargo choices and loading percentages per stop. Configure the supply harbor for the cargo the vessel should collect, rather than applying the same assumption to every stop in the cycle.
Cargo unloads where a compatible receiving location requires or stores the cargo the ship is carrying. A harbor stop alone does not define a useful receiving destination. Check the consumer or storage relationship around the stop if goods remain aboard after arrival.
The departure options include loading available cargo, waiting for a full load of any cargo type and waiting for a full load of all configured capacity. Ships can have separate compartments and carry multiple cargo types, so the difference between any and all matters for mixed-load service.
A ship waiting for all configured loads may remain at the terminal because one of its cargo requirements is not being supplied. Before treating that pause as a broken harbor, inspect the selected departure rule and cargo availability. Use the actual loading status to distinguish missing supply from a path error.
Use Alternative Landings to Handle Occupied Terminals
Alternative terminals allow a ship to choose another enabled landing when its primary one is occupied. For ships, the selection occurs at a waiting point slightly outside the harbor. Inspect that approach and the enabled landings when a vessel waits near the shore.
A queue does not automatically mean the harbor needs another building. The primary landing might be occupied while a suitable existing alternative remains disabled. Conversely, an enabled alternative that is too small or unreachable will not solve the queue.
Review the line's terminal choices after expanding a harbor. Adding a physical landing and allowing a line to use that landing are related but separate actions. Check the line configuration rather than assuming that every new module becomes an active alternative for every service.
Preserve clear stopping arrangements when several lines share a harbor. Inspect one selected line at a time so you can see its primary route and alternative paths without confusing them with another service's stopping positions.
Commission the First Complete Voyage
Follow the ship from its purchase point to the first harbor, through loading, to the destination and back. Confirm the intended terminal at each arrival. That complete cycle catches problems that a successful departure alone cannot reveal.
Open the vehicle window while it is loading. The current state shows whether the vessel is sailing, waiting or handling cargo. The details provide its current load, total capacity and associated line. Use those observations to establish where the service stops making progress.
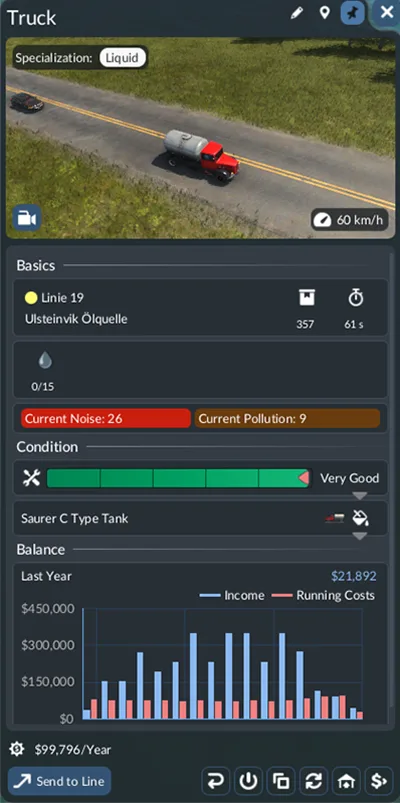
This truck example shows the shared vehicle detail layout; inspect these fields on your assigned vessel.
The line details show transported items or passengers, rate, frequency and operating balance. Compare those measurements after the service has made real trips. Purchased capacity or a full supply warehouse describes potential work, while the transported count shows what the line has actually moved.
When the line has income and running-cost history, compare the two. A service with regular voyages can still need a different vessel size or a more suitable connection. Change the specific operating choice indicated by its loads and costs rather than expanding the fleet because the route looks visually busy.
Correct the Problem the Vessel Actually Shows
| Symptom | Check first | Useful next action |
|---|---|---|
| New ship cannot join the line | Shipyard-to-first-stop water path | Use a reachable shipyard and assigned start |
| Large ship cannot call at a harbor | Assigned landing size | Select a compatible large landing |
| Ship waits outside a busy harbor | Primary and alternative landings | Enable suitable reachable alternatives |
| Ship waits while loading | Departure rule and available cargo | Correct the full-load condition or cargo choices |
| Ship arrives but keeps its cargo | Receiving consumer or storage relationship | Verify the destination served by the harbor |
| Route carries little despite a large vessel | Actual demand, loads and transported history | Adjust the service or vessel to the demonstrated job |
After correcting the selected issue, observe the next complete voyage and check the line warnings again. The working result is a vessel that can launch from its purchase location, use compatible landings, carry the intended load and repeat its route without an unresolved connection or loading condition.