

Transport Fever 3 keyboard shortcuts let you open construction menus, inspect network statistics, change the simulation speed, move the camera, and adjust a construction preview without repeatedly returning to the toolbar. Start with Space to pause, Tab to cycle game speed, L to open the Line Manager, and the number keys for construction menus. These are default bindings: your Keyboard settings may contain a different mapping, and some actions deliberately have no assigned default key.
Use the Keyboard tab to confirm the binding before treating an unresponsive key as a game fault. Construction keys depend on the active tool, while Camera Tool controls belong to a separate context. A key that performs one action during ordinary play can perform another when a specialized tool is active. This reference covers keyboard use; controller prompts and controller configuration belong to the separate controller guide.
Start with the controls you use every session
Learn a small working group before memorizing every menu. Pause while making a construction decision, open the relevant menu, inspect the preview, and resume only after you have confirmed the intended result. Opening a menu and confirming construction are separate actions. The keyboard shortcut provides quick access to the tool; it does not establish that the proposed route or building is suitable.
| Action | Default key | Practical use |
|---|---|---|
| Pause the simulation | Space | Hold the current game state while checking a route or construction preview |
| Cycle game speed | Tab | Change the selected speed without returning to the speed controls |
| Open or close Line Manager | L | Select the line whose stops or assignment you want to inspect |
| Open guide or context help | F1 | Read the available hint or help for the current context |
| Quick save | F10 | Save the current game before a separate construction experiment |
| Take a screenshot | F9 | Capture the current perspective for a useful record |
| Show or hide notifications | F11 | Inspect the notifications without searching the toolbar |
| Close all dialogs and menus | Delete on Windows or Linux | Clear open interface windows before selecting another tool |
On macOS, Close All is listed as fn plus the backspace key, or Delete. Check your current mapping rather than assuming that every keyboard has the same physical keys. F1 is listed for both Guide and Help because the available action depends on context. It does not mean that pressing the same key opens two independent windows at once.
The speed controls offer normal, double, and four-times simulation speed, together with pause. A selected faster speed does not guarantee that a complex world advances at that rate. Use the shortcut to change the selection; diagnose a slow simulation separately instead of interpreting an unchanged-looking world as a failed key binding.
Open the correct construction menu
The number row provides a quick way to switch between transport facilities and construction tools. Read the distinction between Road and Roads, or Rail and Tracks, carefully. They are separate menu entries with different roles. You can open the mode-related facility menu and then use the network construction menu when you need to connect that facility.
| Menu | Default key | What the shortcut selects |
|---|---|---|
| Road menu | 1 | Road transport facilities and the corresponding mode menu |
| Rail menu | 2 | Rail transport facilities and the corresponding mode menu |
| Water menu | 3 | Water transport facilities and the corresponding mode menu |
| Air menu | 4 | Air transport facilities and the corresponding mode menu |
| Roads menu | 5 | Street construction choices |
| Tracks menu | 6 | Railway track construction choices |
| Warehouse menu | 7 | Warehouse construction choices |
| Perks menu | 8 | The perks menu |
| Landscaping menu | 9 | Landscaping tools |
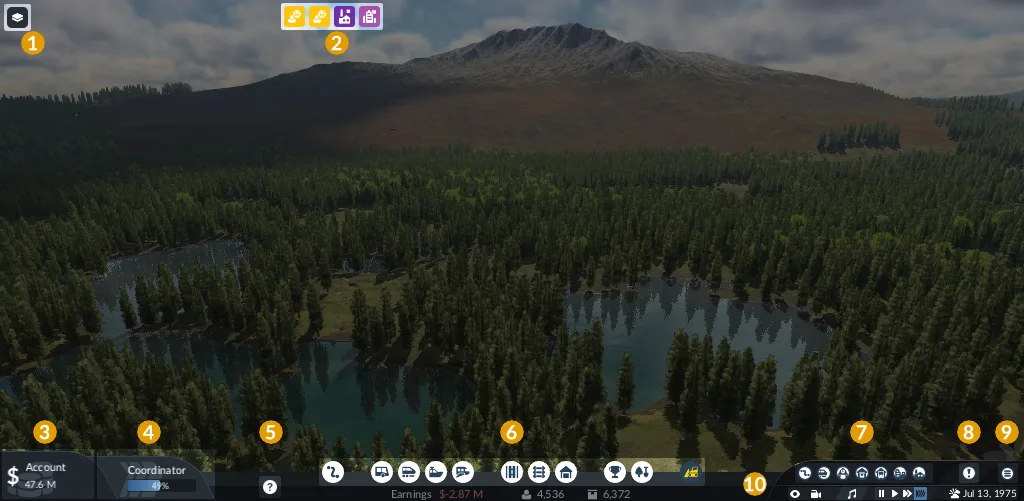
Transport and infrastructure construction menus are grouped along the bottom toolbar. The annotations identify interface areas, rather than keyboard bindings.
Use these keys as a navigation system rather than as a sequence you must execute every time. For example, opening the Rail menu helps you find a station or depot, while opening Tracks takes you to the infrastructure needed to connect the railway. Opening Water identifies the relevant water facilities; it does not automatically create a shipping line. The point is to reach the correct controls with fewer interface steps while keeping the actual construction decision visible.
The default B binding is listed for both the ordinary Bulldozer and the Module Bulldozer. Their availability depends on the current construction context. Check what the interface has activated before confirming a demolition. If you intended to remove a module, verify that you are working in the modular building context instead of treating every B press as an interchangeable demolition action.
Inspect statistics with the function keys
The function keys open statistics for different parts of the company. Use the window that matches the question you are trying to answer. Line statistics and vehicle statistics describe different objects, while stations, warehouses, and depots each have their own view. Opening every statistics window together makes it harder to identify which one contains the relevant result.
| Statistics window | Default key |
|---|---|
| Line Statistics | F2 |
| Vehicle Statistics | F3 |
| Station Statistics | F4 |
| Warehouse Statistics | F5 |
| Depot Statistics | F6 |
| Town Statistics | F7 |
| Industry Statistics | F8 |
A useful inspection sequence starts with a question. If you want to examine the service as a whole, open Line Statistics. If the concern is an individual vehicle, switch to Vehicle Statistics. For a location or building, choose its matching window. The shortcut gets you to the evidence; it does not decide whether the issue is loading, demand, maintenance, or congestion.
Keep F9 and F10 distinct from these inspection keys. F9 captures the current perspective, whereas F10 performs a quick save. A screenshot records what was visible; a save preserves a playable state. Choose the one that serves your purpose and confirm the intended result before proceeding with a major change.
Use the numeric keypad for data layers
The data layer bindings use the numeric keypad. They are not the same bindings as the number row used to open construction menus. This distinction matters on compact keyboards or laptops where a separate keypad may be absent. Open the Keyboard mapping and assign accessible keys if the defaults do not match your hardware.
| Data layer | Default key |
|---|---|
| Terrain | Keypad 0 |
| Towns | Keypad 1 |
| Infrastructure | Keypad 2 |
| Traffic | Keypad 3 |
| Passenger Flow | Keypad 4 |
| Passenger Satisfaction | Keypad 5 |
| Cargo Flow | Keypad 6 |
| Cargo Satisfaction | Keypad 7 |
| Noise | Keypad 8 |
| Pollution | Keypad 9 |
Choose one layer for the current check rather than cycling through all ten without a purpose. Passenger Flow and Passenger Satisfaction are separate views, just as Cargo Flow and Cargo Satisfaction are separate views. Likewise, the Noise layer and Pollution layer answer different questions. A binding that successfully opens a layer does not mean that the highlighted information represents every problem affecting the town.
The general Show or Hide Data Layer Menu action has no default key listed. An empty binding is a configurable action, not a missing feature. You can use the existing interface or choose your own key in the mapping menu. Do not copy a key from an unrelated action merely because another guide presents it as a universal shortcut.
Adjust the camera without losing the construction context
The default camera controls use W, A, S, and D to move toward the upper, left, lower, and right edges of the view. Q and E rotate the camera, while R and F change its tilt. X zooms in. The camera description lists Y or Z for zooming out, while the mapping table lists Y, so the binding shown in your own Keyboard tab should settle the choice for your keyboard configuration.
Mouse controls provide another route to the same view adjustments. Hold the right mouse button to drag the camera. Hold the middle mouse button or wheel to rotate and tilt, and roll the wheel to zoom. Moving the pointer to the edge moves the view only when Edge Scrolling is enabled. If the view does not pan at the edge, inspect that option before changing the keyboard mappings.
The Camera Movement Speed setting changes the sensitivity of keyboard movement. Invert Rotation Keys reverses the rotation direction. These settings change how a working binding behaves; they do not assign a new key to the action. Test direction and speed independently so that a sensitivity change does not obscure whether the mapping itself is correct.
Vehicle cockpit controls have their own defaults: Page Up selects the next position, Page Down selects the previous position, and H triggers the horn sound. These actions belong to the vehicle camera context. They should not be interpreted as general construction controls or used as evidence that an ordinary camera key has stopped working.
Treat construction shortcuts as context-dependent options
The mapping lists Construction Options 1 through 8 as M, N, period, comma, O, P, opening bracket, and closing bracket. Their actual effect depends on the construction tool. Read the active preview and its available options instead of assuming that a particular letter always performs the same adjustment everywhere.
| Construction action | Default binding |
|---|---|
| Construction Option 1 | M |
| Construction Option 2 | N |
| Construction Option 3 | Period |
| Construction Option 4 | Comma |
| Construction Option 5 | O |
| Construction Option 6 | P |
| Construction Option 7 | Opening bracket |
| Construction Option 8 | Closing bracket |
| Follow terrain | T |
| Disable construction snapping | C |
| Underground mode | G |
| Invert Roughen Terrain | Less-than key |
Use a single change at a time while the proposal remains visible. Verify the resulting geometry or selected option, then decide whether to confirm or adjust again. A construction binding is not a reason to bypass the preview. The bridge, tunnel, and terrain guides explain those tools in detail; this page identifies the controls that let you reach and adjust them.
Change mappings and verify the new behavior
Open Settings from the main menu or the in-game menu, then select Keyboard. Most listed actions can be remapped in the key mapping section. The settings tabs depend on connected input devices, so inspect the Keyboard controls rather than looking for a controller setting with a similar name.
- Find the exact action you want to change, such as Camera Move Forward or Show or Hide Line Statistics.
- Check its existing binding and whether the action already has an assigned default.
- Set a key that is available on your keyboard and practical for that action.
- Return to the relevant gameplay context and test the action directly.
- Verify both that the intended action occurs and that you did not merely open a different tool.
- Use Reset to Default if you want to restore the standard mapping rather than retaining the custom arrangement.
Actions such as Use Free Camera, Open Mission Window, and Skip are listed without default bindings. Several Camera Tool actions are also unassigned. Others have tool-specific defaults, including Backspace for Stop, Insert for Add Key Frame, Home for Clear Key Frames, Space for Toggle Play or Pause, and Return for recording or capture. Confirm that the Camera Tool is the active context before using those commands. Assigning a convenient key does not change which tool owns the action.
If a shortcut fails, check the mapping, the keyboard hardware, and the active context in that order. Distinguish the number row from the keypad, and distinguish an unassigned action from an assigned key that produces no visible result. Finish by testing the exact action in the context where you intend to use it. That gives you a working personal control layout without requiring you to memorize or remap every available command.