
If cargo reaches a destination but stays on the vehicle in Transport Fever 3, check the receiver before changing the producing industry. Cargo unloads automatically when the stop can serve a consumer for that cargo or a nearby warehouse configured to store it. A port, station, or platform does not provide cargo storage by itself, and a warehouse does not automatically supply surrounding town buildings.
Identify whether this stop is the final delivery or a transfer to another line. For a final delivery, inspect the actual receiving building and its current demand. For a transfer, inspect the warehouse connection and its selected cargo. Then review the destination stop's loading and waiting instructions: a cargo icon selected for loading is not an unload command.
This guide begins with cargo already aboard. An empty vehicle at the source needs a loading diagnosis instead. Keep the loaded vehicle in view so you can distinguish no unloading, slow unloading, and a successful unload followed by another wait or pickup.
Read the Arrival Before Choosing a Fix
Observe the vehicle while it visits the intended destination, rather than comparing only its departure from the source with its return. Check the cargo type and amount on board, whether it actually enters the assigned stop, and what happens to the receiving building or warehouse during the visit.
| What you see | Receiving-side check | First useful action |
|---|---|---|
| The loaded vehicle never enters the expected stop | Stop order, terminal assignment, or connection warning | Inspect the selected destination and the line's marked problem |
| It stops, but the cargo amount does not fall | A reachable consumer or matching warehouse | Verify the actual receiver, its demand, and its connection to this stop |
| It delivers once, then later carries the same cargo back | Current building demand or changed destination instructions | Recheck the receiving buildings and the drop-off's loading settings |
| Cargo leaves the vehicle but does not appear in warehouse stock | Direct consumer access | Inspect the nearby consumer before treating empty storage as a failure |
| Cargo enters the warehouse but never reaches town | A missing onward movement | Separate the successful incoming unload from the next line's delivery problem |
| The cargo amount falls slowly | Handling speed | Inspect platform-length warnings and specialization modifiers |
These observations narrow the investigation without proving one universal cause. A full vehicle passing a town is different from one using the wrong terminal, and both differ from a vehicle whose cargo is already being unloaded slowly.
Decide What This Stop Must Receive
A final delivery needs a consumer that accepts the exact cargo on the vehicle. A transfer needs storage from which another transport service can collect it. Merely naming a stop after a town or factory does not establish either relationship.
For an industry delivery, check that the receiving industry uses the carried material. The cargo name matters: arriving at an industrial site does not make every item suitable for it. For example, Logs can unload at a Saw Mill served by the stop; a different material needs its own valid consumer.
For a town delivery, identify the requesting buildings rather than using the town boundary as the receiver. In a Fish delivery, the relevant commercial buildings must be accessible and still have demand. That example does not mean all cargo belongs in the commercial district. Inspect the receiver for the cargo actually carried.
For a transfer, the receiving warehouse must be accessible from the incoming stop and support that cargo. Station size and extra handling platforms cannot substitute for this storage. Establish which of these destinations you intend before adding infrastructure, because a direct consumer delivery can work without a warehouse.
Check Coverage and Current Building Demand
A cargo stop can look close to the right district yet miss the buildings that need its load. Select the destination used by the line and inspect its actual catchment or connection feedback. Confirm that the intended receiver is connected to this stop; do not rely on a visual estimate or a fixed radius copied from another layout.
Inspect the individual receiving buildings as well. A building can accept a cargo type but already have its demand filled. For Fish carried back from a town stop, checking those buildings separates an access problem from a receiver that currently needs no more Fish.
This distinction also explains why the same physical route can appear to work during one visit and stop accepting a later shipment. Recheck the present receiver state before assuming the earlier successful delivery proves that every later load must unload there.
If the stop misses the requesting buildings, correct that local connection rather than rebuilding the entire route. If the covered buildings are already supplied, reconsider where the next shipment should go based on current demand. More vehicles or a larger terminal do not create an additional consumer.
Do not use a warehouse beside the district as evidence that the town has been served. Town buildings and factories cannot take cargo directly from warehouse contents. The final movement still needs a vehicle delivering to their accessible consumer location.
Inspect Destination Loading Instructions
Open the line manager and select the actual destination stop. Its cargo icons and stop configuration describe what vehicles should load there, including the selected cargo types and their loading percentages. They do not replace the automatic receiving relationship needed for unloading.
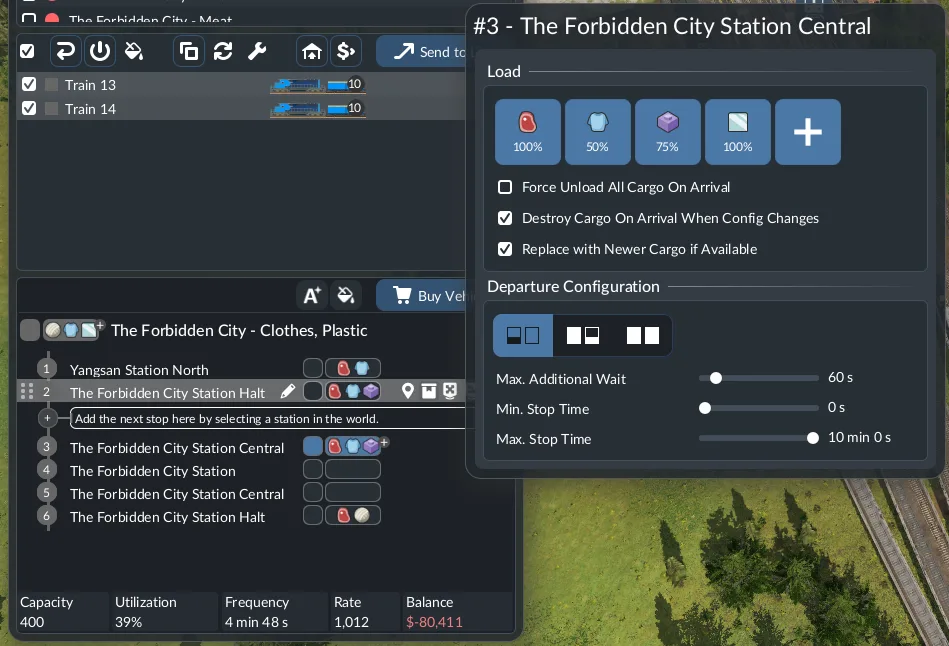
The Load panel sets pickup instructions at this stop. Check for unintended destination loading; these controls do not define which buildings accept the delivery.
For a simple one-way delivery, keep the source pickup and destination drop-off roles clear. Allow the intended cargo at the pickup. At the receiving end, remove any unintended instruction to load or fill with that cargo, then watch another arrival. A deliberate return pickup may need different settings, so this is a check against the intended service rather than a ban on loading at all destinations.
Watch the amount during the stop. A vehicle may unload and then wait under its next loading instruction, so its presence at the destination is not proof that unloading failed. Likewise, looking only at the cargo carried away can leave the sequence unclear when a stop can both receive and provide cargo. Compare the vehicle's movement with the receiver's delivery or storage change.
Review departure behavior if the destination is also configured to collect something. Load if available collects compatible cargo that is present. Full load modes wait for the requested load condition, and an additional wait can hold the vehicle after loading or unloading. For this diagnosis, determine whether the cargo leaves the vehicle first; then investigate any subsequent loading wait separately.
Changing a load checkbox cannot give a disconnected stop a valid consumer. After correcting an unintended pickup or fill instruction, retain the coverage and acceptance checks. The setting and the receiver are separate parts of the same visit.
Verify a Receiving Warehouse at a Transfer
When the cargo must change lines, open the receiving warehouse and inspect Stocks. The warehouse does not require its own road access, but it must fall within the incoming station's catchment. Confirm that connection using the game feedback rather than assuming two neighboring buildings can exchange freight.
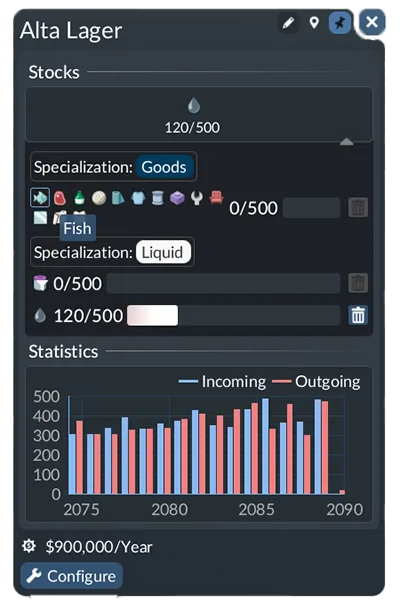
Inspect the receiving module and its selected cargo in Stocks before changing the transport line.
Stocks has one row for each module. Use the supported cargo and the amount currently stored to identify where the arriving shipment should go. For a specialized module, inspect the selected item, not only its broad specialization category.
A specialized module holds one cargo type at a time. Crude Oil and Fuel both belong to Liquid, but storing both requires separate modules. Apply the same distinction when diagnosing another specialization: a category-compatible module assigned to a different item is not the intended receiving slot. Select the correct cargo for an available specialized module, or use suitable universal storage for a mixed flow.
Observe an incoming visit with the warehouse window open. If the vehicle's cargo falls and the corresponding stored amount rises, the incoming unload has worked. If the vehicle keeps its load, recheck the incoming connection and item selection. If it unloads but storage stays empty, inspect whether an accessible consumer received the shipment directly.
Once cargo enters storage, keep the diagnosis precise. A warehouse that retains stock until another vehicle collects it is performing its storage role. The next service must access that warehouse and carry the cargo onward; town buildings cannot empty it by proximity. Do not confuse a missing onward delivery with the incoming vehicle refusing to unload.
The Stocks view also shows average remaining delivery time and a discard control for each module. Discarding stored cargo is not a delivery to the town and does not repair the receiving connection. Use it only when you actually intend to remove that stock, rather than as an unloading workaround.
Confirm the Vehicle Uses the Right Terminal
A line stop and its terminal assignment must lead the vehicle to a reachable receiving location. Terminals are assigned automatically according to reachable platforms and their utilization. Review that assignment if the vehicle uses an unexpected terminal or fails to enter the destination.
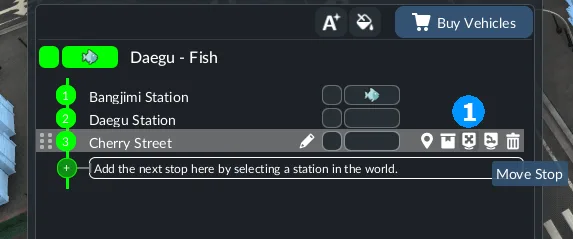
Use the stop-move control to assign the line to the reachable receiving terminal.
The move-stop control lets you adjust the selected stop's terminal. Choose a reachable terminal appropriate to the intended receiving connection, then observe the next approach. Moving an assignment is useful when that assignment is wrong; it does not by itself correct an incompatible warehouse item or a town building with no outstanding demand.
Read the line's warning before changing track or road layouts. A problem icon can identify the affected line, and a red exclamation mark identifies a problematic segment in the line manager. The terminal-selection dialog can indicate whether the problem concerns reaching or departing a terminal. Tracks and signals changed outside the line manager can also cause a connection problem.
If alternative terminals are enabled, verify their reachability too. Do not treat a vehicle waiting for an occupied terminal as a failed cargo unload when it has not yet completed its approach. Correct the named connection or assignment problem first, then judge what happens during the actual destination visit.
Separate Slow Unloading from No Unloading
If the onboard amount decreases, the receiver is accepting cargo. Diagnose the pace of that operation rather than replacing the destination as though nothing can leave the vehicle.
For trains and trams, a platform shorter than the vehicle slows loading and unloading. Check the vehicle window, station window, and terminal-selection dialog for the corresponding warning. Use a suitable platform or a consist that fits the available platform when that mismatch is the observed constraint.
Handling speed also depends on the vehicle, terminal, and applicable warehouse specializations. Matching specializations can improve the rate, while mismatches can reduce it. Inspect the loading HUD indicator and the detailed cargo-loading status rather than assuming specialization determines whether every cargo can be accepted at all.
Keep this distinction visible during a retest. A slow but falling cargo amount shows progress; an unchanged amount requires the receiver and stop-setting investigation. Buying another vehicle before establishing which state applies can add traffic without correcting the current destination visit.
Preserve a Clear Unresolved Case
After an adjustment, compare the same loaded arrival at the same destination. For a direct delivery, verify the accepting building's current demand and the vehicle's cargo change. For a transfer, verify the receiving module's stock change, then treat onward collection as a separate stage.
If cargo still remains aboard after the receiving connection and intended settings are checked, save the vehicle load, destination cargo configuration, terminal assignment, receiver demand or warehouse item selection, and any warning text together. Those views describe the failure more clearly than repeated reconstruction or an unsupported assumption that every similar route is bugged.