

To upgrade roads in Transport Fever 3, open Roads, select the street type you want, and choose Replace in the construction panel. Apply it to the existing street rather than drawing a second road. Before confirming, check the highlighted extent and the tram-track and bus-lane settings. Their default Keep option preserves those features while changing the road type.
Use Tools when the street itself is suitable and you only need tram tracks, bus lanes, ownership, or another street feature. Road replacement and feature modification solve different tasks. Neither operation guarantees that traffic will move faster: the connected lanes and the destinations they serve still determine whether the new layout is useful.
Choose the replacement that fits the street
Open the Roads menu and inspect the available types before touching the existing network. Small town streets have two lanes, medium streets have four, and large streets have six. These urban types provide sidewalks and support town buildings along them. Country roads and highways serve connections between places; new houses do not spawn along them.
| Intended change | Relevant choice | Check before applying |
|---|---|---|
| Increase lanes on an urban corridor | Medium or large town street | Existing buildings, sidewalks, and junction connections |
| Change a directional layout | Available one-way street variant | Direction and access to every required stop |
| Improve an inter-town connection | Country road | Whether the segment should support town development |
| Build a regional high-speed road corridor | Highway | Connections at either end and the absence of roadside housing |
| Keep the street geometry but add a transport feature | Roads Tools tab | Tram electrification, bus lanes, or ownership rather than road width |
A road's family matters as much as its lane count. Replacing an urban street with a country road changes its role in the town, even if the new road looks wider or has a higher speed limit. Choose an urban street where you want buildings to continue developing along the corridor. Use roads without roadside housing where that separation is intentional.
The menu's search field can filter types by name. Select the desired entry and read the configuration shown on the left. This is also where you distinguish building a new section from replacing an existing one. A selected road type alone does not put the tool into replacement mode.

Select the street family that matches the role of the existing road.
Replace an existing section
Start with one short, identifiable segment, preferably between two intersections. You can then inspect the finished result before repeating the operation along the whole corridor.
- Open Roads from the toolbar.
- Select the replacement street type in the type list.
- Activate Replace, shown by the magic-wand symbol in the construction panel.
- Inspect the tram-track and bus-lane settings. Leave Keep selected if you want to retain the existing features.
- Move over the intended street and check the highlighted sections.
- Apply the replacement only after the extent and configuration match your intention.
- Inspect the new road, then check any managed lines that use it.
In replacement mode, sections with a different street type appear yellow, while sections already matching the selected type appear blue. These colors help you see where a type change is needed; they are not a measurement of congestion or the financial benefit of upgrading.
The tool normally works on the entirely visible sections between intersections or until the next change of street type. The affected extent can therefore be longer than the piece directly beneath your cursor. Hold Shift when you need a more local change and inspect the affected highlight before applying it. Do not assume that one click always means one short segment.
If a road refuses to behave as expected, first verify the active mode. In build mode you are placing new infrastructure, so moving across an old street is not the same operation. Return to Replace and check the selected street type rather than repeatedly drawing over the existing corridor.
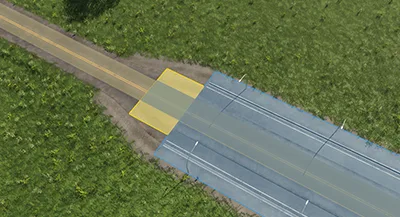
Inspect the highlighted extent before applying road replacement.
Preserve tram tracks and bus lanes
The replacement panel can add or remove tram tracks and bus lanes during the same operation. Its Keep setting retains the corresponding feature if one is already present. This is useful when widening a road underneath an operating tram or bus corridor: you can change the street type without deliberately removing the transport feature.
Read both controls independently. A road with tram tracks may also have bus lanes, and retaining one does not tell you what the other setting will do. If your task is simply widening the corridor, preserving existing features makes the intended change easier to inspect. If you are deliberately redesigning the corridor, select the desired change explicitly.
For electric trams, distinguish tracks from tracks with catenary. The street Tools menu offers tram tracks with or without overhead wires. A replacement that leaves the vehicle's required infrastructure incomplete has not finished the job, regardless of how the road looks from a distance.
After applying the upgrade, follow the line through the modified stretch. Check the approaches to stops and the joins to unmodified streets as well as the new section itself. A retained tram corridor needs continuous usable infrastructure; one isolated upgraded segment does not establish continuity through the entire route.
Bus lanes are generally excluded from individual traffic. Adding them is therefore a choice about how the road's lanes are used, rather than an extra lane automatically available to every car. Confirm that dedicating the space matches the corridor's role before applying it across a long stretch.
Modify street features without replacing the type
Use the Tools tab when you want to keep the existing street and change one of its features. The menu includes tram tracks, catenary choices, bus lanes, ownership, crosswalks, trees, noise barriers, and controls related to crossings. You do not need to select a wider street merely to add one of these features.
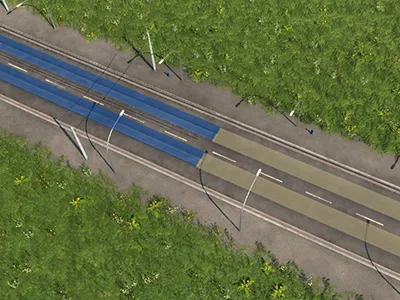
Check both the tram tracks and overhead wires along the affected sections.
Work on one feature at a time when the purpose is a specific conversion. For example, adding tram infrastructure to an otherwise suitable urban street is a different task from replacing that street with a six-lane version. Keeping those actions separate makes it easier to identify which change affected a line or the surrounding town.
The tools also normally apply across visible sections between intersections. Use Shift for a limited application and check the affected highlight. This is especially useful near the boundary between a tram corridor and an ordinary road, or where only one part of the street should remain under your control.
Trees and noise barriers have different consequences. Alley trees reduce noise and pollution but also lower the street's maximum speed. Noise barriers reduce noise, while buildings do not develop along the barrier-equipped road. Choose them for the intended surroundings rather than treating either option as a free visual upgrade.
Crosswalks and crossing controls belong to the street's operation, not its type selection. If the problem is which movement can pass through an intersection, widening the adjoining road is only part of the possible solution. Inspect the crossing separately after the replacement instead of assuming that its old lane connections now suit the wider approaches.
Keep a road under company control
Towns can automatically build and upgrade streets as they expand. The player usually does not own streets, even streets constructed by the player. Construction by your company and ongoing company ownership are therefore separate concepts.
Use the ownership tool if a particular layout needs to stay under your control. Player-owned streets are not automatically upgraded by towns, but your company pays their maintenance costs. This can protect a carefully chosen road type or corridor configuration from an automatic town upgrade, with an ongoing financial consequence.
Apply ownership to the sections that need it, rather than assuming the whole network should be company-owned. Inspect the extent in the same way as any other street tool. A short controlled section around a carefully designed transport connection is a different commitment from taking over every road in an expanding town.
Ownership does not itself add lanes, change the direction of a one-way street, or install tram wires. Check the actual type and features after changing control. If the purpose is to preserve an existing design, confirm that the design is already the one you want before preventing the town from upgrading it.
Reverse a one-way road deliberately
The street tools support reversing the direction of one-way streets and highways. On PC, hold Ctrl while applying a modification or replacement with the same road type to reverse its direction.
The same-type condition matters. Selecting a different road type and using a modifier is not a substitute for checking the resulting layout. First identify the current type, select the matching type, and inspect the affected section. Use a short stretch for the initial change, then verify the direction before continuing.
After reversing a road, inspect both ends. A direction that works in the middle of a corridor can still leave a stop, depot access, or junction approach facing an unusable connection. Follow the managed line's route rather than judging only the arrows on the replaced street.
When you also want to widen the corridor, make the two intentions explicit: the new type determines the street layout, while the same-type Ctrl operation addresses direction. Inspect after each change. This avoids mistaking a reversed approach for an improvement simply because the corridor now has more lanes.
Inspect tunnels and separate structures
Press G on PC, or use the construction panel's Underground Mode toggle, when you need to see a buried street. Underground mode lets you inspect and work with tunnels more clearly. While it is active, new streets and tracks do not snap to above-ground infrastructure; toggle it off when you need that surface connection again.
Road-type replacement and bridge or tunnel model replacement are separate choices. To change a bridge or tunnel model, select the existing structure, choose the new model in its selection window, and review the cost shown by Replace For. The model is replaced in place, so demolishing the structure first is not required for that operation.
Structure replacement costs depend on the length, height or depth, and the selected new model. There is no single universal upgrade price. Review the displayed proposal for your actual structure and avoid using a price from a different road or map as a budget estimate.
If a larger redesign requires new construction, inspect its proposal for highlighted buildings and demolition warnings before accepting it. That is a different task from swapping a compatible existing road type. Do not turn a small street upgrade into demolition and reconstruction unless the desired geometry requires it.
Verify the finished conversion
Return to the section you changed and check the result in three passes. First inspect the infrastructure: road family, lane count, direction, tram tracks, overhead wires, and bus lanes. Then inspect the connections at both ends and the line path through any stops. Finally, watch a vehicle use the route rather than relying only on the construction preview.
If the street looks correct but the intended result has not appeared, identify which requirement is still missing. A tram needs the usable track connection; a one-way road needs a continuous permitted direction; a bus lane changes traffic allocation; company ownership prevents automatic town upgrades. These are distinct checks, and another width increase does not replace them.
For congestion that remains after a successful conversion, continue with the traffic-congestion guide. For an operating rail-and-street passenger corridor, see light rail. For construction-related town reputation changes, use the reputation guide.